
How to use MIDI in Suno Studio: record, convert and edit notes
My stack My fav 6 tools for AI music after testing 70+
-
 ElevenMusic · Music generation
 -
 Moises · Stem separation
 -
 Controlla · Voice swap & cloning
 -
 Cryo Mix · Mixing + mastering
 -
 Neural Frames · Music videos
 -
 ONCE · Distribution
Some links are affiliate links — I earn a commission at no cost to you. Every tool here is one I run myself and truly believe in. This stack is proven.
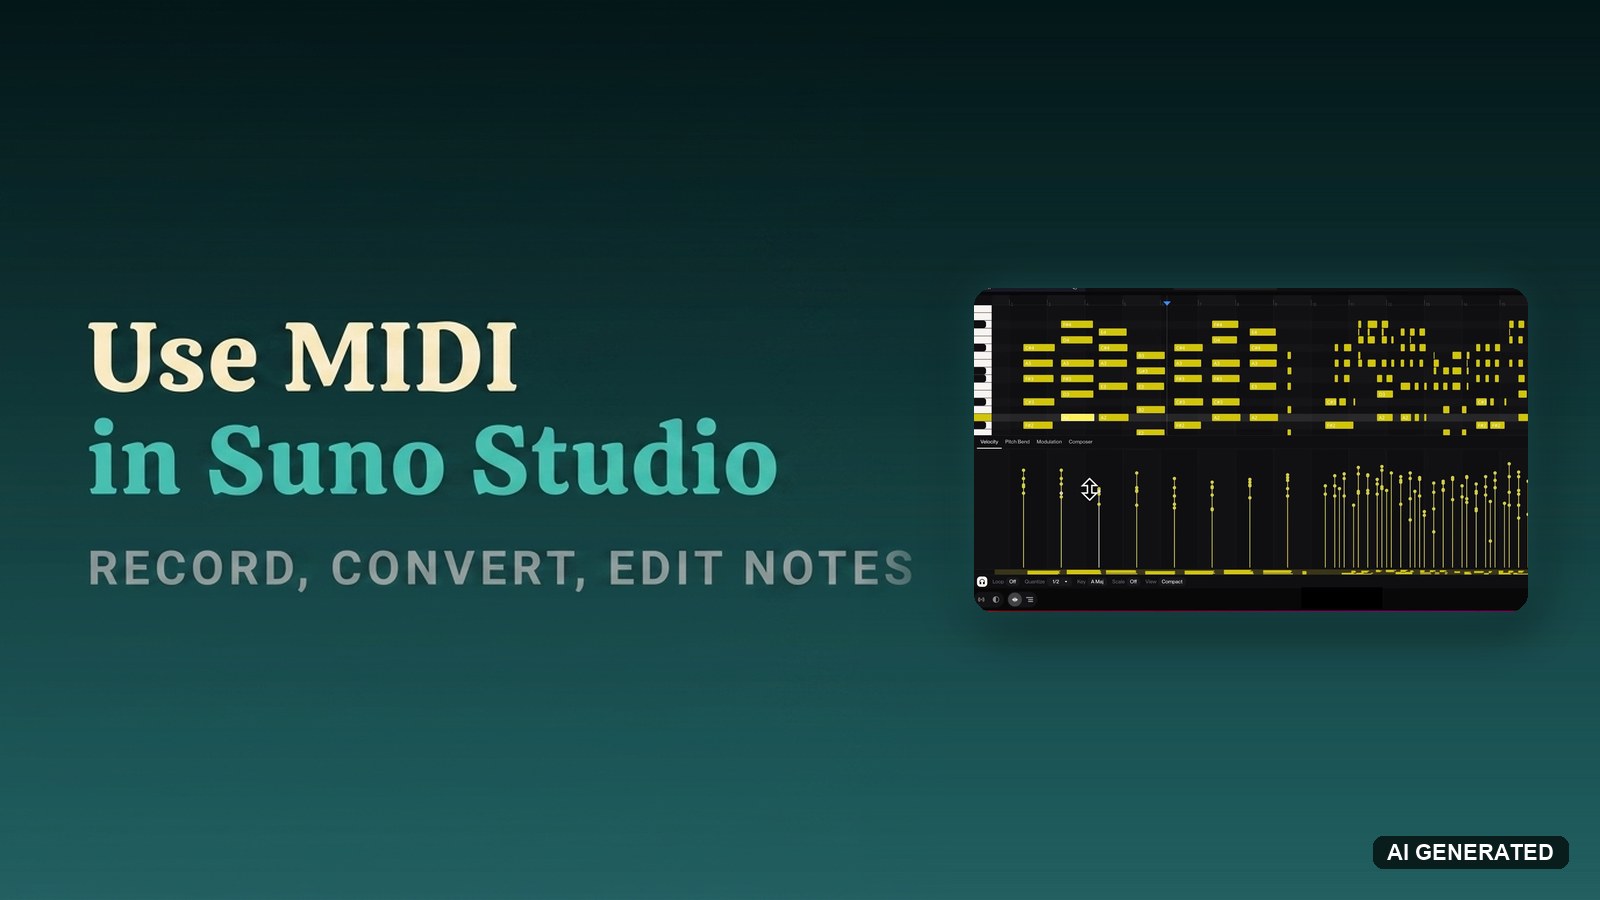
You can hear the chord voicing you want. Getting Suno to generate exactly it is another story. Prompts get you close, and close is exactly the frustrating part.
MIDI in Suno Studio 2.0 closes the gap. You place the notes yourself, and the AI plays them with any sound you describe. This guide walks you through recording MIDI, covering it as real instrument audio, converting audio back to MIDI, and cleaning up the notes.
What you need before you record MIDI in Suno Studio
The checklist is short:
- A Suno Premier subscription ($24 a month, annual billing). Studio is Premier-only, as covered in my Suno Studio beginner’s guide.
- Chrome. Web MIDI does not work in Safari, per Suno’s help centre.
- Optional: a USB MIDI controller. A keyboard is the comfortable way in, but musical typing means you can start with none.
- No music theory required. Scale mode keeps your notes in key.
Why record MIDI in Suno Studio instead of prompting?
MIDI is the note data under the sound: which pitches play, when, how hard. A MIDI definition in one line: sheet music a computer reads. Because the notes stay editable, you fix a wrong pitch by dragging it instead of re-recording.
Henry Phipps, Suno’s Studio product manager, gives the reason for the feature in the Studio 2.0 announcement: “not all G major chords are created equal, right? There’s different ways to play them. And so with MIDI, you can finally get really, really precise.”
The part no competitor has written about: MIDI in Studio runs in both directions, and both directions are one click. MIDI becomes audio through the chat bar. Audio becomes MIDI through Convert to MIDI. A producer who owns Ableton has piano rolls already. The round trip through Suno’s music model is the thing a regular DAW cannot do. Suno’s own MIDI walkthrough shows the full loop:
How to use MIDI in Suno Studio, step by step
Eight steps take you from empty track to edited, humanized notes.
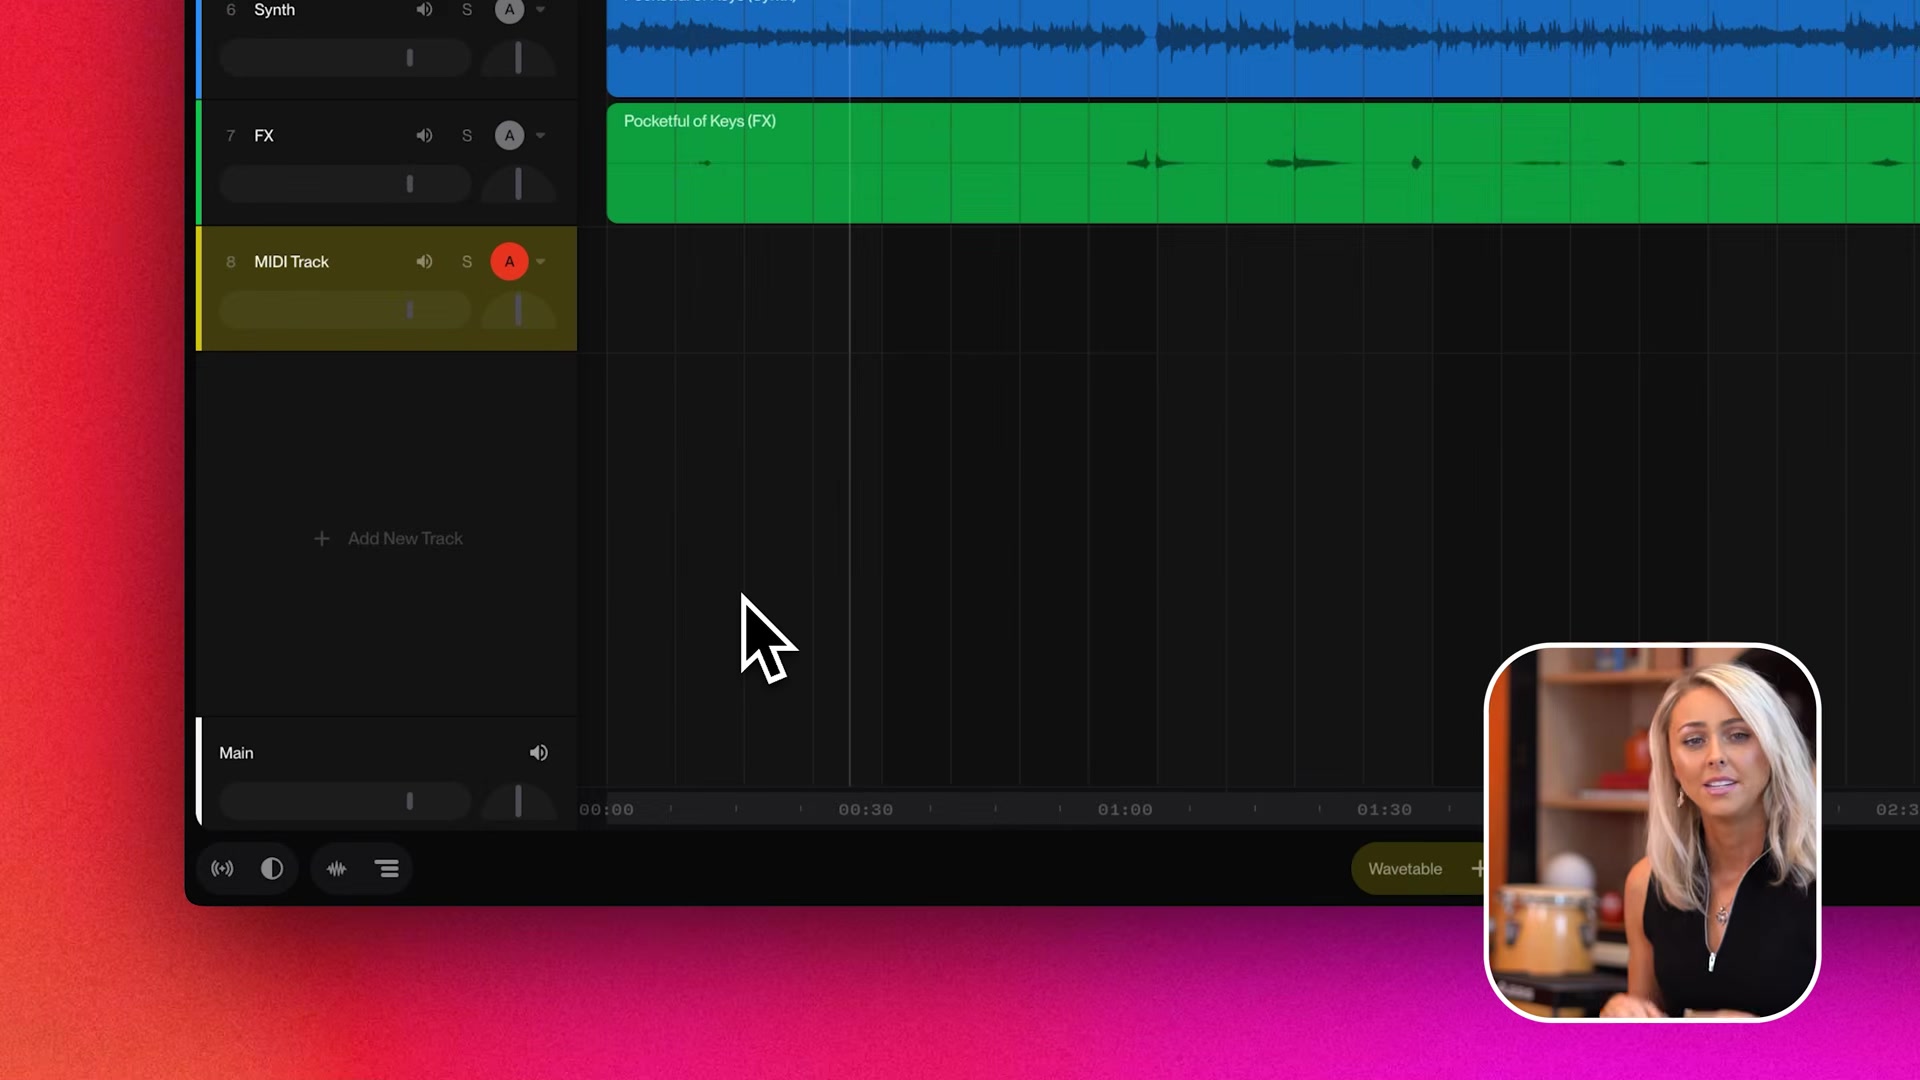
Step 1: Add and arm a MIDI track
- Press Shift+T, then M. A MIDI track appears in the track list.
- Click A on the track header to arm it for recording.
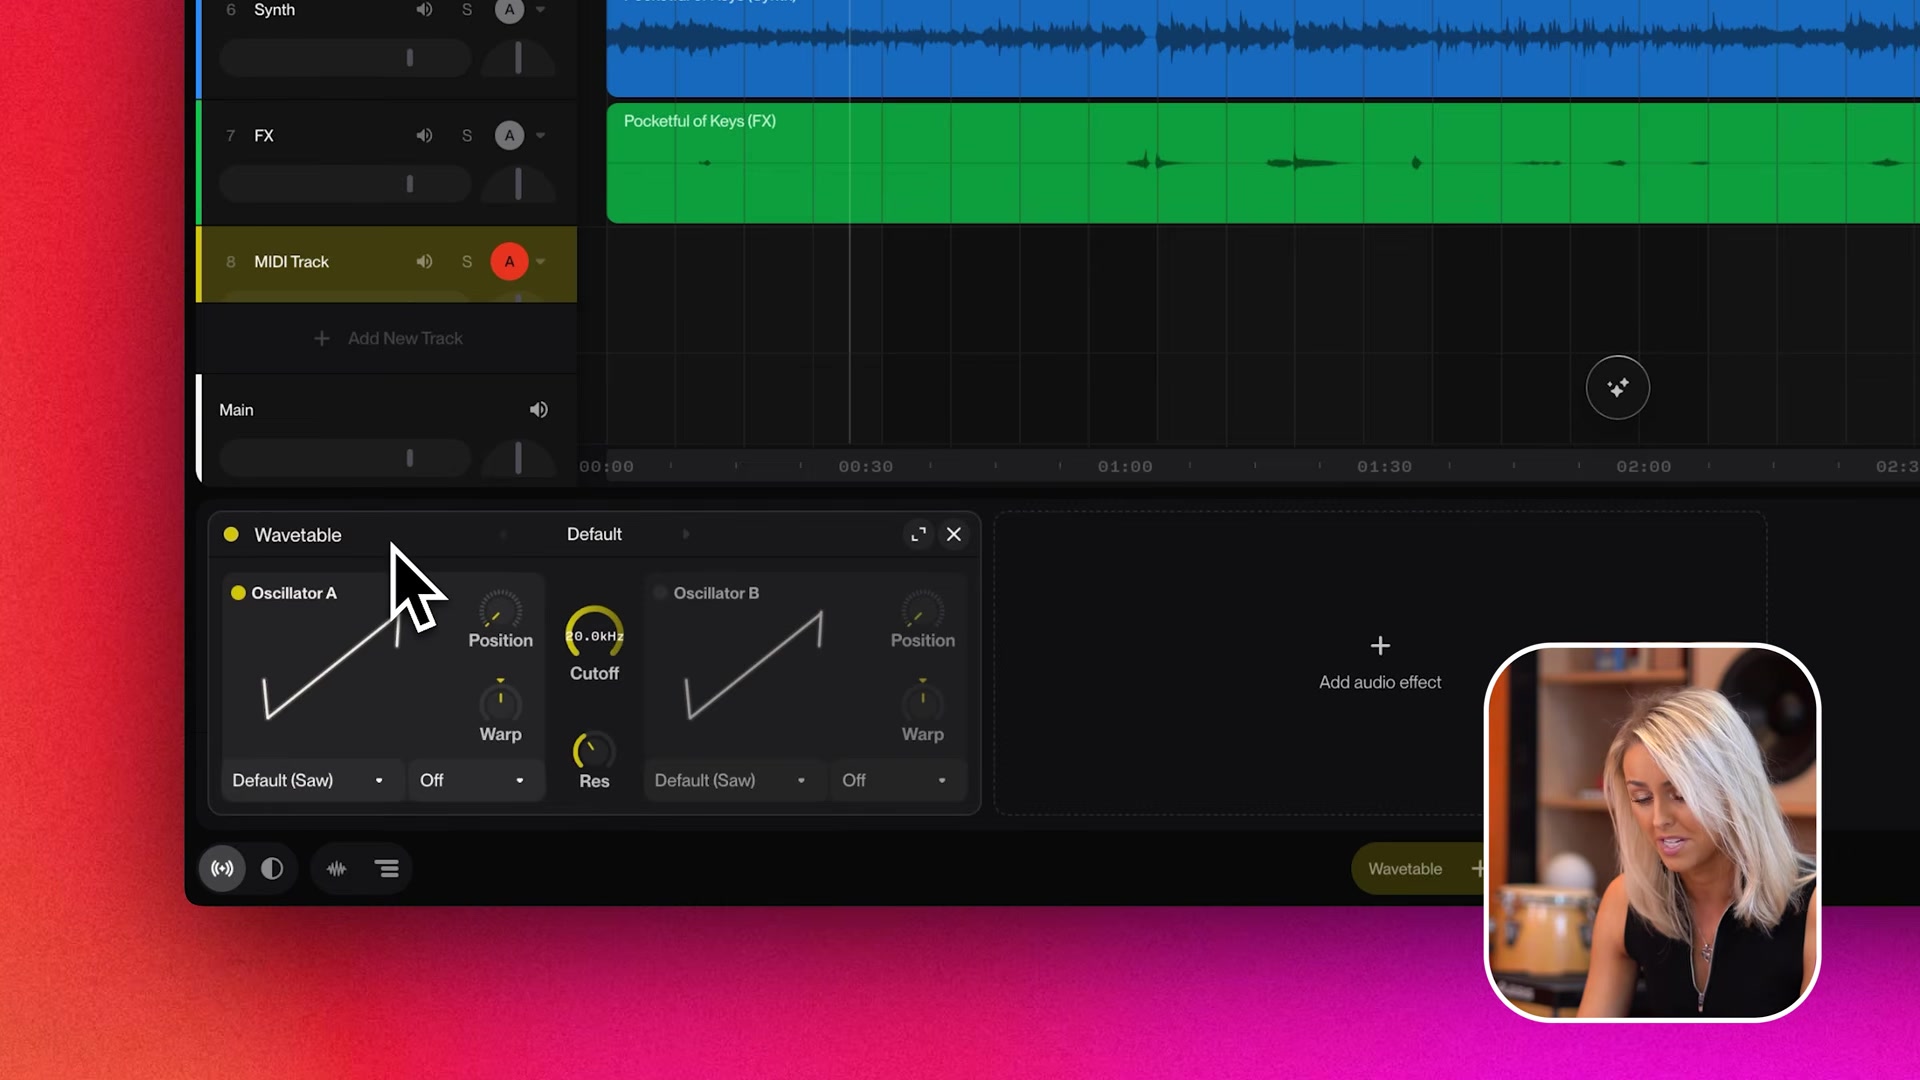
Step 2: Pick a sound in the wavetable synth
- Open the track’s Effects panel (press 2 for device view).
- The wavetable synth sits first in the chain. Browse the factory presets.
- Suno’s walkthrough uses “big strings”. “Sub” covers basslines.
Step 3: Play the part in
Two ways in, pick one:
- Hardware controller. Plug in over USB and play. Studio reads keys, knobs, faders and Launchpad buttons. A MIDI keyboard setup here is plug and play, no driver install.
- Musical typing. Press Cmd+K (Ctrl+K on Windows), or click the keyboard icon at the bottom right. The synth keyboard superimposes onto your typing keyboard: A to ; play the white keys, W, E, T, Y, U, O and P play the black keys, Z and X shift octaves, C and V change velocity. The built-in arpeggiator turns one held note into a rhythmic pattern.
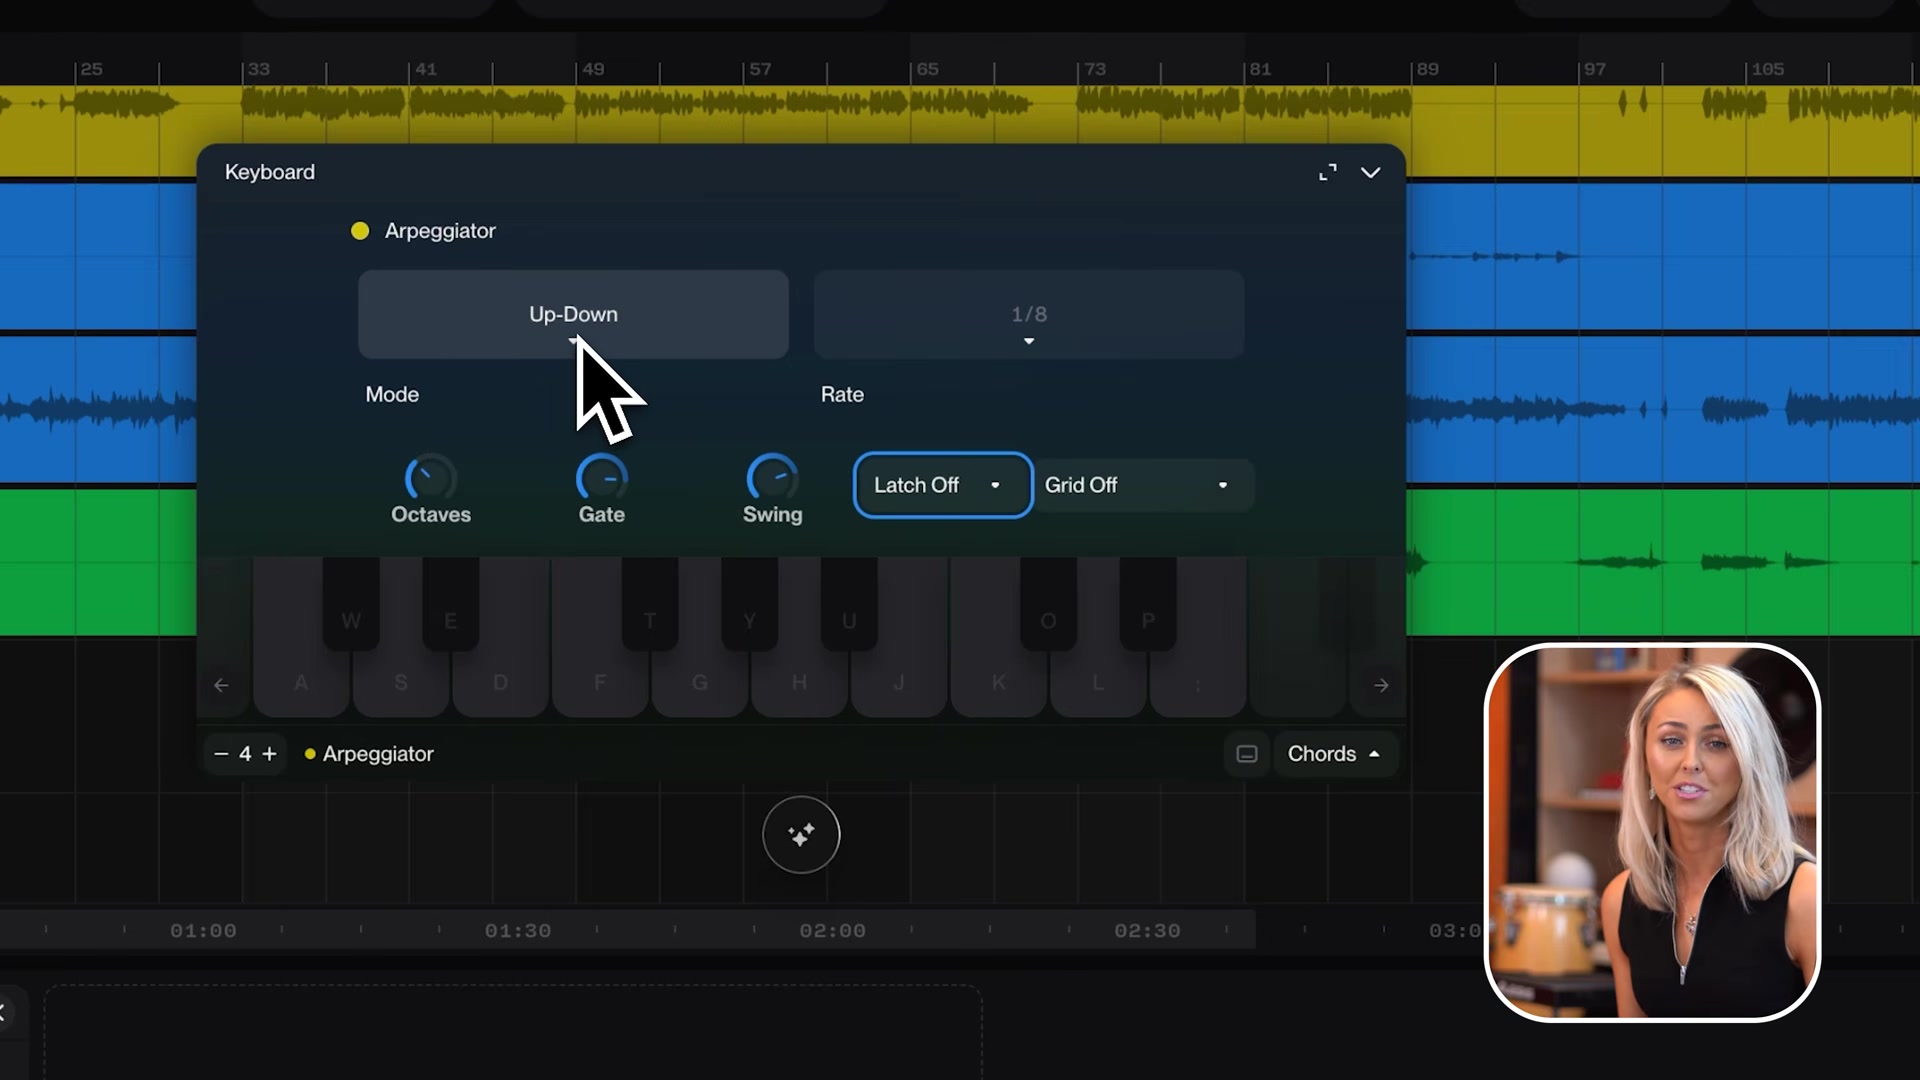
Turn on the metronome (Shift+C), press Shift+R and play. Do not worry about timing yet. Quantise fixes it in step 7.
How to play chords on the Suno Studio keyboard
Suno’s Studio 2.0 page advertises “musical typing, arpeggiator and chord mode”, and readers have gone hunting for a chord mode button. There is no separate toggle in the app. Next to the arpeggiator you get the keyboard itself, and chords work the way they do on any keyboard: hold the keys together.
- Open the playable keyboard with Cmd+K (Ctrl+K on Windows).
- Hold two or more keys at once. Held keys light up purple, and the track’s instrument sounds the full chord.
- Drag the chord straight from the keyboard onto the timeline. It lands as a MIDI clip you can move, copy and edit.
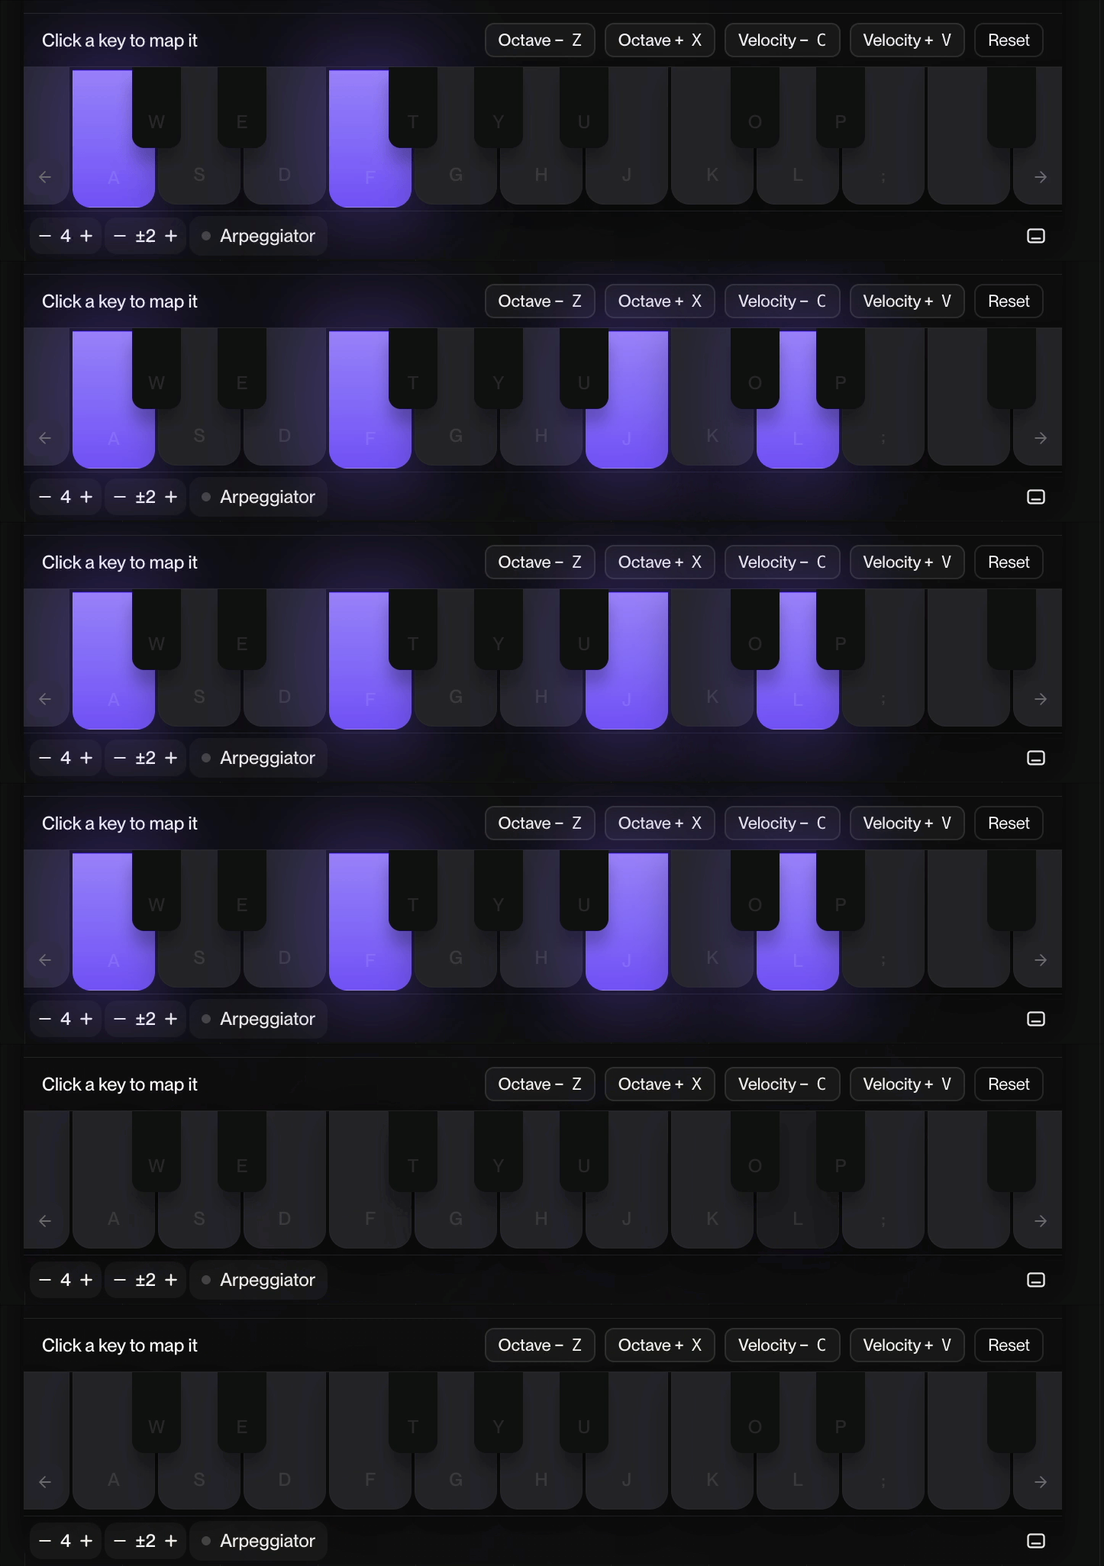
That drag is the part worth knowing. Play a voicing until it sounds right, drop it on the timeline, then repeat for the next chord in the progression and you have written a chord track without touching the piano roll.
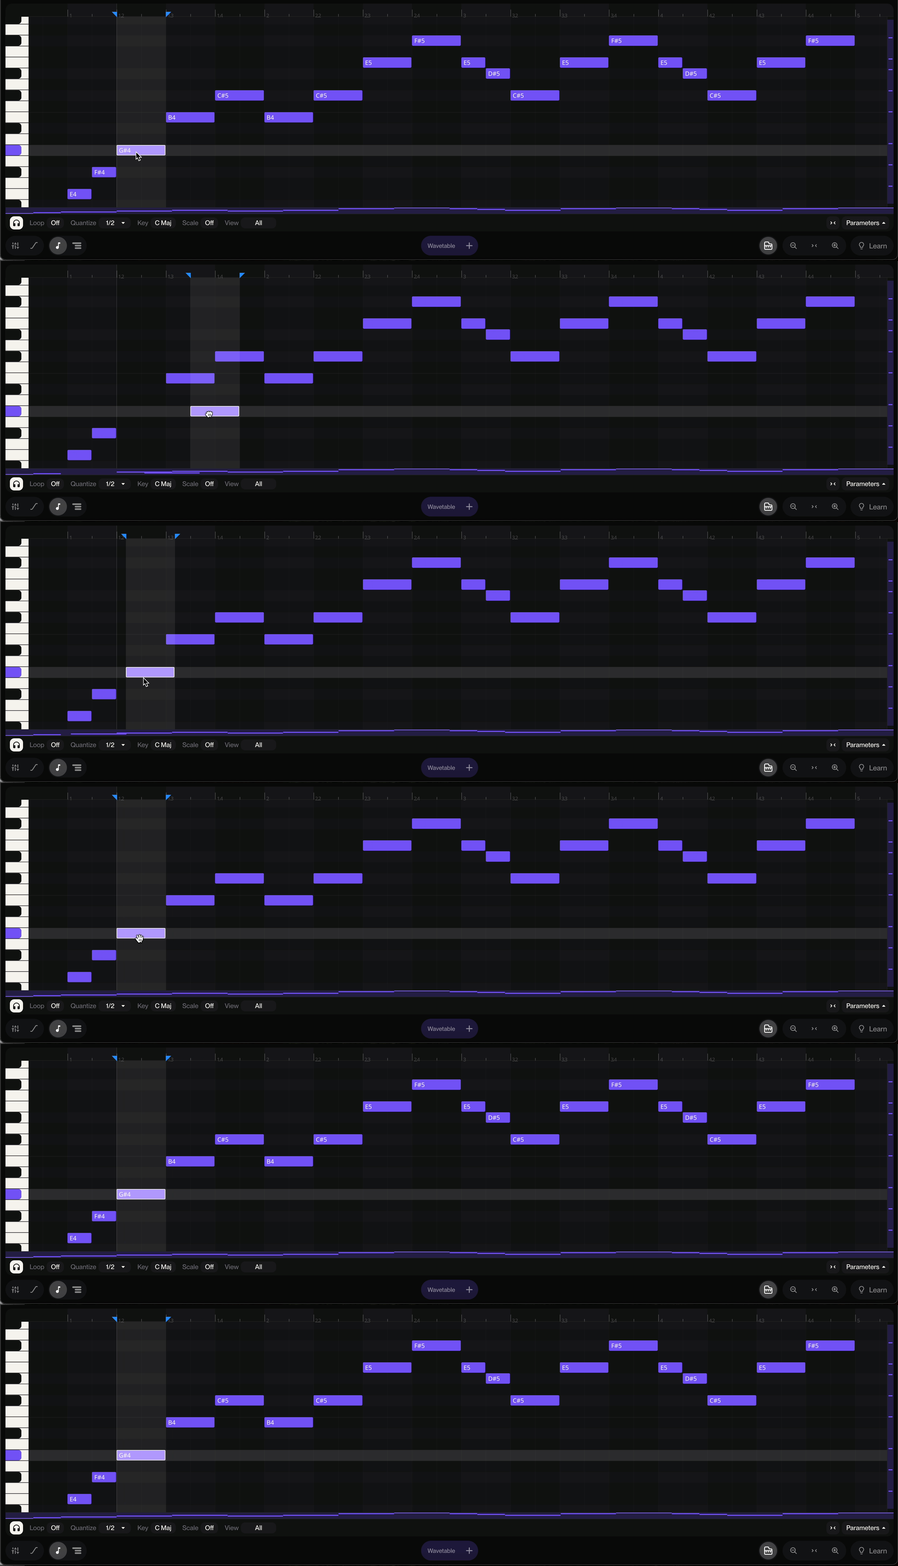
The precise route runs through the piano roll instead. Double-click a MIDI clip, then double-click inside the grid to place each note of the chord in the same bar, stacked vertically. Set Key and turn Scale on in the clip footer and every row that belongs to your key stays highlighted, so the voicings land in tune.
Step 4: Turn the MIDI into a real instrument with the chat bar
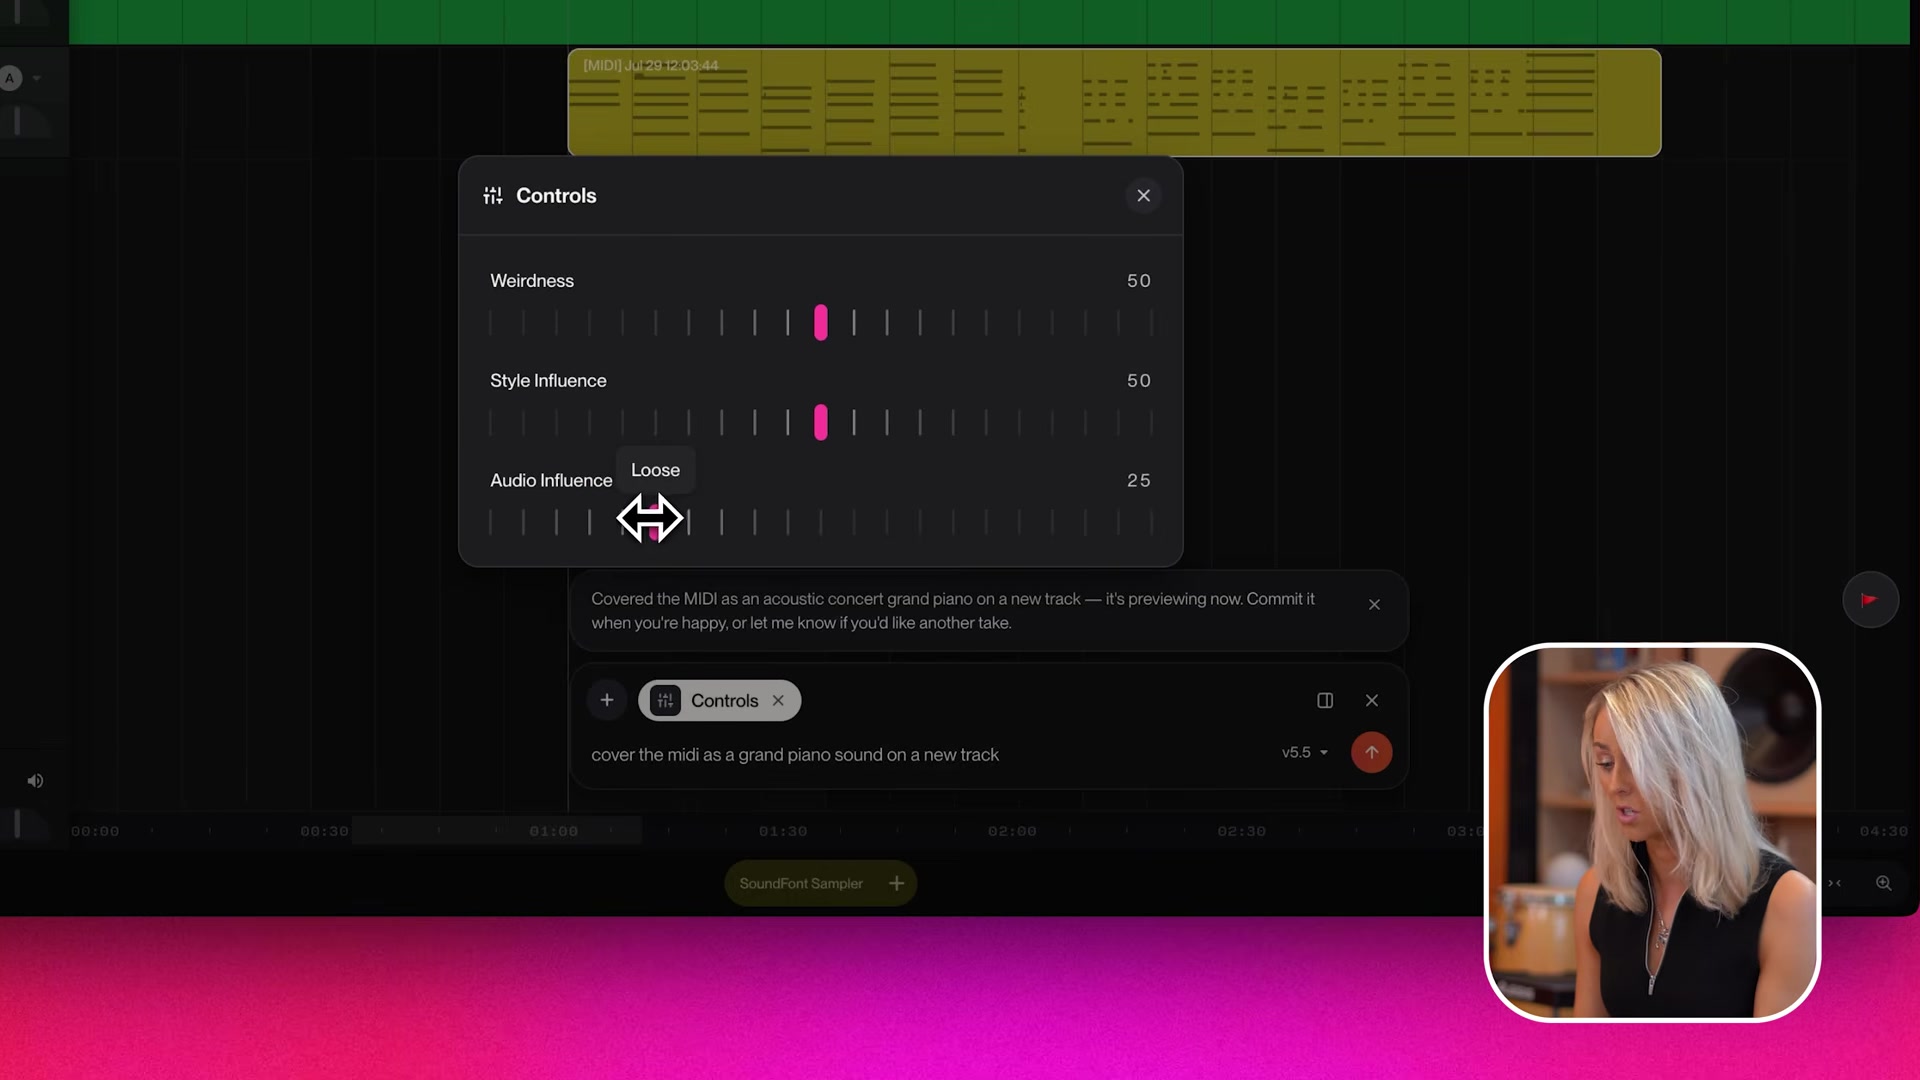
- Press Enter to open the chat bar and attach the MIDI clip as context.
- Ask for the cover. Audrey’s prompt in Suno’s walkthrough: “cover the midi as a grand piano sound on a new track.”
- Open Controls and raise audio influence so the cover sticks close to your written notes. Low influence lets the model improvise around them.
Step 5: Go the other way, convert audio to MIDI
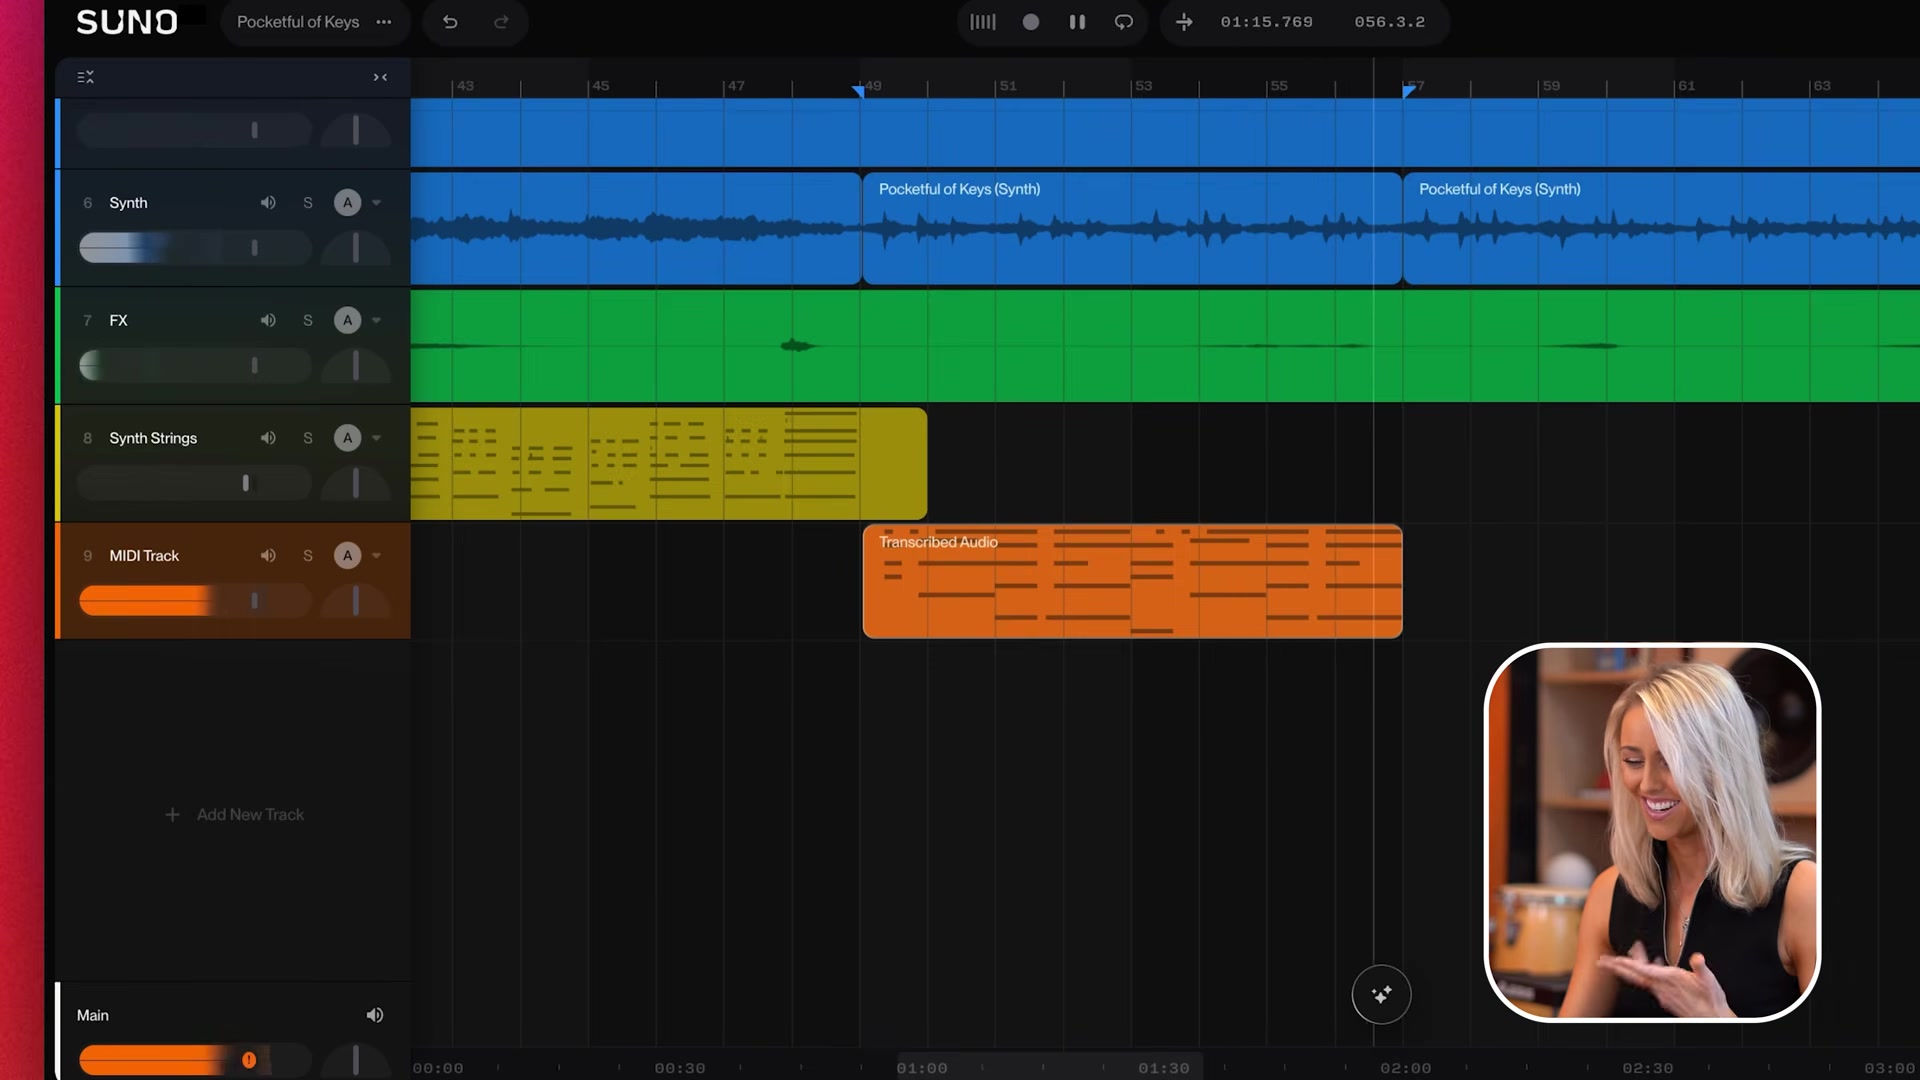
- Split the audio region you want (Cmd+E).
- Drag the region onto a MIDI track.
- Click Convert to MIDI.
Step 6: Edit the notes in the piano roll
- Open the piano roll with Shift+Tab.
- Delete wrong notes, drag notes up or down for pitch, left or right for timing.
- Set the song key at the bottom of the piano roll, then turn scale mode on. Every note you drag now lands in key.
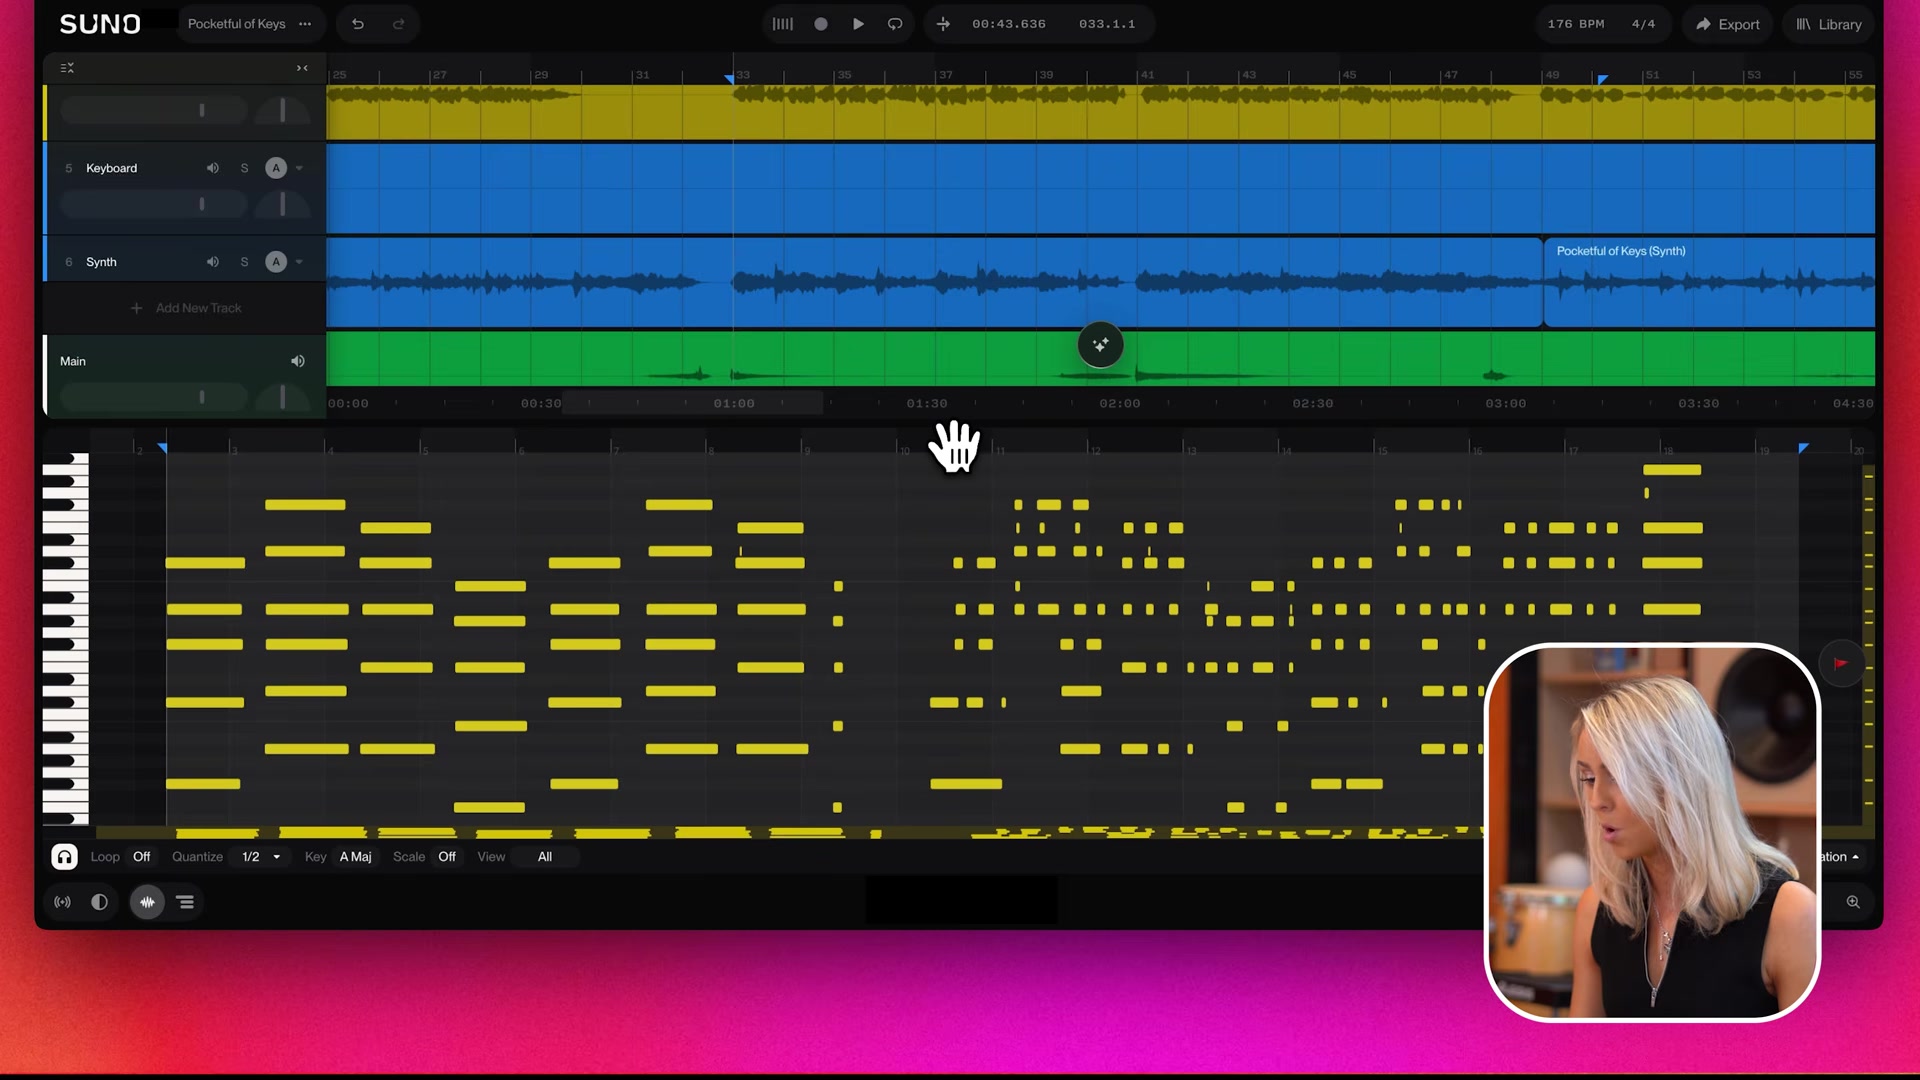
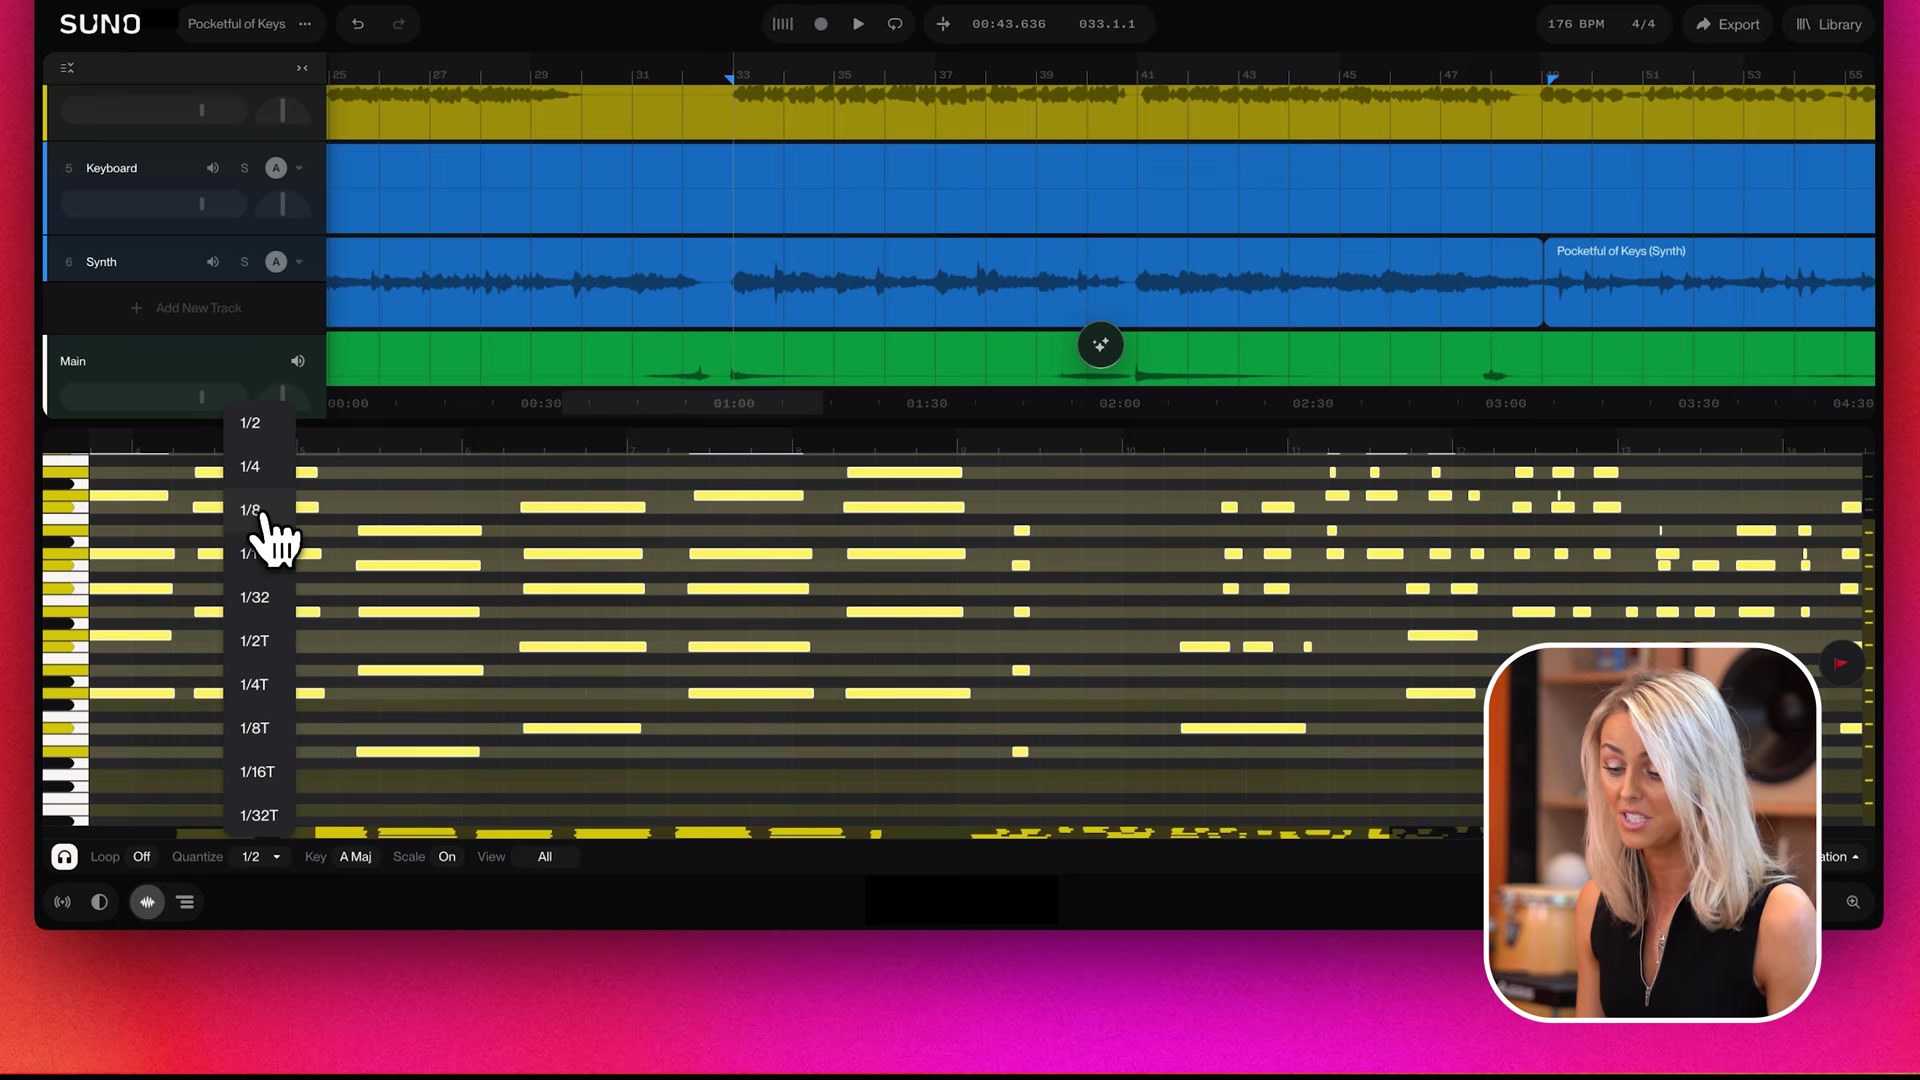
Step 7: Quantise the take
- Select all notes (Cmd+A).
- Open the Quantize dropdown at the bottom of the piano roll.
- Pick a note value. Eighth notes suit most parts.
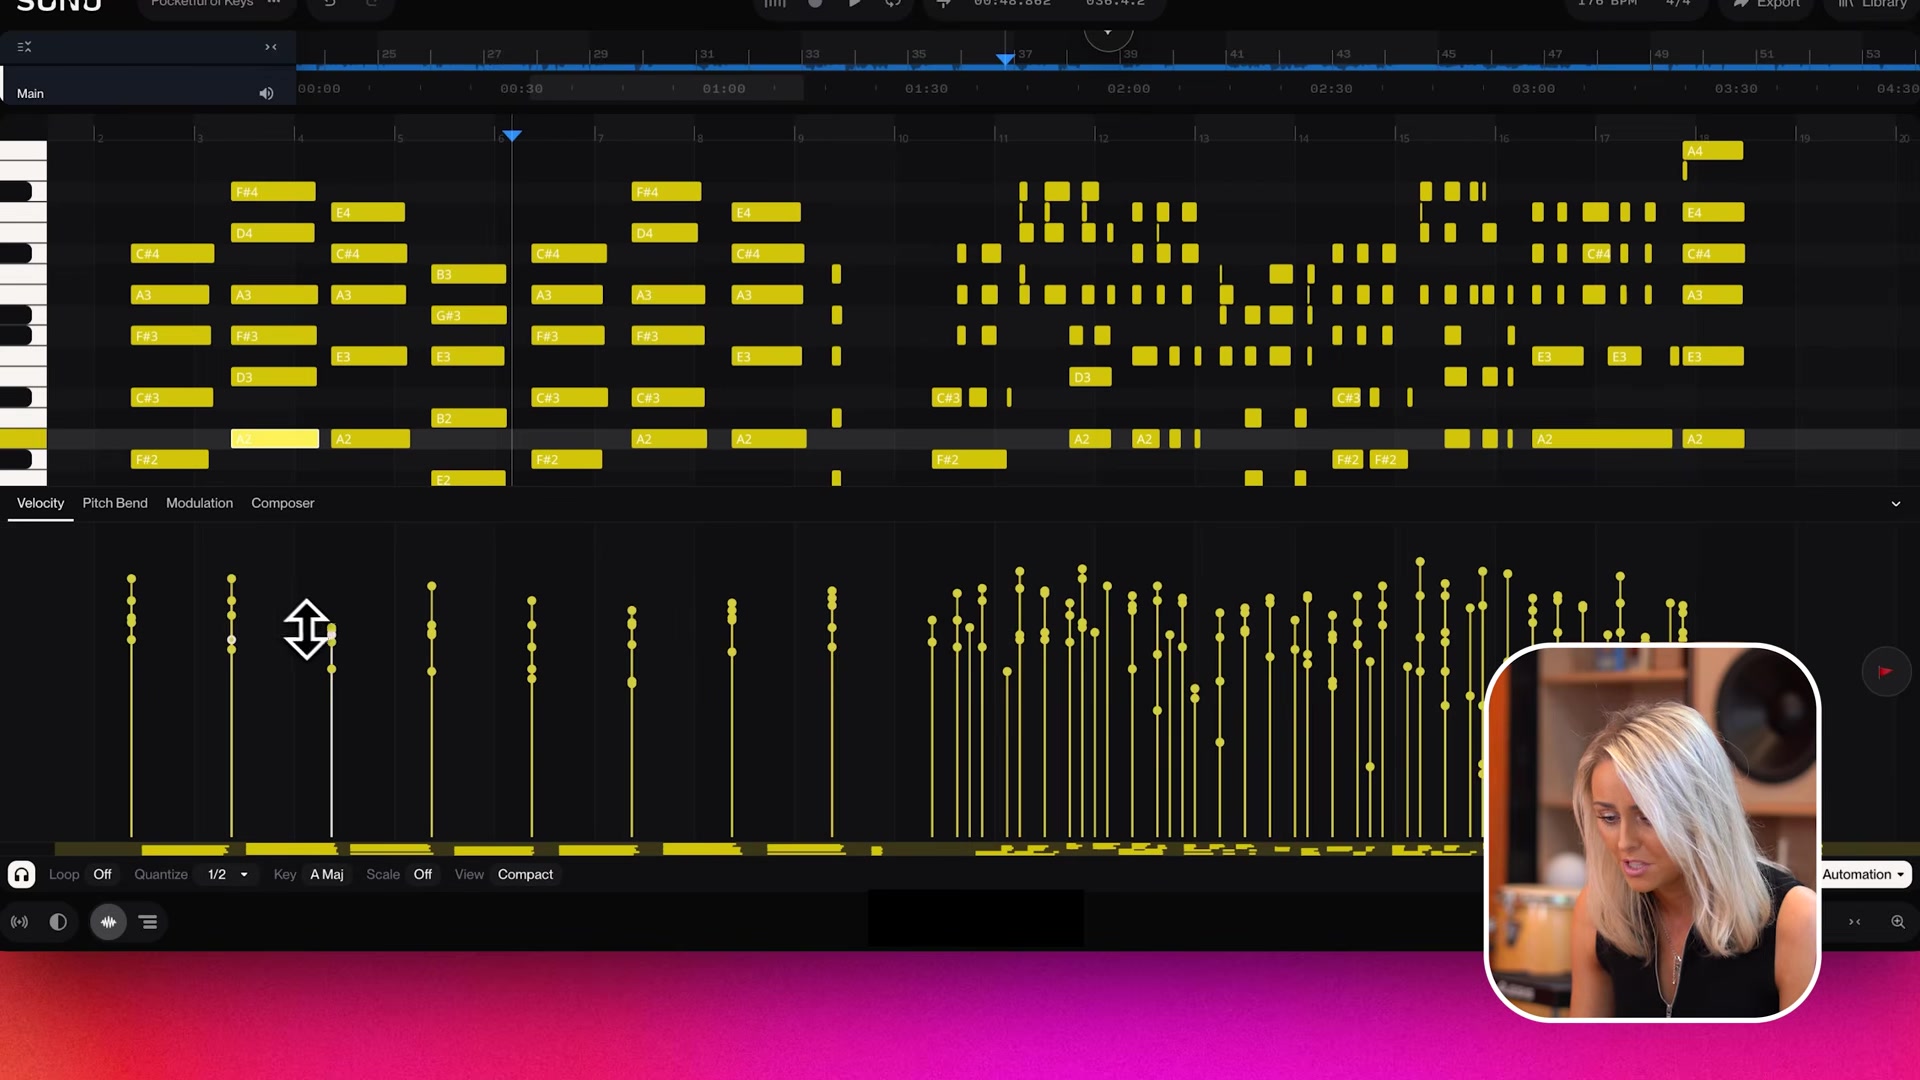
Step 8: Dial in velocity, pitch bend and modulation
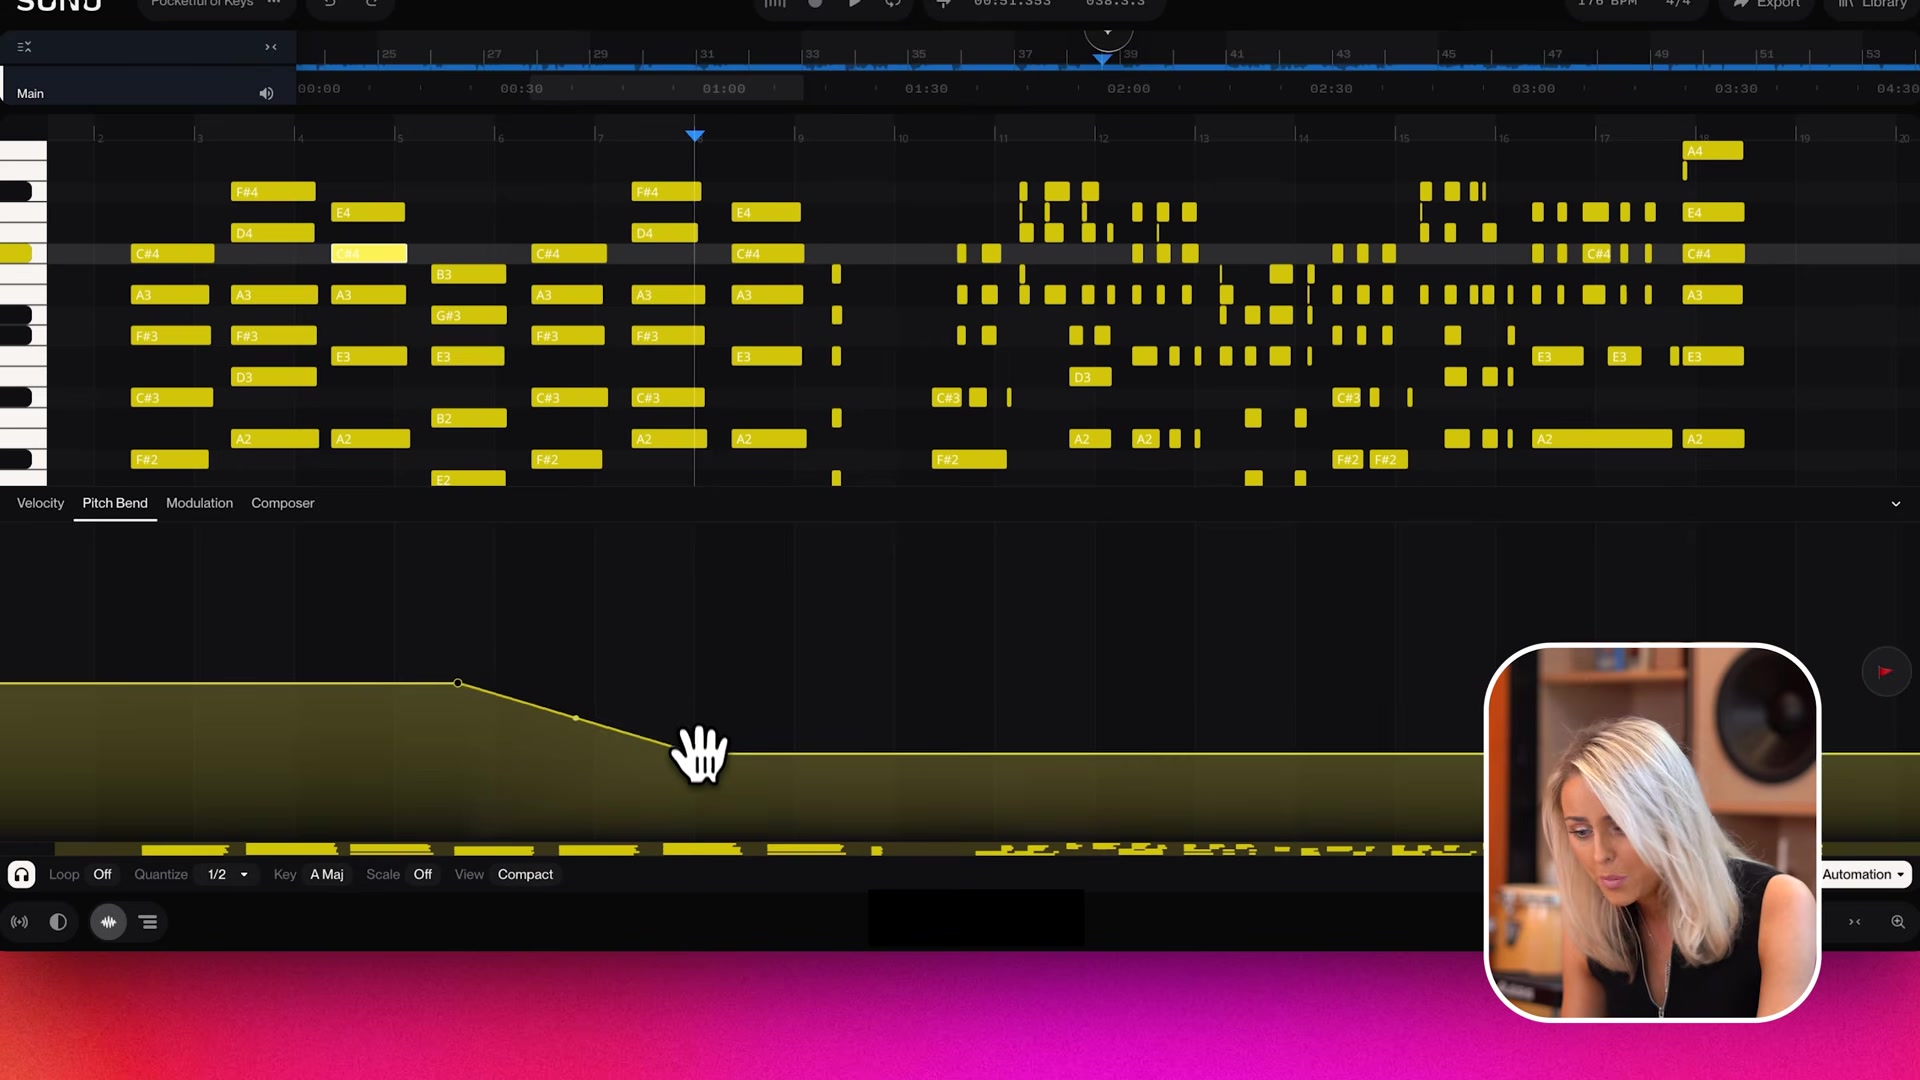
- Open the lanes under the piano roll: Velocity, Pitch Bend, Modulation.
- MIDI velocity is how hard each note hits. Vary it so the part breathes.
- Draw pitch bend for slides, modulation for movement over held notes.
What common MIDI mistakes trip people up in Suno Studio, and how do you fix them?
Three issues catch almost everyone:
- Notes vanish at the clip start. Notes dragged before the clip boundary get cut off. Fix: keep notes inside the clip bounds, or drag the clip edge out first.
- Notes land out of key. The chromatic default view lets you drop a note anywhere. Fix: set the song key, then turn scale mode on before editing.
- The MIDI controller does nothing. You are in Safari. Fix: switch to Chrome, where Web MIDI is supported.
How do you get the best results out of MIDI in Suno Studio?
Habits worth adopting from day 1:
- Record loose, then quantise, then edit velocity. Feel comes from dynamics, and quantise kills none of it.
- Raise audio influence when you cover MIDI you wrote precisely. It is the slider deciding whether the model plays your notes or its own.
- Use the arpeggiator for motion you cannot finger on musical typing.
- Convert to MIDI works best on one melodic line. Split stems first, convert second. My Suno stem separation guide covers the split.
- Map your hardware knobs with MIDI Learn so synth tweaks happen on physical controls.
Is Suno Studio’s MIDI good enough to replace your DAW’s piano roll?
For writing and sketching, yes. The piano roll covers editing, scale lock, quantise and per-note expression, which is the full core of what Ableton or FL Studio offer for note work, minus advanced tools like MPE editing. Suno also has a second MIDI surface, the MILO-1080 groovebox, but Studio is where MIDI meets the full timeline. Dedicated MIDI copilots like Delphos generate notes inside your DAW instead.
The honest verdict: what makes Studio’s version worth opening is the round trip. Write MIDI, hear it as a grand piano played by the model, convert the result back to notes, edit, repeat. Your DAW’s piano roll edits notes. This one trades them back and forth with a music model. Play one chord progression in, cover it as strings, and you will get the difference in under a minute.
Frequently asked questions
Where is chord mode in Suno Studio 2.0?
Suno's Studio 2.0 marketing page names chord mode, but the app has no chord mode button. The playable keyboard (Cmd+K) shows the keyboard and an arpeggiator toggle only. To play a chord, hold two or more keys together, then drag the chord from the keyboard onto the timeline, where it lands as a MIDI clip. For exact voicings, stack the notes by hand in the piano roll.
Does Suno Studio support MIDI controllers?
Yes. Suno Studio 2.0 reads hardware MIDI controllers over USB in Chrome, and knobs, faders and Launchpad buttons can map to Studio parameters via MIDI Learn. Web MIDI is not available in Safari, so hardware input needs Chrome.
Can you convert audio to MIDI in Suno Studio?
Yes. Split the audio region you want, drag it onto a MIDI track and click Convert to MIDI. Studio turns the audio into editable notes in the piano roll. It works best on clear, single-line material like a melody or bassline.
Does Suno Studio MIDI work in Safari?
No. Suno's help centre states Web MIDI is not available in Safari. The piano roll and musical typing still work there, but a hardware MIDI controller only registers in Chrome, which Suno recommends for Studio anyway.
Can you export MIDI out of Suno Studio into Ableton?
Yes. Right-click any MIDI clip in Suno Studio and download it as a MIDI file, then drag it into Ableton, Logic, FL Studio or any DAW. Converted audio-to-MIDI clips export the same way.
What synth does Suno Studio use for MIDI tracks?
MIDI tracks in Suno Studio run through a built-in wavetable synth with oscillators, filters, envelopes, LFOs and a mod matrix, plus factory presets like big strings and sub. Suno states more instrument types are coming.
About the author

Covering AI music tools, industry shifts, and news for music creators and professionals. Twice-weekly newsletter at aimusicpreneur.com.