
How to write chords, arpeggios, and basslines fast with Reason 14 Players
My stack My fav 6 tools for AI music after testing 70+
-
 ElevenMusic · Music generation
 -
 Moises · Stem separation
 -
 Controlla · Voice swap & cloning
 -
 Cryo Mix · Mixing + mastering
 -
 Neural Frames · Music videos
 -
 ONCE · Distribution
Some links are affiliate links — I earn a commission at no cost to you. Every tool here is one I run myself and truly believe in. This stack is proven.
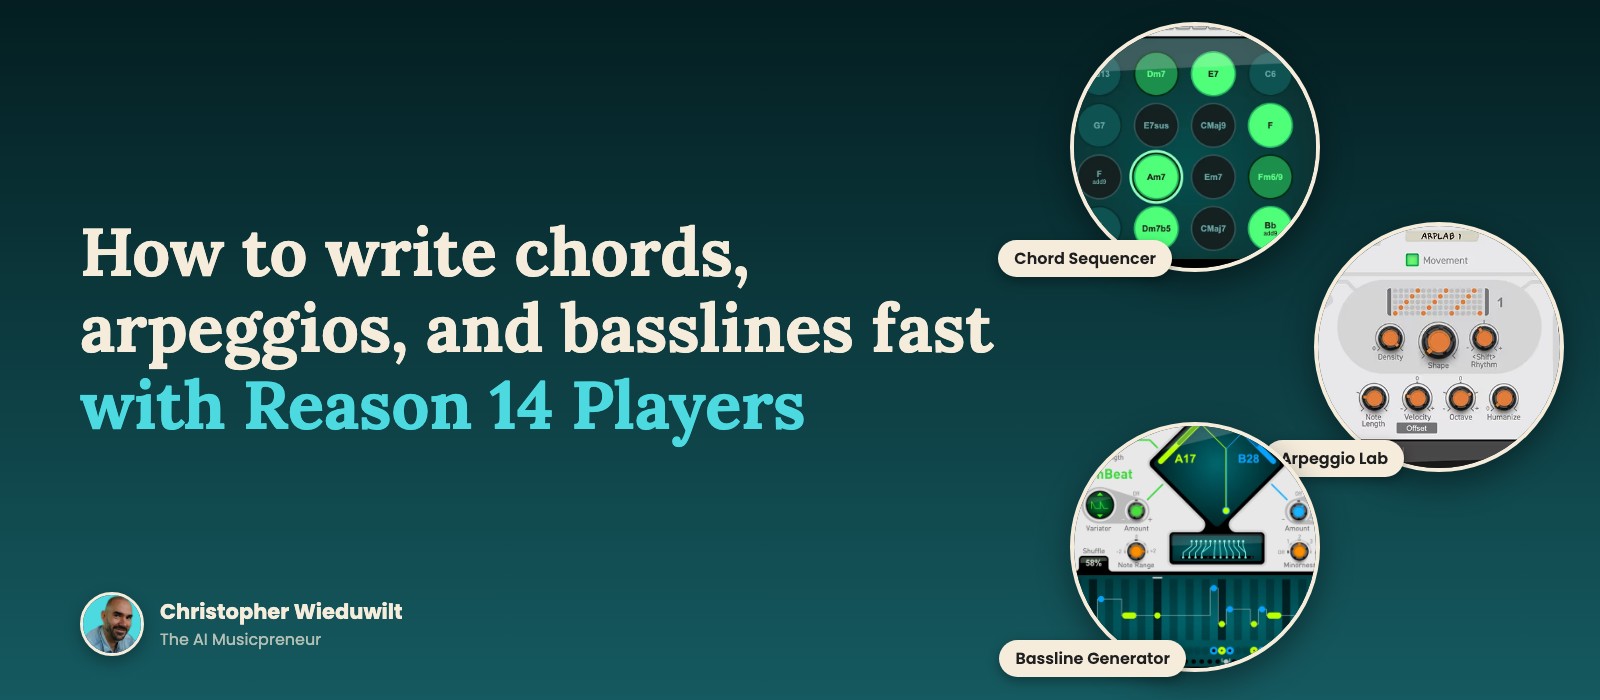
You open a project. You play the same 4 chords you always play. You close the project. The blank-page problem in music production is a harmony problem, and Reason 14 Players solve it with 3 devices: Chord Sequencer for chords, Arpeggio Lab for arpeggios, and Bassline Generator for the low end.
Quick answer: load an instrument in the Reason 14 rack. Stack Chord Sequencer above it for the progression. Add Arpeggio Lab to break the chords into a pattern. Then run Bassline Generator on a separate bass track and send the MIDI to your tracks.
This guide walks you through all 3 devices, knob by knob, plus the CV trick nobody writes up. You will leave with a chord progression, an arpeggio, and a bassline in about 20 minutes, with no music theory required.
What you need before loading Reason 14 Players
The wall most readers hit sits right here, so let’s clear it first. Buying Reason 14 outright (€239) covers 68 Reason Rack Devices. These 3 Players sit outside it.
Here’s what gets you in:
- Reason+ at €11.25 a month billed annually (€15.99 monthly): the DAW, the Rack plugin, and all 93 Rack devices, including all 3 Players
- Reason Rack plugin subscription at €6.58 a month billed annually (€9.99 monthly): plugin only, same 93 devices, for FL Studio and Ableton users
- €74 per device as a one-time Rack Extension add-on for perpetual license owners
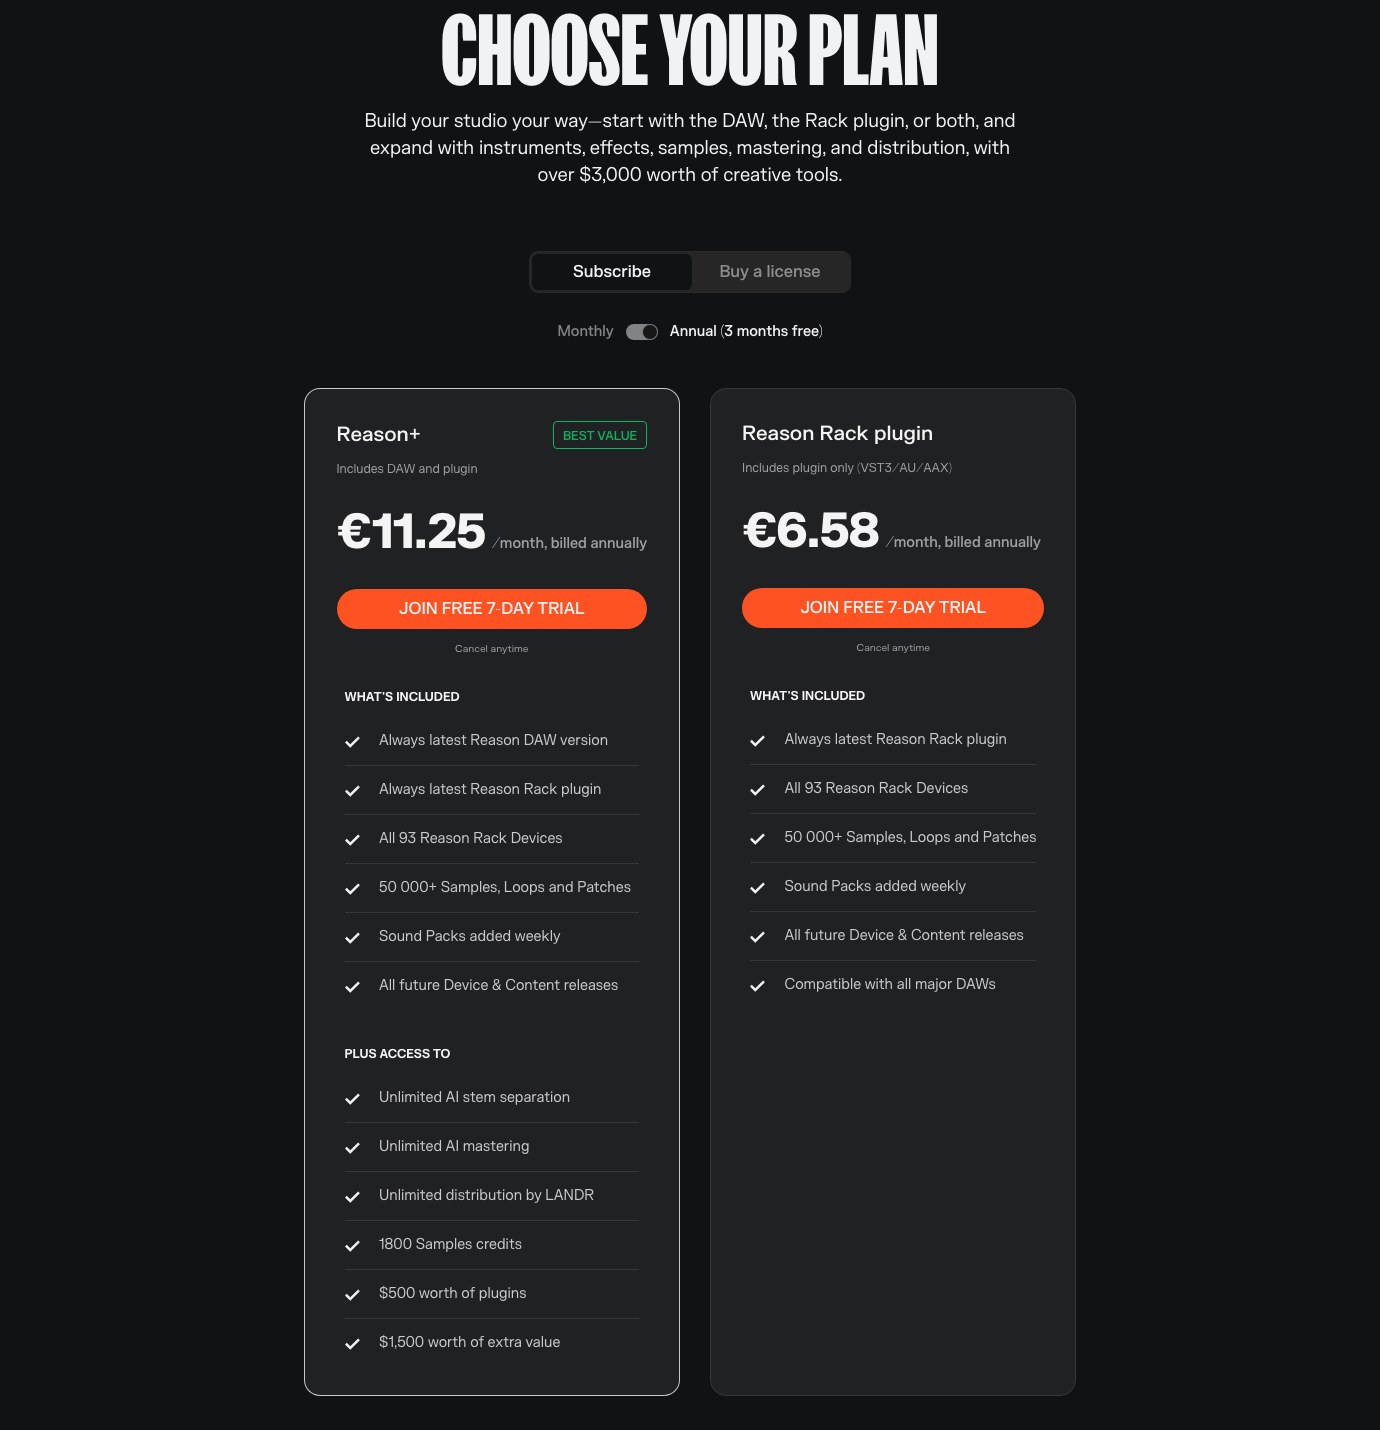
Both subscriptions carry a 7-day free trial, and each device page offers a downloadable trial. The Players run in Reason 10.1 and later, so an older license still works with the add-ons. Bassline Generator’s bundled Combinator bass patches need Reason 12 or newer.
Time commitment: about 20 minutes. Prior knowledge: you can load a device and hit record. My full breakdown of where these devices rank sits in the generative music tools roundup, where Reason 14 Players took the top spot.
Why use Reason 14 Players instead of writing chords by hand?
A Player is a device class in the Reason Rack, next to Instruments, Effects, and Utilities. Players process, filter, and generate MIDI notes in real time, feeding whatever instrument sits below them. Some generate notes with no input at all.
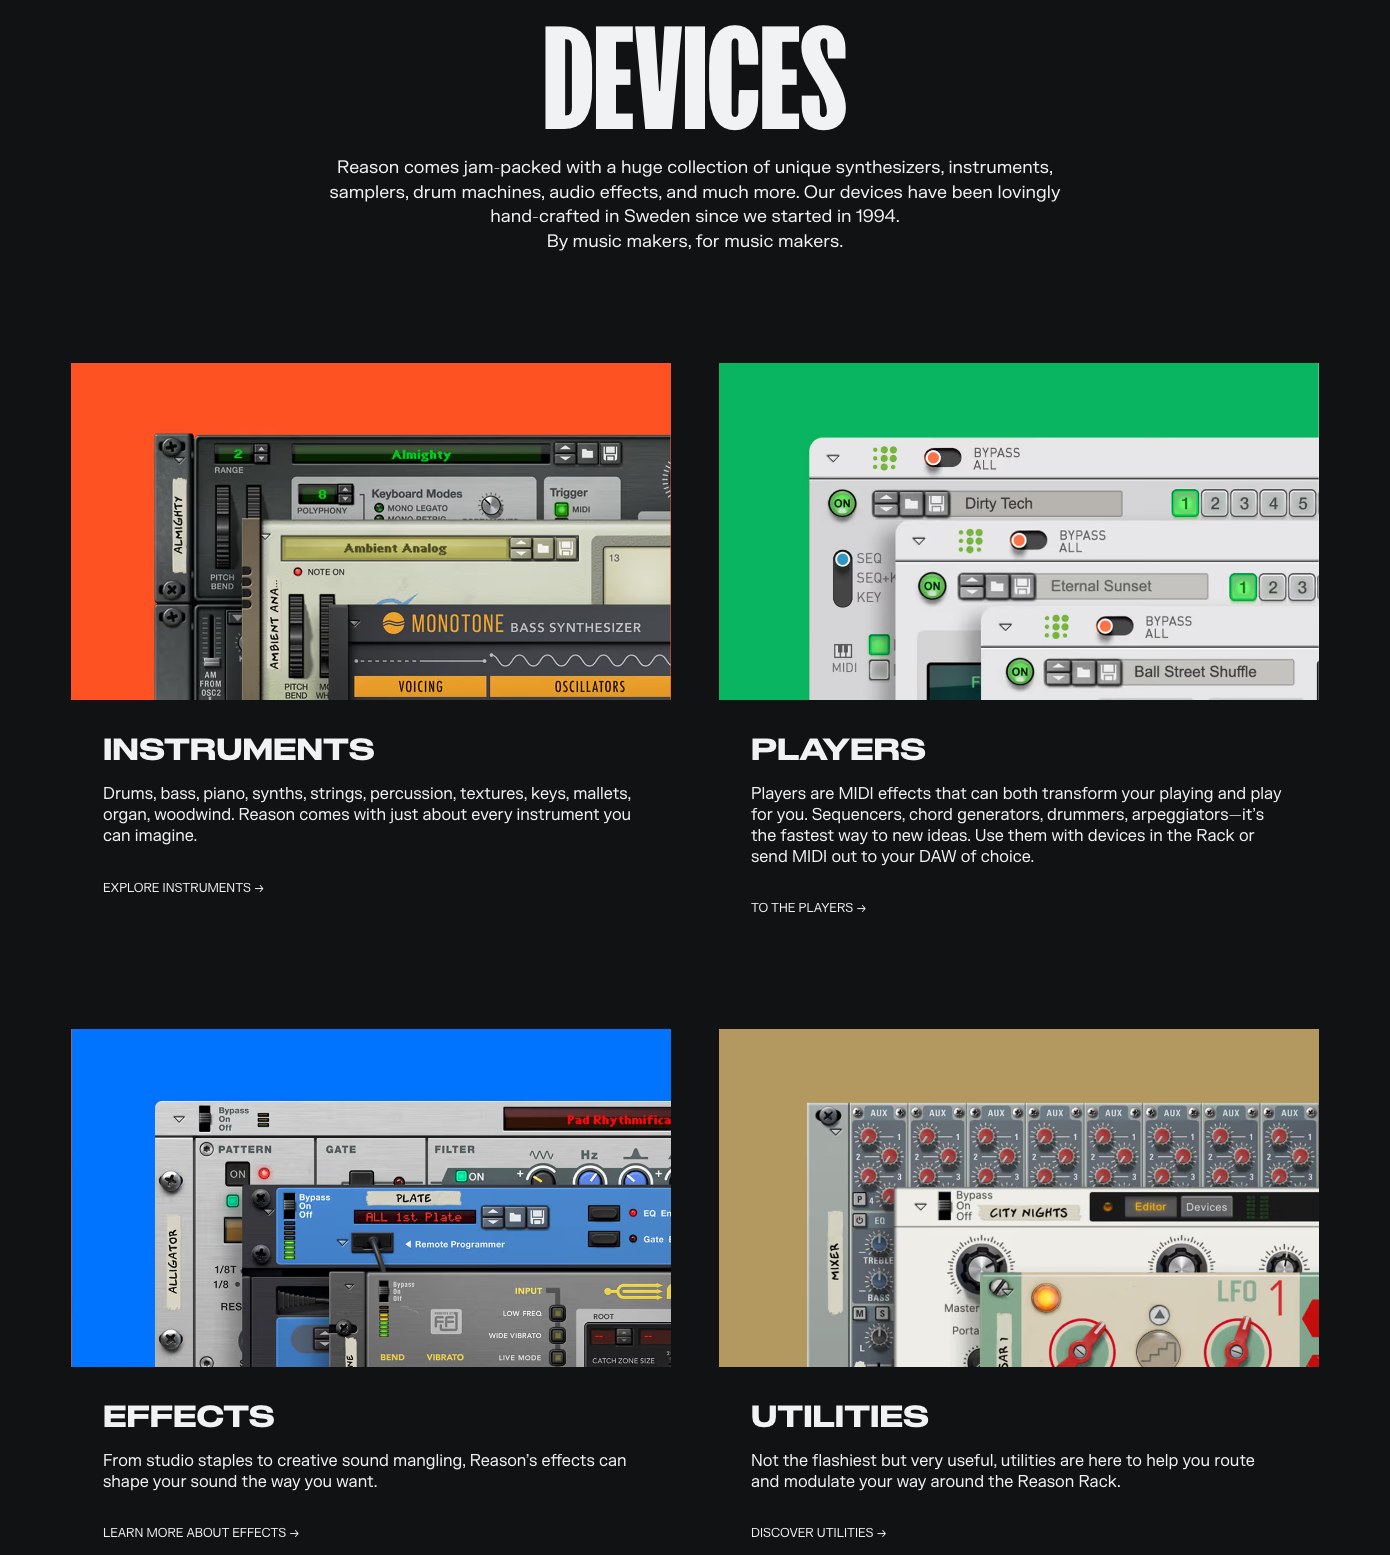
None of this is AI. The 3 devices build patterns from rules, curated chord sets, and randomization. Nothing was trained on anyone’s music, so every note belongs to you. If you already know the progression you want and need voicings only, a chord tool like Scaler makes more sense. These Players earn their spot when you want ideas you would not have played yourself.
Reason 14 changed how fast you reach them. “With Reason 14, we set out to rethink the music-making workflow,” says Mattias Häggström Gerdt, Product Manager at Reason Studios, in the April 2026 announcement. The new Track Panel puts Players one click from the sequencer.
Reason users stick around for decades, and the comment thread under Reason’s own Reason 14 walkthrough shows it. “Best Reason yet,” reads the top comment. “Reason has never been better,” says the one pinned by Reason Studios. One user checks in with “been in it since Reason 2,” a 2002 start. Another writes: “Iv been on reason since 6 and this is a massive improvement in workflow, I can mix a lot quicker.”
The sharpest one names the shift plainly: “They’ve added some of the best features from other DAWs. I love it! Workflow will be lightyears better.” Reason was behind on workflow, and 14 catches up.
Grammy-winning producer Ian Kirkpatrick (Dua Lipa, Lizzo, The Chainsmokers) has used Reason for 20 years and built a full track idea on camera with Chord Sequencer:
You don't want to operate slower than the rate of inspiration.
One side note on ownership: LANDR acquired Reason Studios in January 2026, which is why Reason+ now bundles LANDR’s AI mastering, stem separation, and distribution.
Step 1: Stack the Players above your instrument in the Reason Rack
- Create an instrument track first. Any synth or piano works.
- Add a Player from the Players palette on the Device Palette, or straight from Reason 14’s new Track Panel without opening the rack.
- Check the order. The Player must sit above the instrument in the same rack column. Players process top-down, so a Player below the instrument does nothing.
Reason 14 shows one rack column per track by default (Rack per Track), so your chain stays visible. Every Player also wears the same header strip: Bypass All on the left, Direct Record and Send to Track on the right. Learn it once and you can read all 13 Player devices at a glance.
Reason’s own beatmaking walkthrough shows the Track Panel route at speed. Producer J-Lang adds Chord Sequencer and Arpeggio Lab to a Serum 2 instance in seconds, without opening the rack once:
Step 2: Build your chord progression in Chord Sequencer
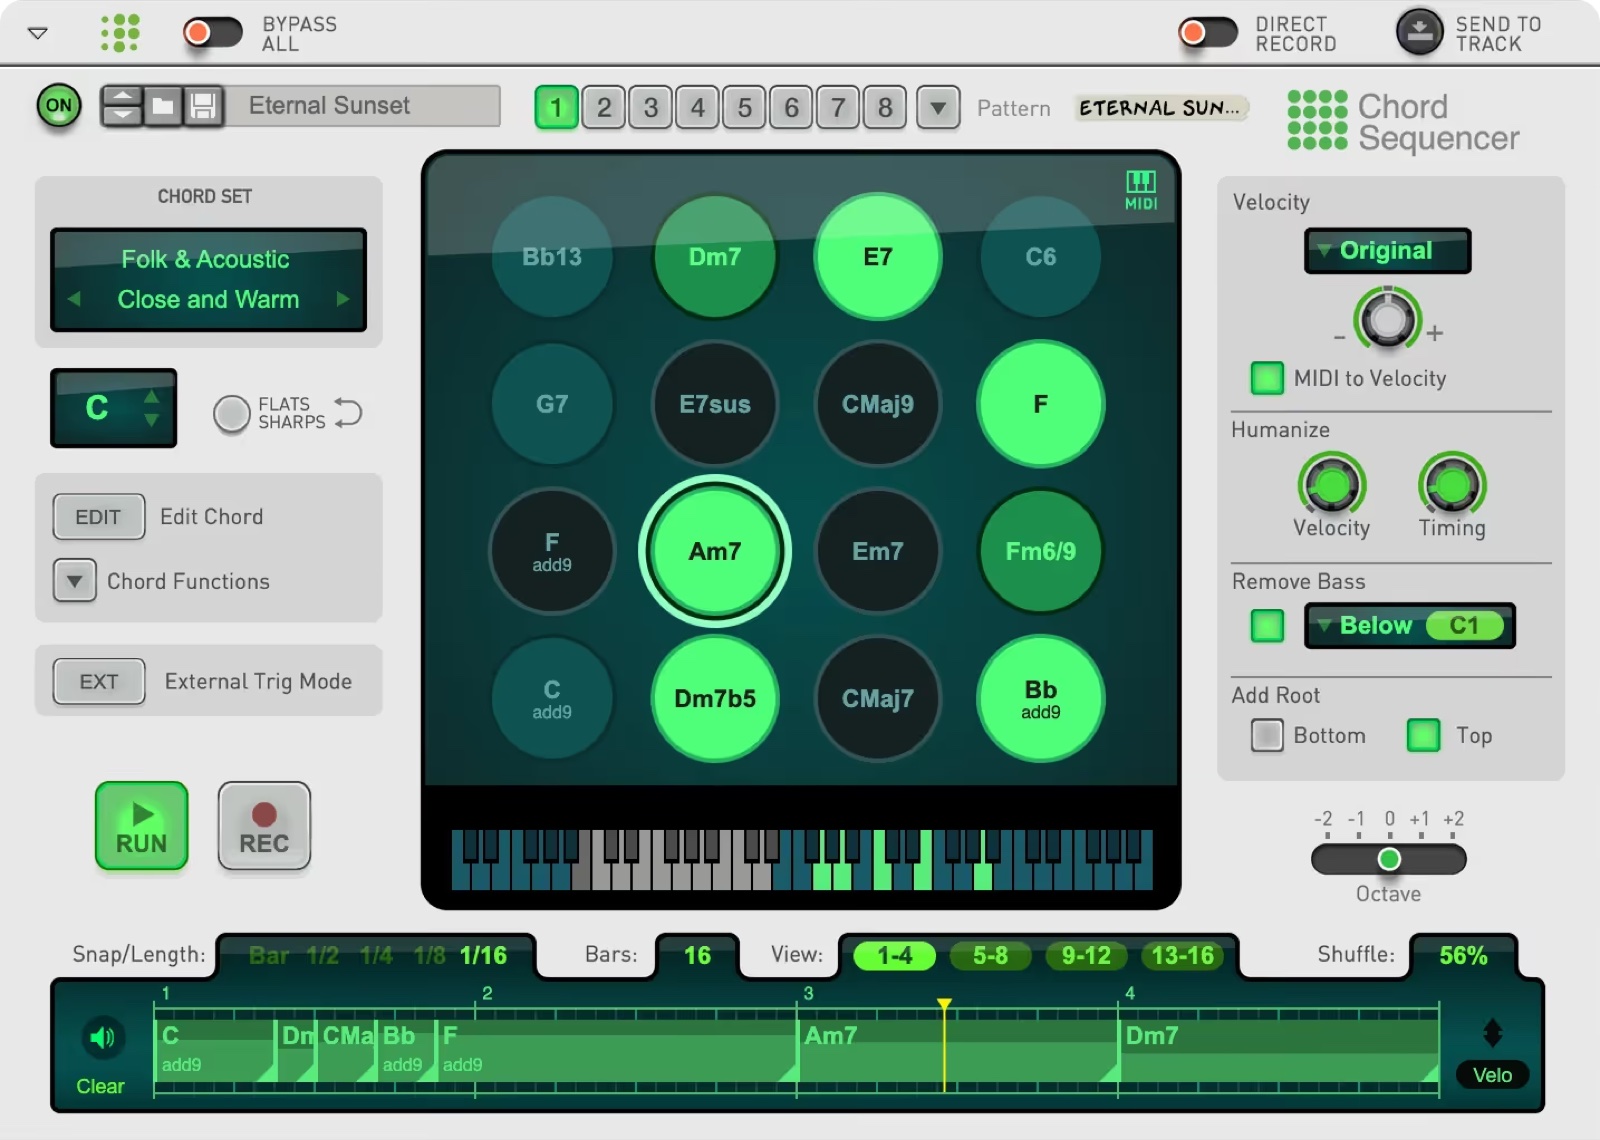
The panel reads left to right: the Chord Set box, a 4x4 grid of 16 chord pads with a keyboard strip below, voicing controls down the right, and the Chord Progression Sequencer along the bottom.
- Pick a Chord Set. The box on the left shows a category over a set name. 8 categories cover Classic Pop & Rock, Dance & Modern Pop, Folk & Acoustic, Jazz & Fusion, Latin, Soul & R&B, Soundtrack & Classical, plus an Empty slot for your own. Each set holds 16 chords, mapped across your MIDI keyboard from C1 or onto 16 controller pads.
- Play a pad and follow the green. The other pads re-shade on a gradient. Brightest green is the familiar next move. Darker is more unexpected. Near-black changes direction. Kirkpatrick calls the dark ones the reason he uses it: chords his fingers would never find.
- Drag pads into the timeline at the bottom, or hit REC and record the progression in real time. Option-drag (Alt on Windows) duplicates a chord. Set Snap, Bars, and Shuffle to taste.
- Shape the voicing on the right: Humanize has separate Velocity and Timing knobs, Remove Bass clears everything below C1 for your bassline, Add Root drops a root on top or bottom, and Octave shifts the whole set.
Want a chord the set doesn’t have? Click EDIT. The pad turns red, and a toolbar appears with Chord Root, Transpose, Velo, and Learn, which lets you play your own chord straight in. You can also copy and paste chords across the 8 pattern slots to build a custom set from several of the 100+ included ones. The display then reads “custom.”
Here’s Reason’s own walkthrough of taking a raw progression to a full song:
Watch for: pressing RUN with an empty timeline plays nothing. The pads and the sequencer are 2 different surfaces, and RUN reads the sequencer.
Step 3: Turn the chords into an arpeggio with Arpeggio Lab
Add Arpeggio Lab below Chord Sequencer and above the instrument. The chords flow down into it.
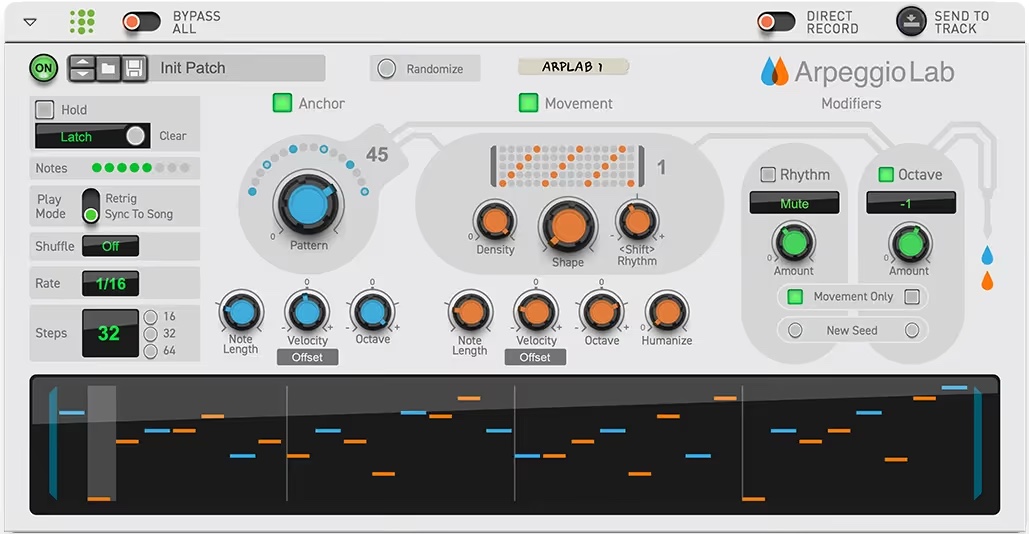
The panel splits into 4 zones: globals on the left, the blue Anchor section, the orange Movement section, and the Modifiers on the right. The note display at the bottom uses the same colors, blue bars for Anchor notes and orange for Movement.
- Set the globals. Hold has 4 modes (Hold All, Latch, Chord, Toggle) so the arpeggio keeps running while your hands leave the keys. Pick a Rate and a step count (4 to 64, with quick buttons for 16, 32, 64).
- Dial the Anchor. The Pattern knob picks 1 of 64 patterns, each 16 steps, using 1 to 3 chord notes. This is the pulse. Anchor Pattern 0 plays nothing on purpose.
- Dial the Movement. The Shape knob picks 1 of 40 shapes, and Density (0 to 100%) sets how many steps fire between the Anchor notes. Shift Rhythm slides the shape up to 16 steps either way.
- Add trouble with the Modifiers. The Rhythm modifier mutes or doubles notes. The Octave modifier jumps registers (-1, or -1 or +1). Each has its own Amount knob, its own Movement Only switch, and its own New Seed button to re-roll which notes get hit.
If the arpeggio sounds cramped, lower the Anchor’s Octave knob or stretch its Note Length. For pluck arps, shorten Movement Note Length to staccato. And Humanize, on the Movement side, plays the pattern like a person instead of a grid.
Step 4: Generate a bassline with Bassline Generator
Create a second instrument track with a bass synth, and drop Bassline Generator above it.
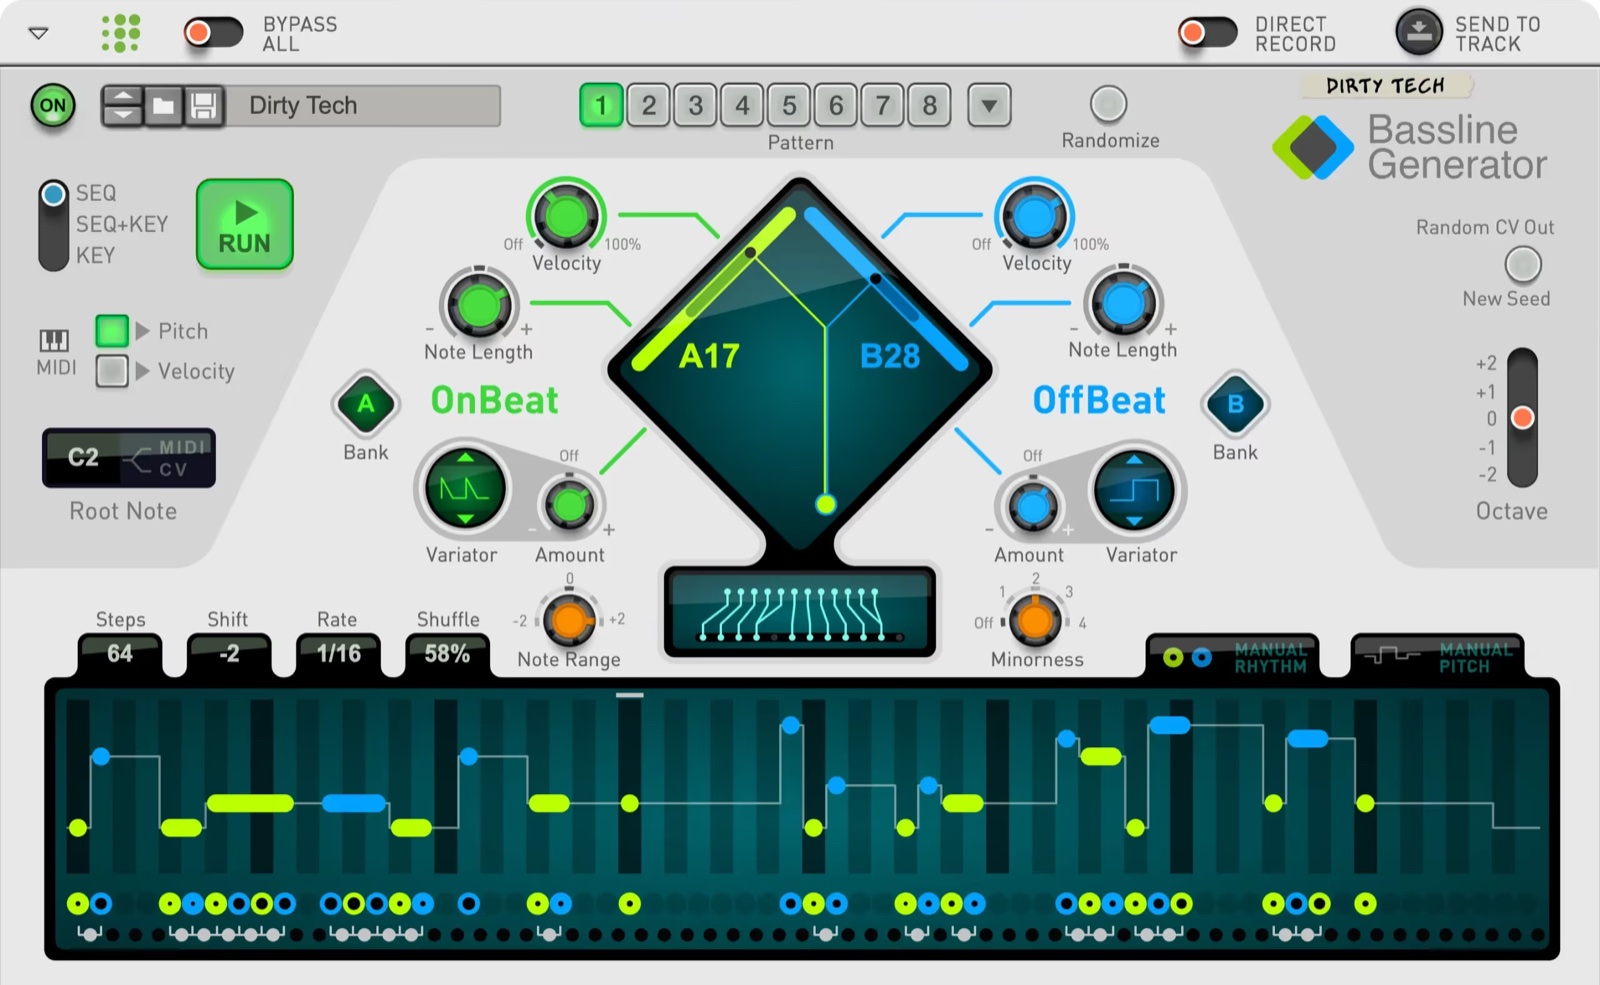
The green and blue color code carries the whole device. Green OnBeat notes land on the beat divisions (at a 1/16 rate, the eighth-note pulse). Blue OffBeat notes land on the syncopated positions in between, and those blue notes are where the groove lives. The patterns carry pitch too: roots, octaves, fifths, and passing tones.
- Drag the diamond. The handle inside the diamond moves both pattern selections at once. The 2 edge sliders move one side each: green upper-left, blue upper-right. The readout names each pick by bank and number, like A17 and B28. Hold Shift while dragging for precision.
- Double your options with the banks. Banks A and B hold 64 OnBeat and 64 OffBeat source patterns each, 128 per side, switchable per side.
- Fit it to your key. Note Range (-2 to +2) limits how far the line strays from the root. Minorness (Off to 4) strips major notes for darker keys.
- Add motion. The Variators push each side toward more complexity (positive) or less (negative) in repeating cycles. Shift slides the whole line up to 32 steps. Randomize rolls a fresh line when nothing clicks.
Now the trick worth the whole tutorial. Flip the rack (Tab) and drag a CV cable from Chord Sequencer’s Root Note CV Out to Bassline Generator’s Root Note CV In. The bassline now follows your chord changes live. Set the octave switch next to the jack (C1, C2, or C3), or your bass tracks the right notes in the wrong register.
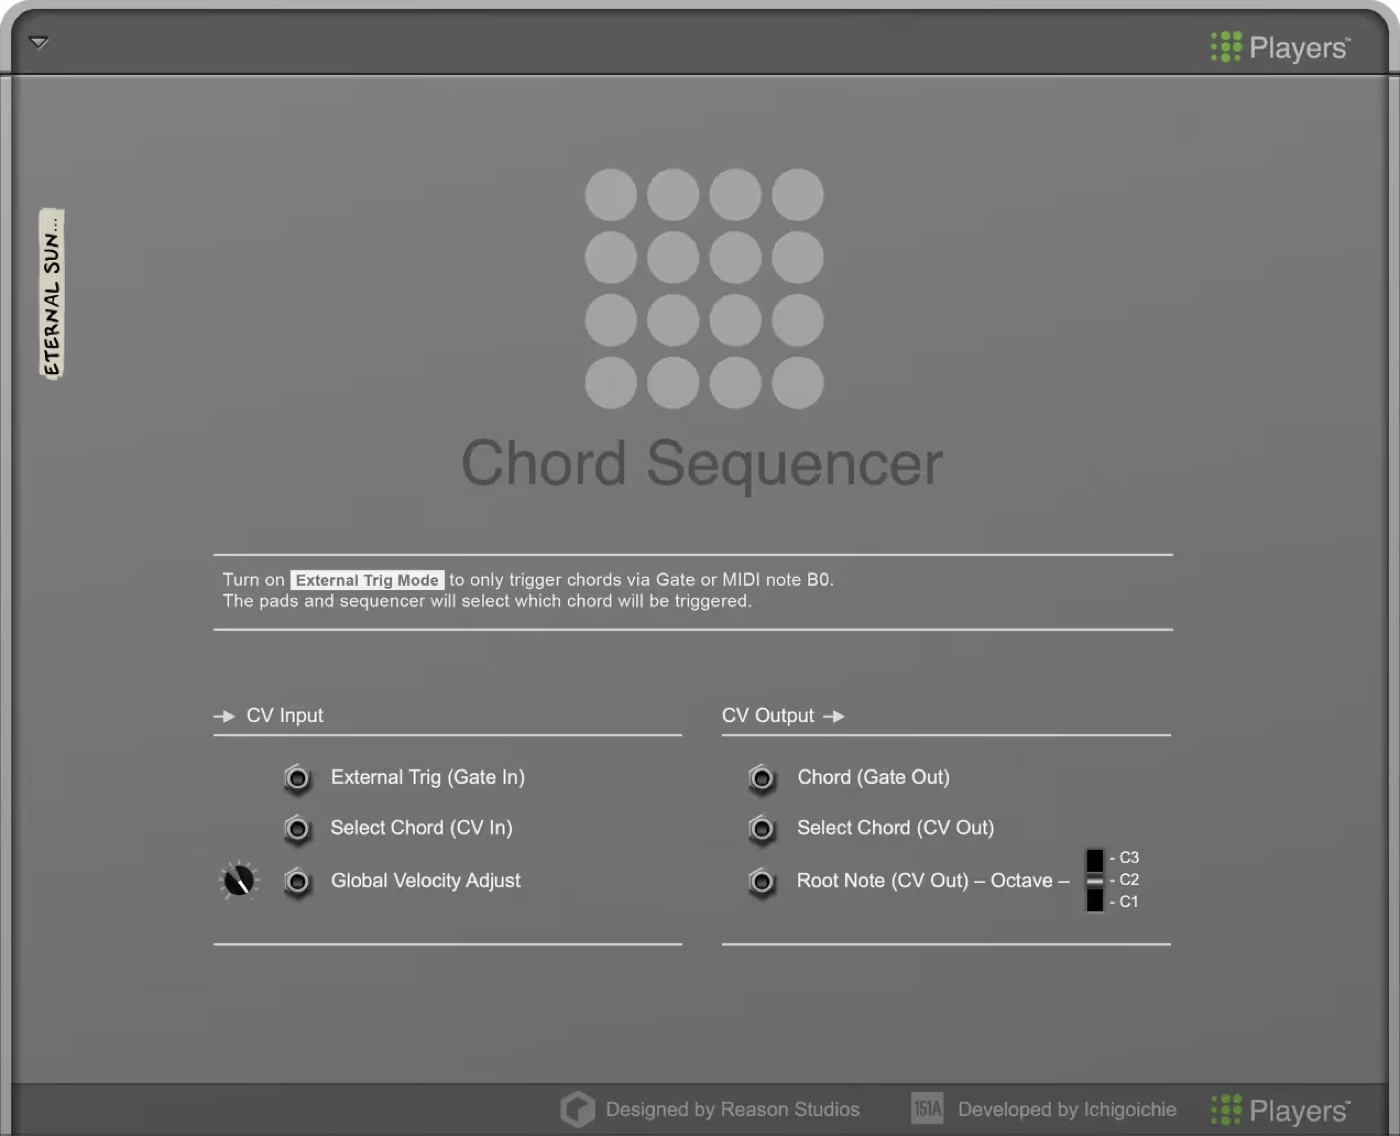
One honest caveat: CV alone won’t finish the job. The pattern carries its own pitch movement, and some notes will fight your chords. Fix them in the note display, where the guideline names each note with its distance from the root, like G2 (+7). Tied notes move as one block since the 1.1 update.
Step 5: Send the Player MIDI to your track
Every Player header carries a Send to Track button. Click it and the generated MIDI lands on the sequencer track as regular notes, ready for the piano roll. Prefer the live feel? Hit record and play the part in, then quantize with Ctrl+A and Ctrl+K.
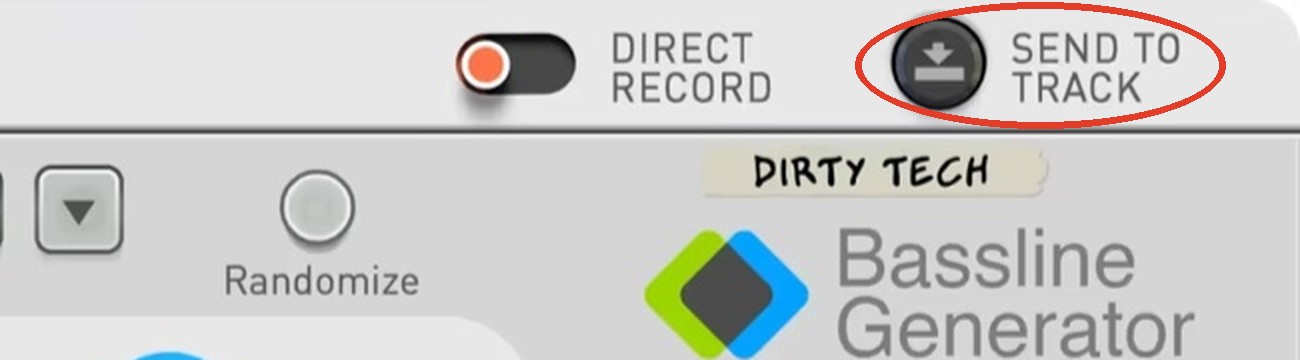
Once the notes sit on the track, Reason 14’s sequencer upgrades take over: velocity handles in the piano roll, looped clips (drag the top corner of any clip), and Track Folders to keep the session tidy.
Watch for: bypassing a Player after recording changes nothing. The notes are already committed, which is the point.
What common Reason 14 Players mistakes trip people up?
Quick fixes for the 5 failures I see most:
- A Player makes no sound. It sits below the instrument. Move it above.
- The Players are missing from the palette. A perpetual license doesn’t include them. Start the Reason+ trial or buy the €74 add-on.
- Arpeggio Lab is silent. Anchor Pattern 0 with Movement off equals silence. Turn Movement on or pick a non-zero pattern.
- The bassline clashes with the chords. Fix Note Range and Minorness first, then patch Root Note CV as shown in Step 4.
- Parts vanish when you start playback mid-song. Turn on Chase Notes during playback under Options, then Playback and Recording.
How do you get the best results out of Reason 14 Players?
Chain all 3 on one idea: Chord Sequencer into Arpeggio Lab over your lead instrument, with Bassline Generator on the bass track following via Root Note CV. One chord change moves the whole arrangement.
Automate one knob per section instead of writing a second part. The Arpeggio Lab Pattern knob, the Movement Density, or a Variator Amount each turn a loop into a song.
Record early. The Players find the idea, the piano roll finishes it. And leave Randomize as a rescue tool, since starting from random skips the part where the suggestions teach you something.
How do FL Studio and Ableton users run Reason 14 Players?
The Reason Rack loads as a VST3, AU, or AAX plugin in any major DAW, on its own subscription (€6.58 a month billed annually) or license (€159 once). Build the same stack inside the plugin: Chord Sequencer over Arpeggio Lab over a synth, driven from your host’s piano roll.
Kirkpatrick works this way, running Reason “in the capacity of a VST insert” inside his sessions for 2 decades. The honest limitation: the Rack carries the full Reason environment, which feels heavy when all you want is one small MIDI device.
FL Studio users can compare the workflow with FL Studio’s chord progression tool, which lives inside the piano roll. For the full pricing picture and how the Players stack up against Scaler 3, Cthulhu, and Ableton’s MIDI Generators, my rule-based music tools roundup has the comparison table.
Frequently asked questions
What is a Player device in Reason 14?
A Player is a device class in the Reason Rack. Players process, filter, and generate MIDI notes in real time and feed them to the instrument below them in the rack. Some Players, like Chord Sequencer and Bassline Generator, can also play back on their own with no MIDI input at all.
Do Reason 14 Players come with a standalone Reason 14 license?
A perpetual Reason 14 license (€239) includes 68 Reason Rack Devices. Chord Sequencer, Arpeggio Lab, and Bassline Generator sit outside it and sell for €74 each. All 3 come included with Reason+ and the Reason Rack plugin subscription, which both carry all 93 devices and a 7-day free trial.
What is the Anchor and Movement system in Arpeggio Lab?
Arpeggio Lab splits your chord into 2 roles. The Anchor plays 1 to 3 chord notes in a sparse, repeating pattern, which gives the arpeggio its pulse. The Movement arpeggiates the remaining chord notes in 1 of 40 shapes, filling the space between Anchor notes. You control each side separately.
What does Minorness do in Reason's Bassline Generator?
Minorness removes major notes from the generated bassline, in 4 steps from Off to 4, so the note pool leans minor and fits darker keys. It sits next to the Note Range knob, which limits how far the bassline moves from the root, from -2 to +2.
Can you use Arpeggio Lab to write a bassline instead of Bassline Generator?
Yes. Put Arpeggio Lab over a bass synth and feed it a single note. The Anchor pattern holds the pulse while Shift Rhythm and the Octave Modifier add syncopation and register jumps. Bassline Generator stays the better pick when you want ready-made OnBeat and OffBeat patterns to browse.
About the author

Covering AI music tools, industry shifts, and news for music creators and professionals. Twice-weekly newsletter at aimusicpreneur.com.
