How to Make an AI Music Video with OneMoreShot AI (Step-by-Step)
To make an AI music video, upload your song, pick or create an AI artist, describe the video and choose a style, review the moodboard, then generate and edit your clips. One More Shot AI (OneMoreShot AI) renders a beat-synced, lip-synced video in minutes.
You have a finished single. It is mixed, maybe AI mastered with RoEx or Landr, and ready to drop. The video is the part that stops you. A real shoot runs $5,000 to $50,000, takes weeks, and needs a crew you do not have.
This guide walks you through how to use OneMoreShot AI to turn a song into a music video, from the upload screen to an exported file. I tested the full workflow on a 4 minute track in June 2026, so the time and token numbers below are what I actually saw, not the marketing claims.
What you need to make a music video with OneMoreShot AI
Here is what to have ready before you start:
- A OneMoreShot AI account. Create one here, the first video is free to plan.
- A finished song as an audio file (MP3, WAV, FLAC, AAC, or OGG), or a link from Suno, Udio, YouTube, or SoundCloud to auto-import.
- Optional reference photos of the singer, 2 work well, and more photos from different angles work better.
- Tokens to render. You can build the whole concept for free, but the actual generation spends tokens.
Why turn your song into a video with OneMoreShot AI?
A traditional music video costs $5,000 to $50,000 and takes 2 to 8 weeks with a director, crew, and editor. OneMoreShot AI does the same job from $0 to a few dollars in tokens, in well under an hour, with you as the only person involved. For a finished single that needs visuals fast, that math is hard to argue with. For the wider field, see my best AI music video generators roundup.
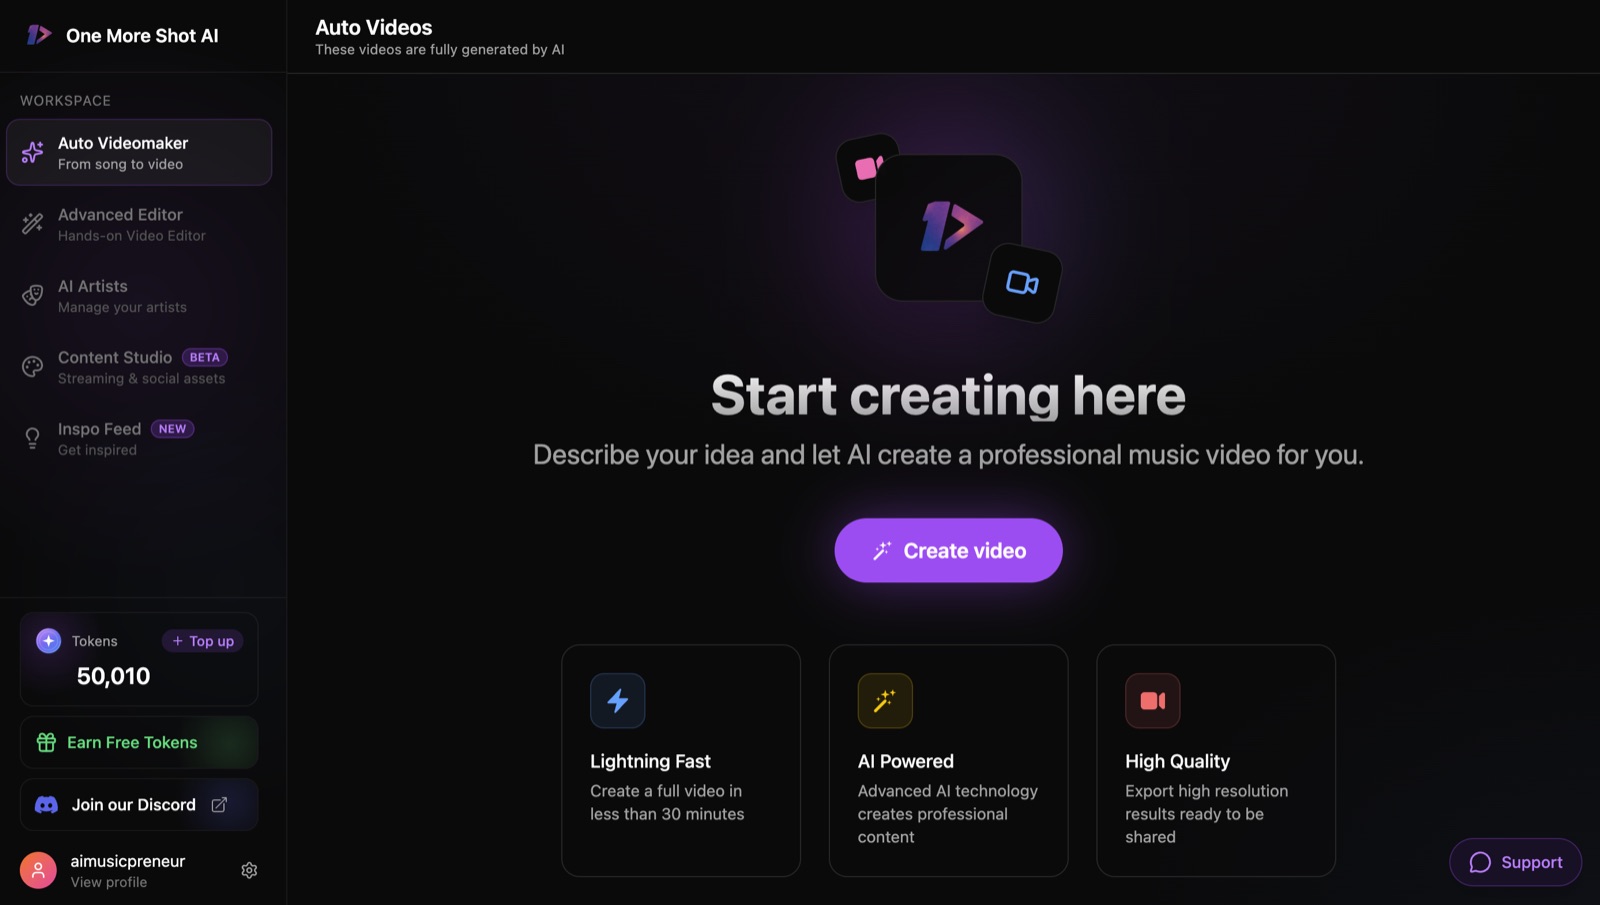
The tool gives you two ways in. The Auto Videomaker is the guided path: five screens, a moodboard, one click to render. The Advanced Editor is the manual path: generate individual frames, animate them into shots, and arrange them on a timeline. More control lives in the Advanced Editor, less in the Auto Videomaker. This guide covers the Auto Videomaker first, since that is how most people will make their first video, then shows the Advanced Editor for when you want to direct every cut.
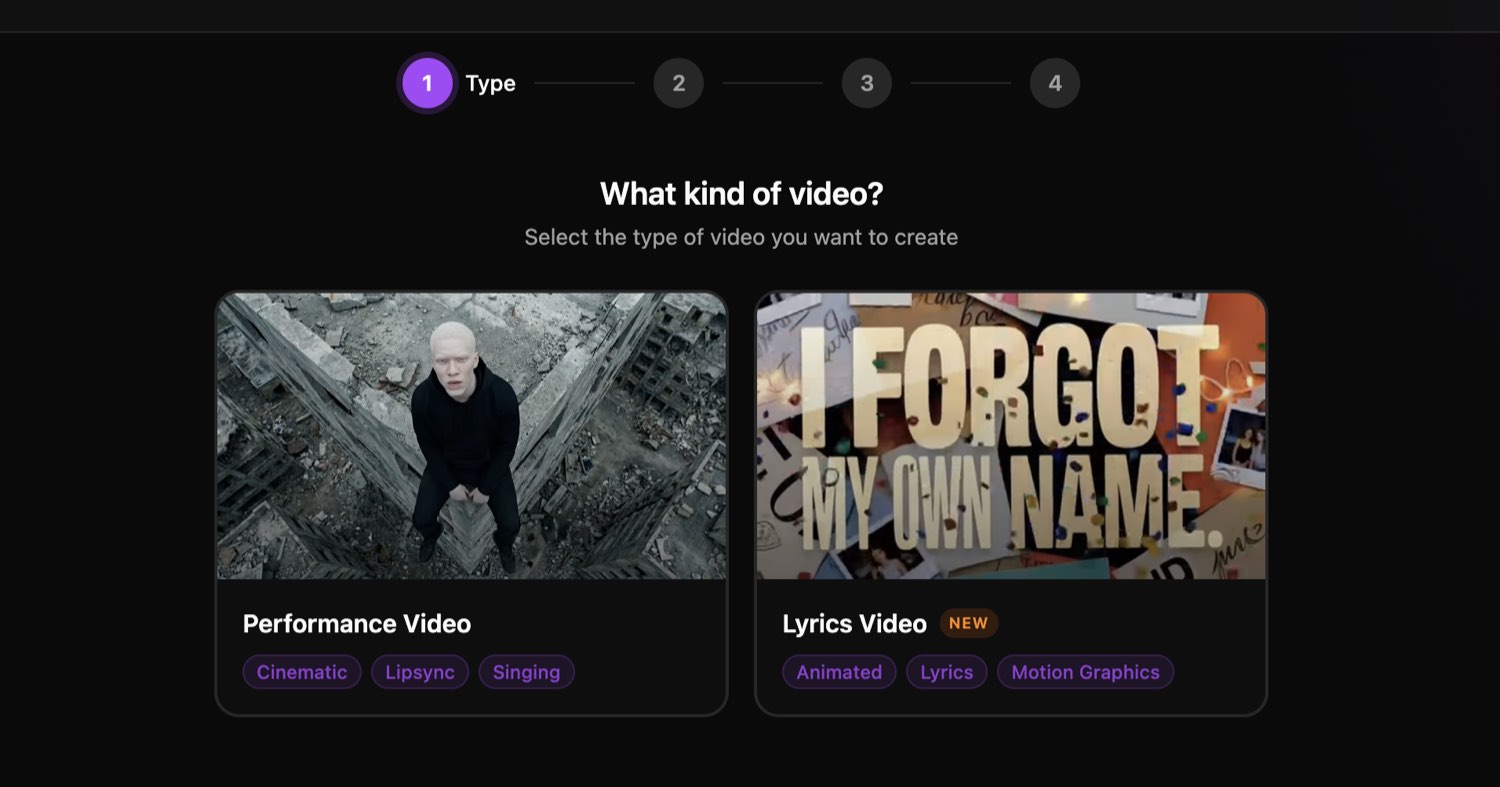
Step 1: Choose your video type in OneMoreShot AI
The first screen asks what kind of video you want. Your choice sets the whole pipeline.
- Performance Video: your AI artist performs the song. Options are Cinematic, Lipsync, and Singing.
- Lyrics Video: your words land on screen in time with the track. Options are Animated, Lyrics, and Motion Graphics.
Pick Performance Video for a singer-led clip with lip-sync. Pick Lyrics Video for an animated music video or a visualizer. If lyrics on screen are the whole point, my AI lyric video generator guide covers that route in more depth.
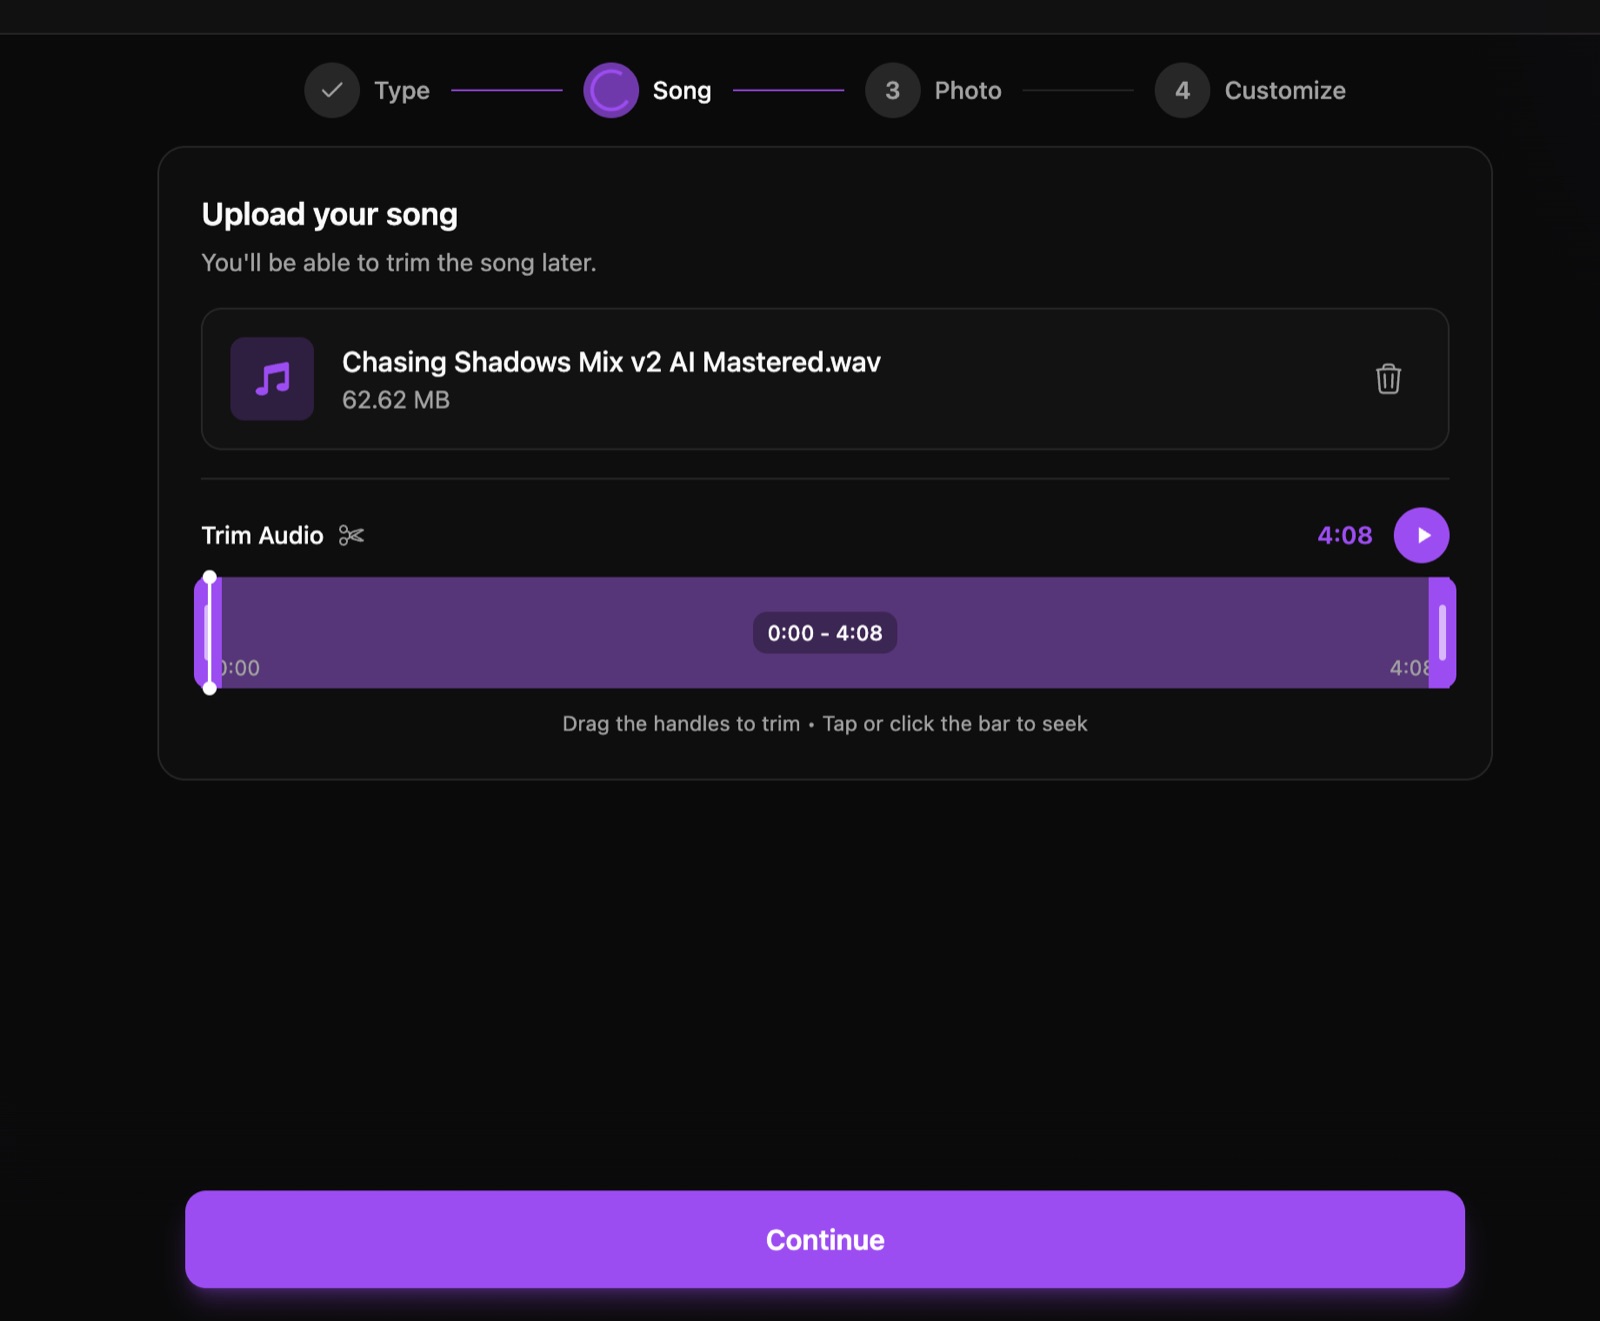
Step 2: Upload and trim your song
Now you add your track. This is where the beat-synced visuals get their timing.
- Drag in an audio file, or paste a Suno, Udio, YouTube, or SoundCloud link to auto-import.
- Use the trim handles to set the start and end of the section you want.
- Keep it short for a teaser, or load the full song for a complete music video.
A shorter clip costs fewer tokens and renders faster, so trim hard if you only need a social cut. The track I used was a 4:08 WAV at 62 MB, imported straight from the file.
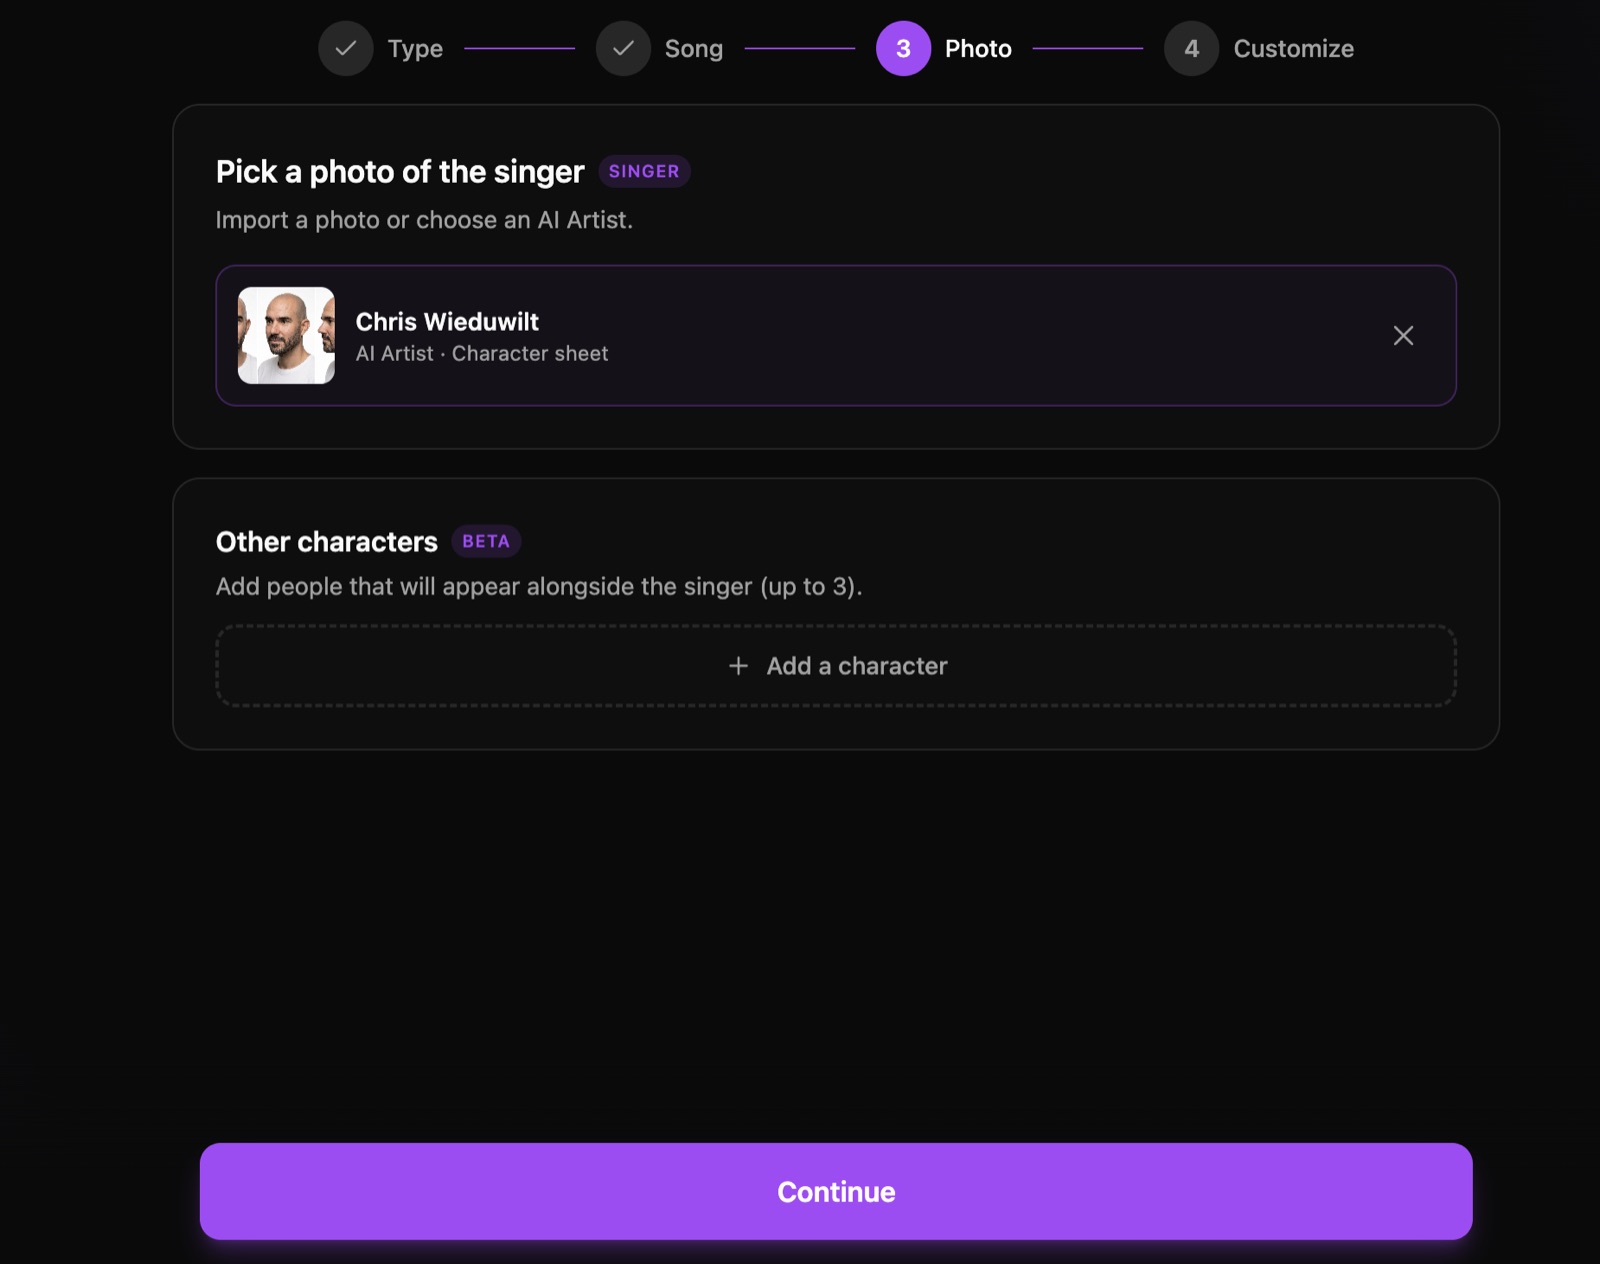
Step 3: Pick or create your AI artist
This is the singer. OneMoreShot AI keeps one face consistent across the whole video, which is the part most AI video tools get wrong.
- Pick an existing AI Artist from your library, or import a photo of the singer for this video.
- Add up to 3 other characters alongside the singer (beta) if the scene needs them.
To build a reusable virtual performer, open AI Artists and create one:
- Name the artist.
- Upload up to 10 reference photos. More angles improve the character sheet.
- Pick Realistic or Illustrated, and add an optional bio.
- Click Generate Preview (35 tokens) to get a multi-angle character sheet.
- Refine it with a prompt if needed (35 tokens), then Save.
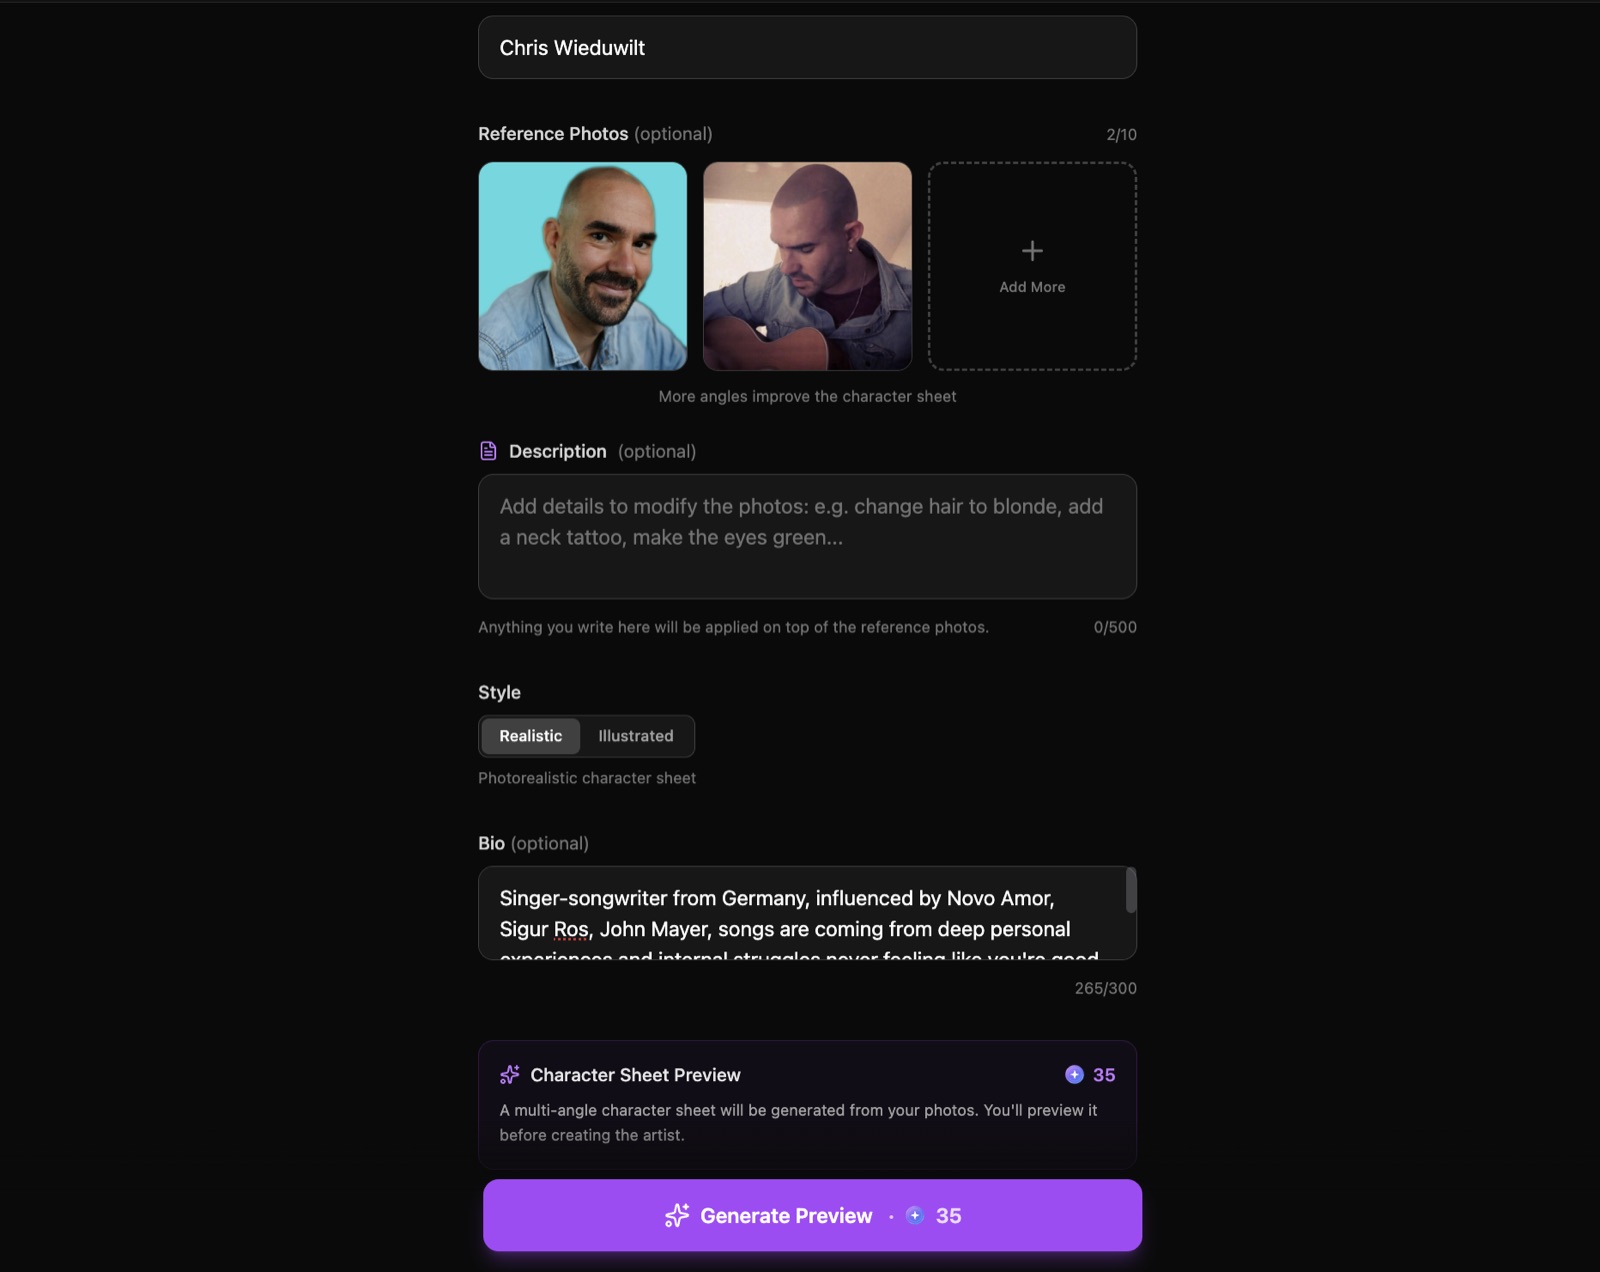
The character sheet (front, three-quarter, and profile) becomes the reference for every video that artist appears in, so your visual identity stays the same release to release. One note from my test: I trained mine on 2 photos and the likeness on the moodboard came back close to 100%. But if you want the finished video to nail your likeness too, upload images of yourself from different angles so the AI better understands your face and facial features.
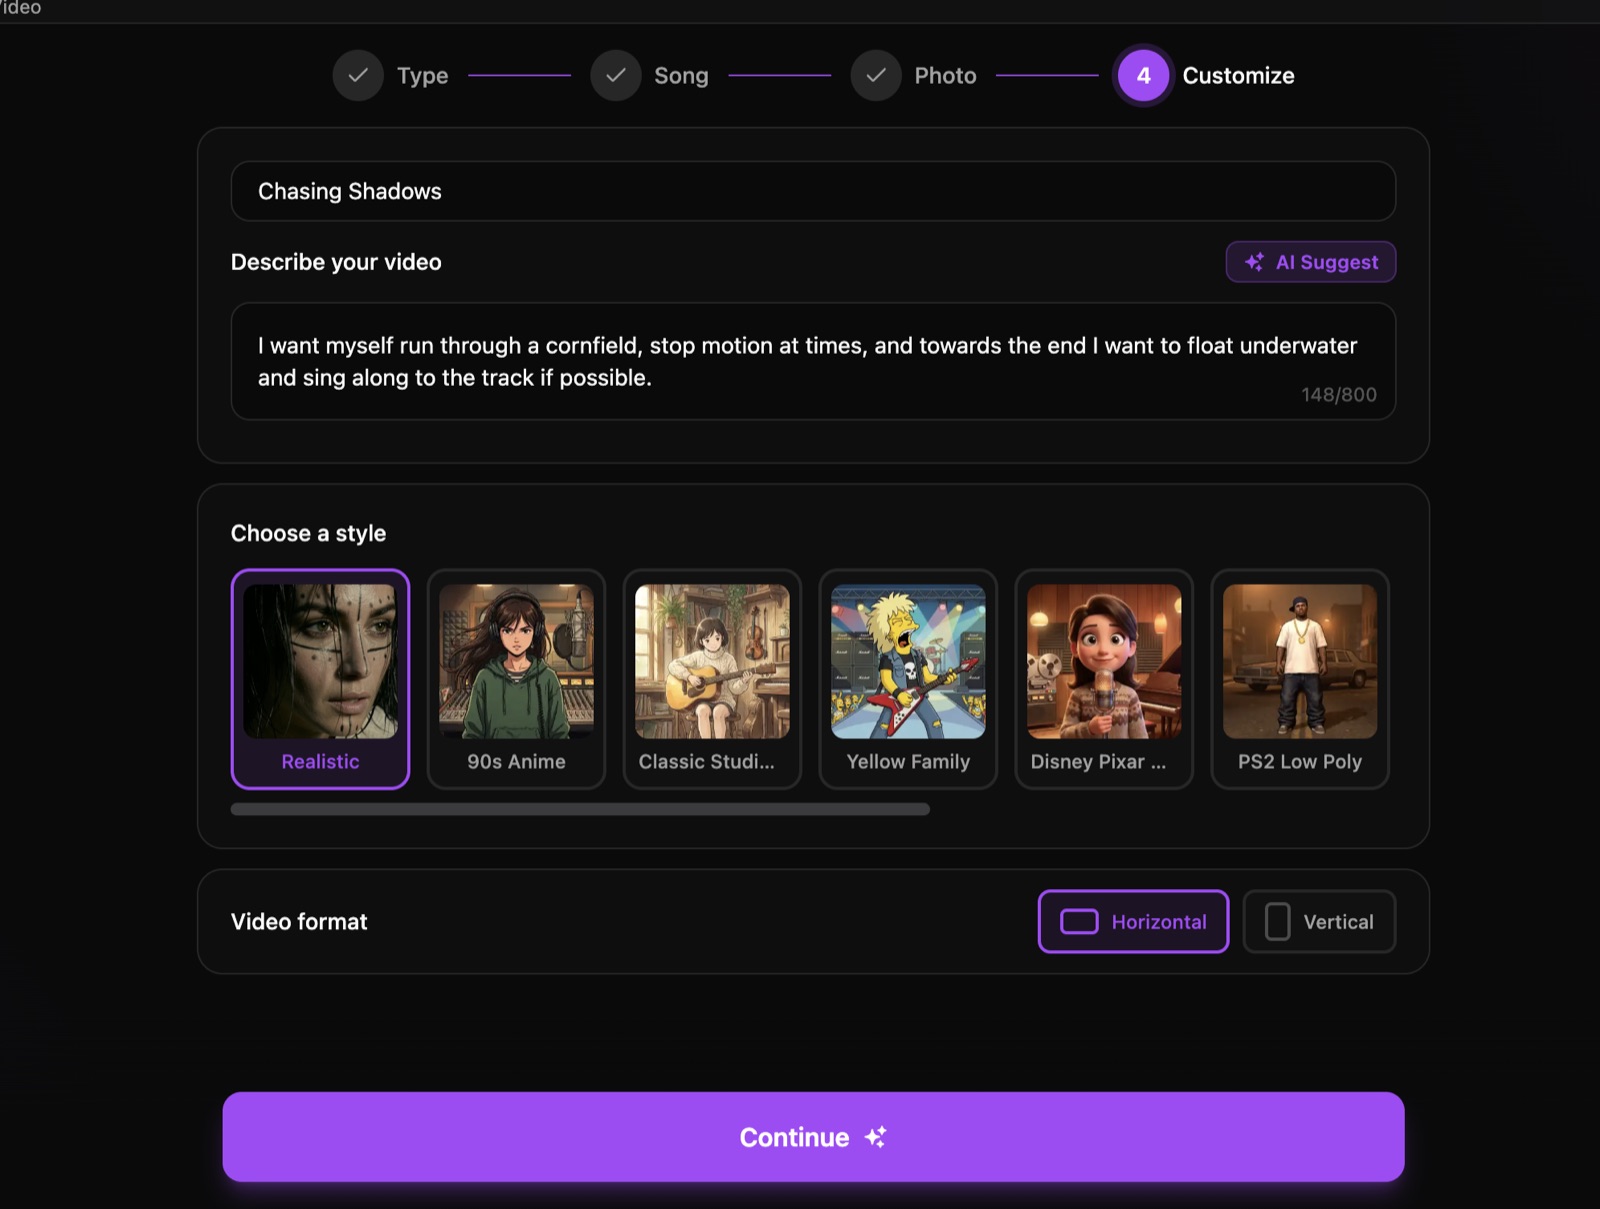
Step 4: Customize your video
Here you tell OneMoreShot AI what the video should be.
- Give the video a title.
- In “Describe your video,” write the scenes in plain language. Mine read: run through a cornfield, stop-motion at times, then float underwater and sing along toward the end. Tap AI Suggest if you want help.
- Choose a style from the carousel: Realistic, 90s Anime, Classic Studio, Yellow Family, Disney Pixar, or PS2 Low Poly.
- Set the video format: Horizontal for YouTube, Vertical for TikTok, Reels, and Shorts.
Keep the scene description to one clear theme. Pile on too many specific instructions and the model picks the closest match instead of following all of them. Then click Continue.
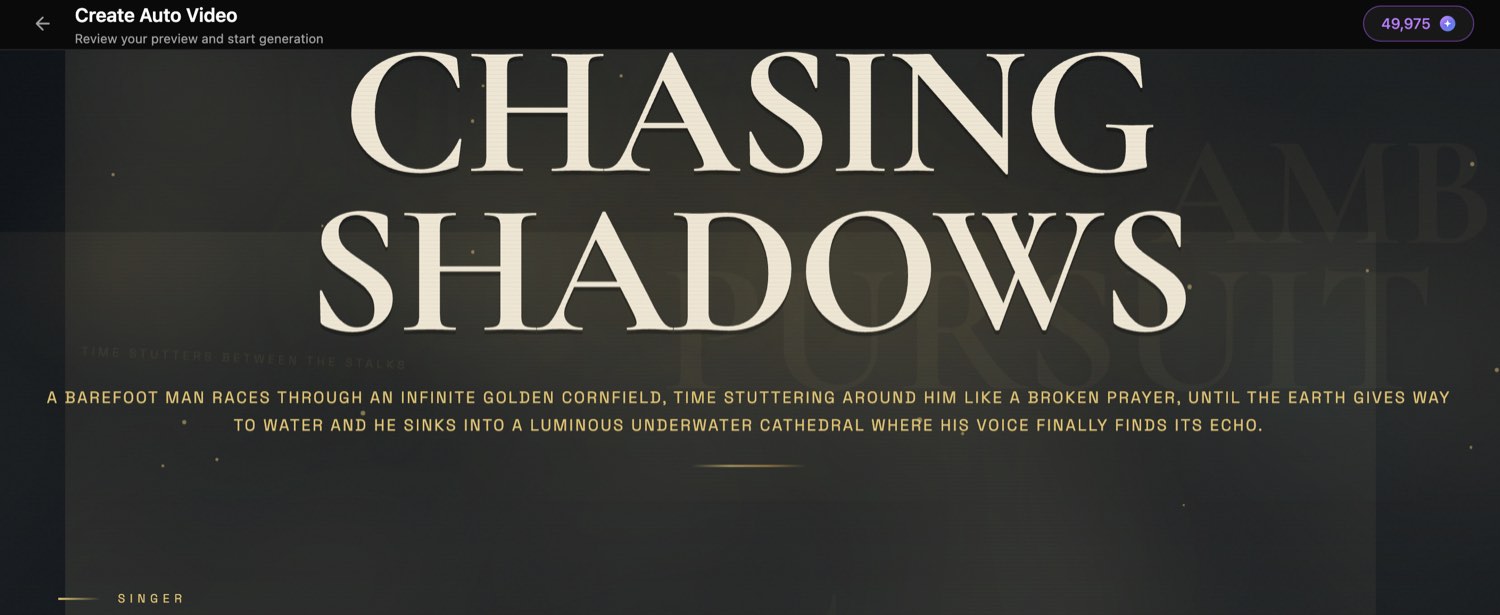
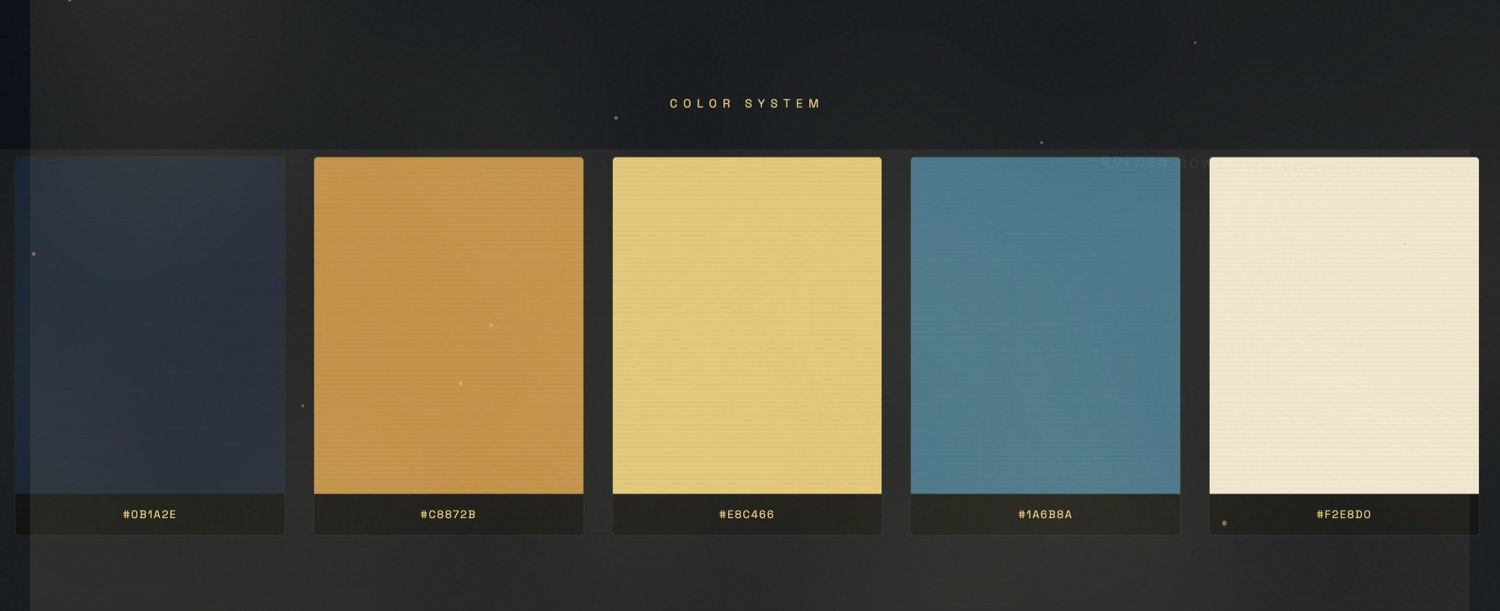
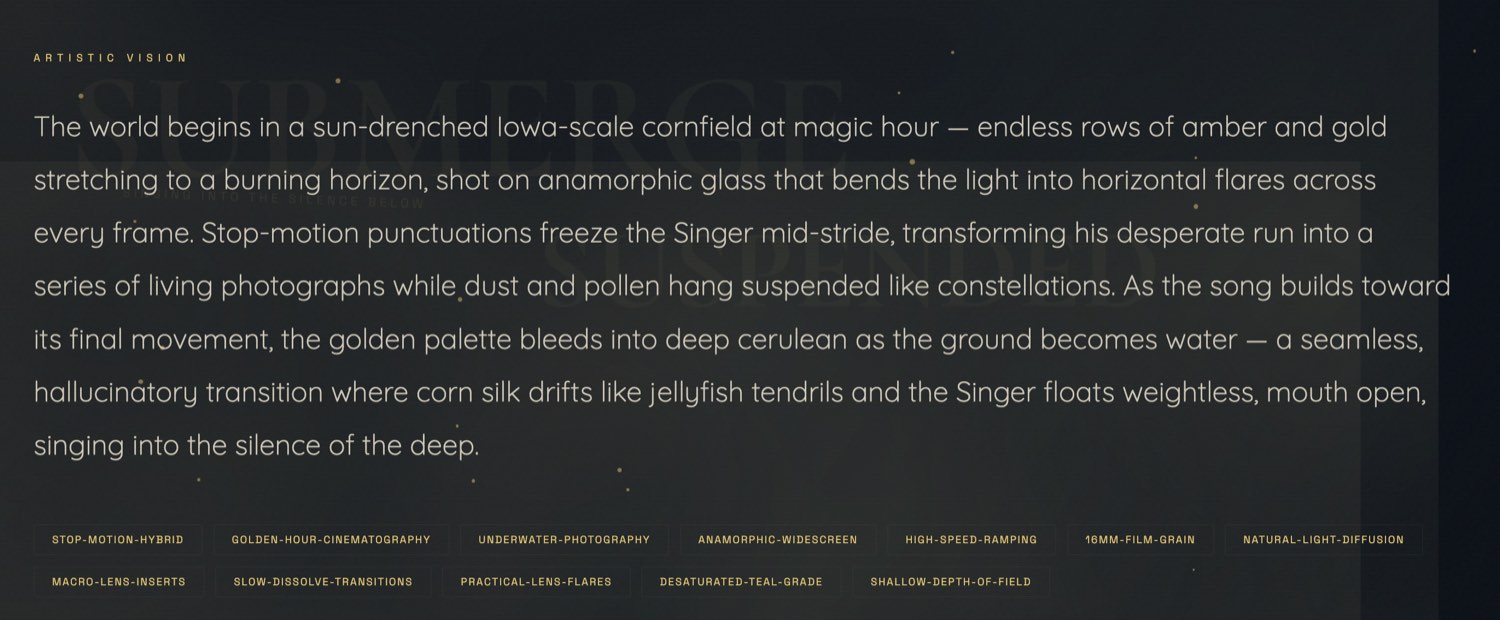
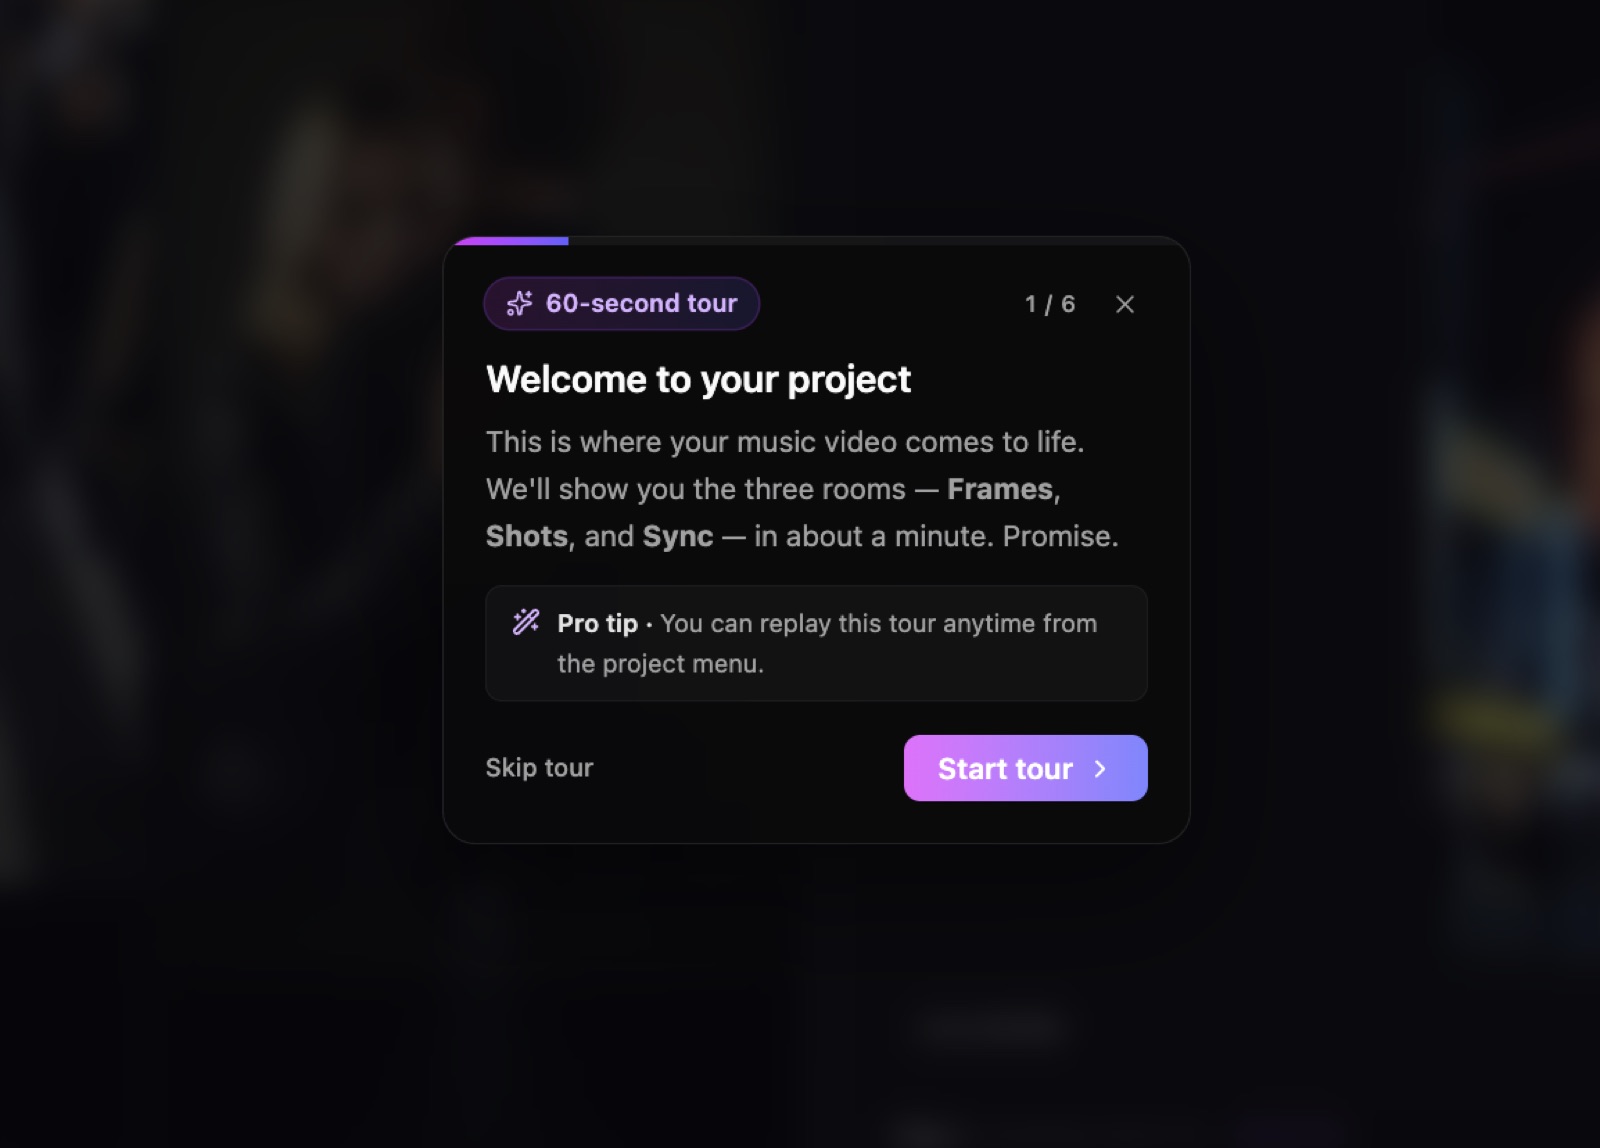
Step 5: Review the moodboard, then generate
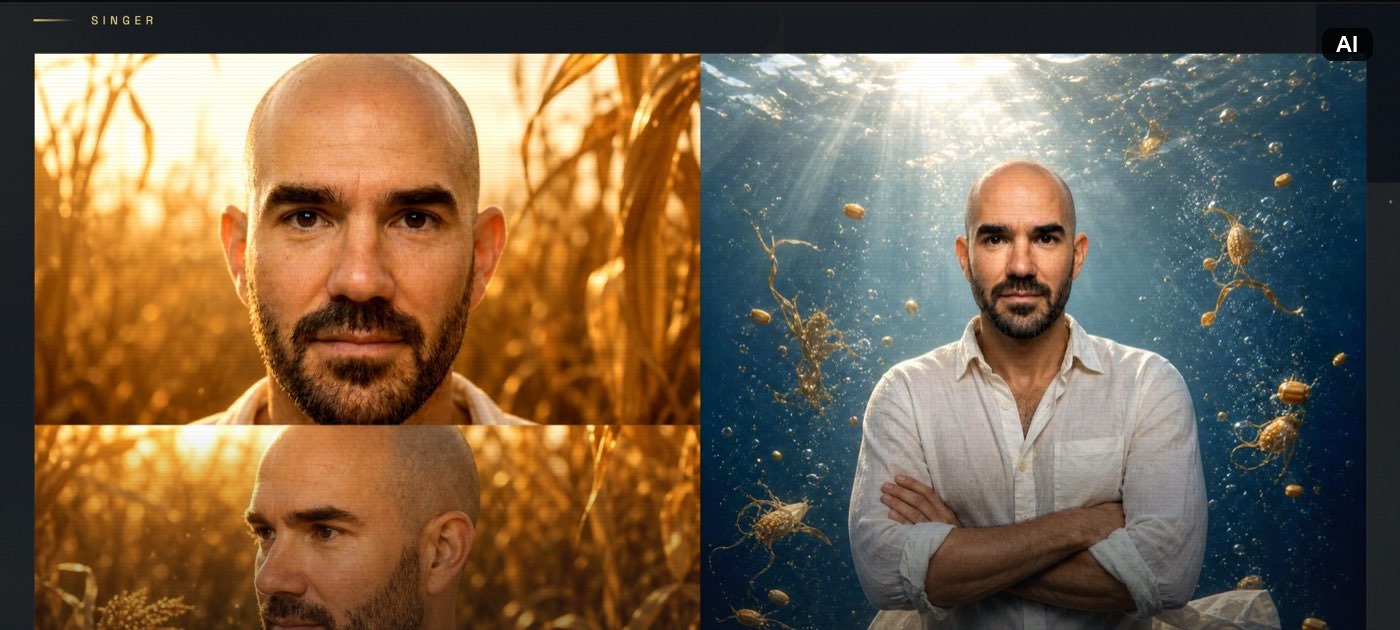
This screen is the best part of OneMoreShot AI. Before any render tokens are spent, it expands your rough Step 4 prompt into a full music-video concept you can read and approve.
From my “Chasing Shadows” session it produced a concept title and a one-line logline, an Artistic Vision paragraph describing the story arc and look, a Color System of five swatches with hex codes, character stills of my AI artist rendered into the concept, a tagline pull-quote, and a row of cinematography style tags.
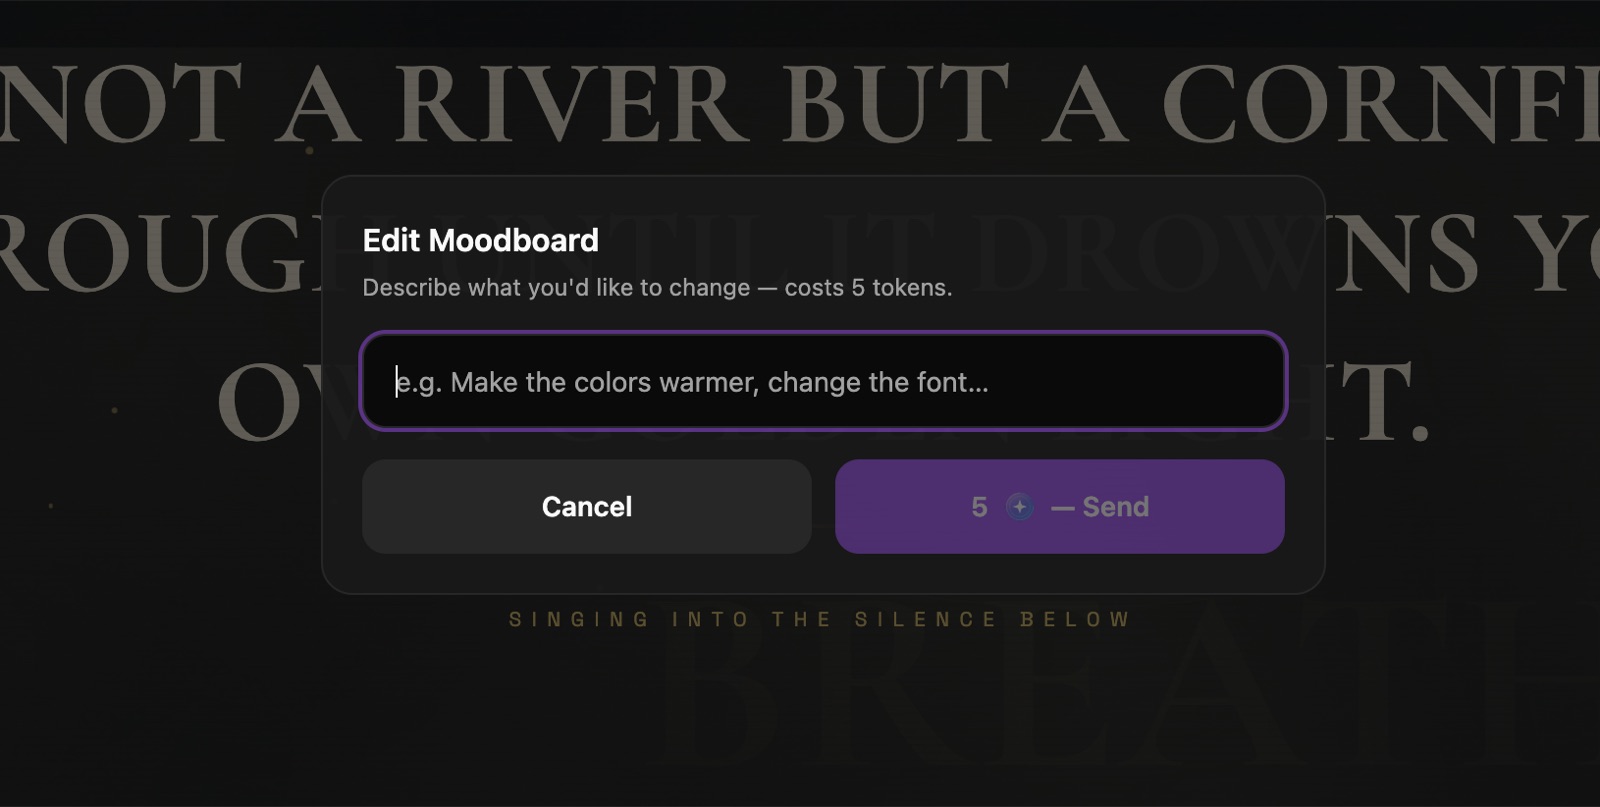
If something is off, click Edit Moodboard and describe the change (warmer colors, a different font) for 5 tokens. This is your lock-in checkpoint, so use it. Once you are happy, start the full generation.
Set your expectations on time and cost here. The on-screen countdown can read about 60 minutes, but my full 3 to 4 minute video actually arrived in 20 to 30 minutes. It burned roughly 8,000 tokens for the concept I asked for, which works out to about $80 in real money (the range runs $64 to $112 depending on which token pack you buy). A simpler concept or a shorter clip costs less. For the full pricing breakdown, see my OneMoreShot AI review.
Step 6: Edit and export your finished video
The generated video does not lock you in. It imports into a full editable project (“Quick Gen Project”) that opens in the same three-room editor, so the first render is a starting point, not the final word.
- Step through every clip on the Sync timeline. Mine had 38 shots across 4:08.
- Toggle Lipsync per clip. It is applied to the vocal on export.
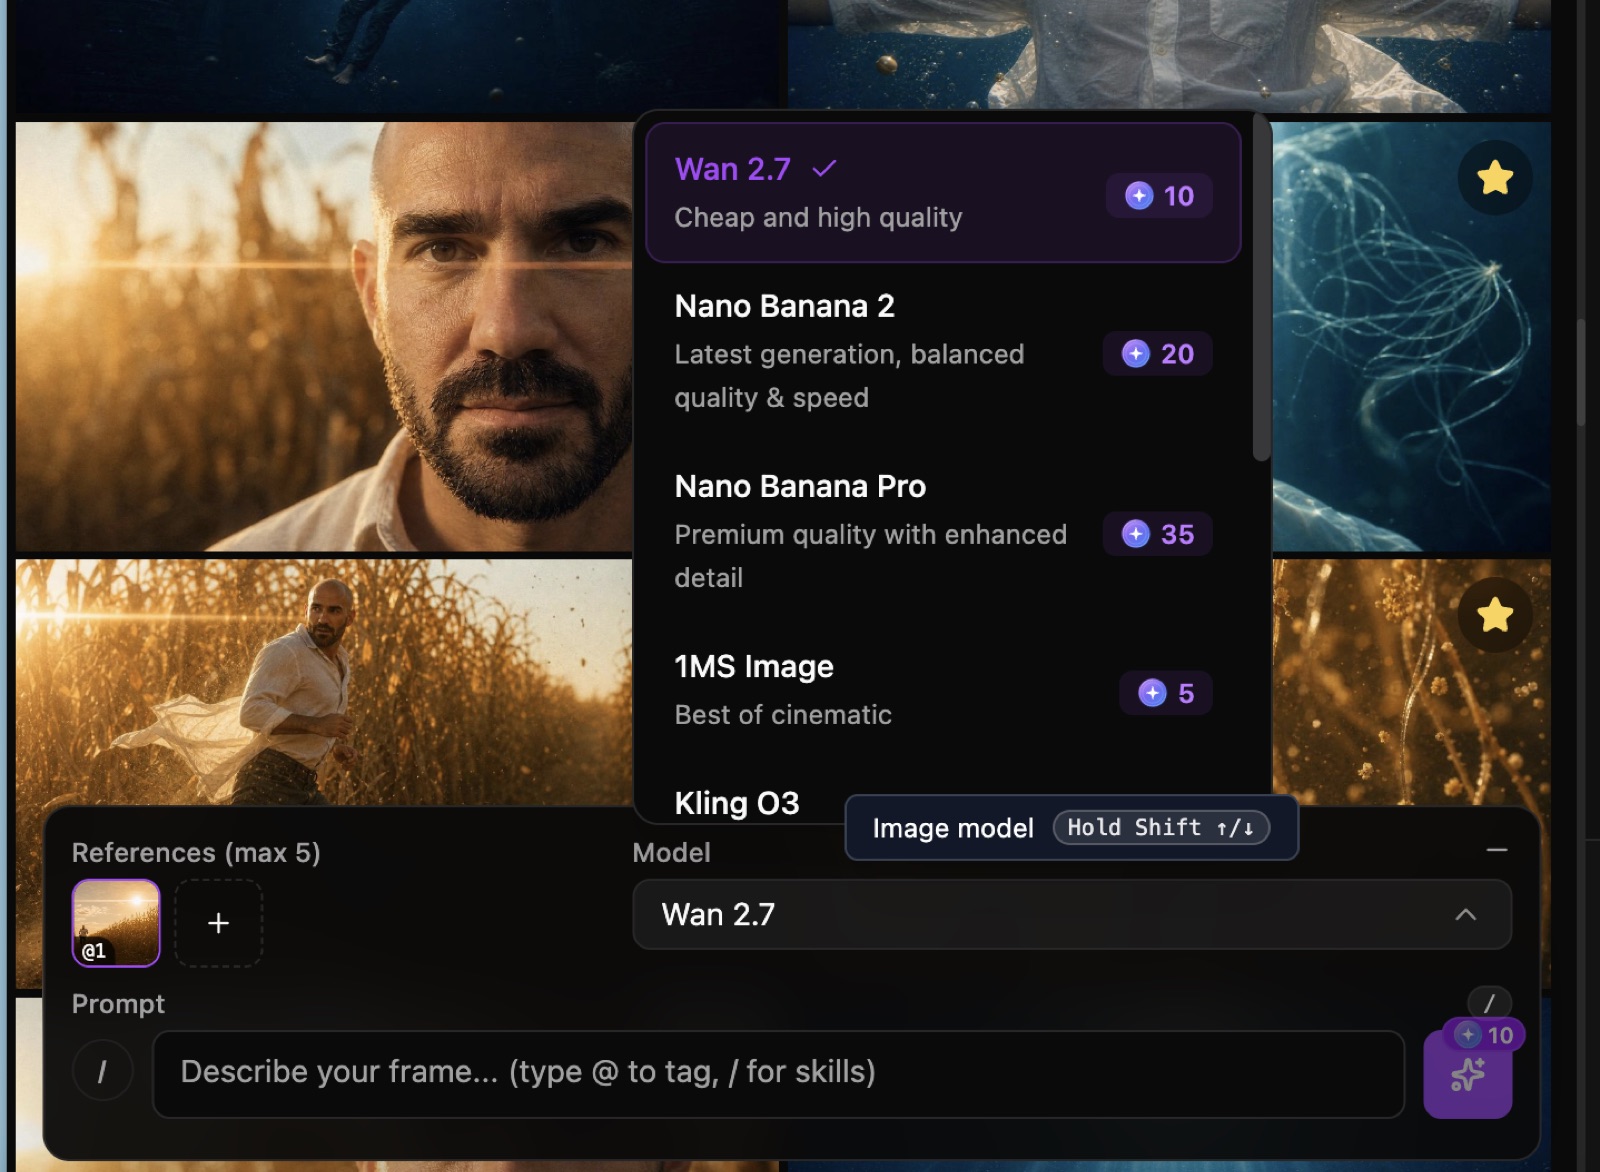
- Regenerate any frame or shot with the image and video model pickers if a scene missed.
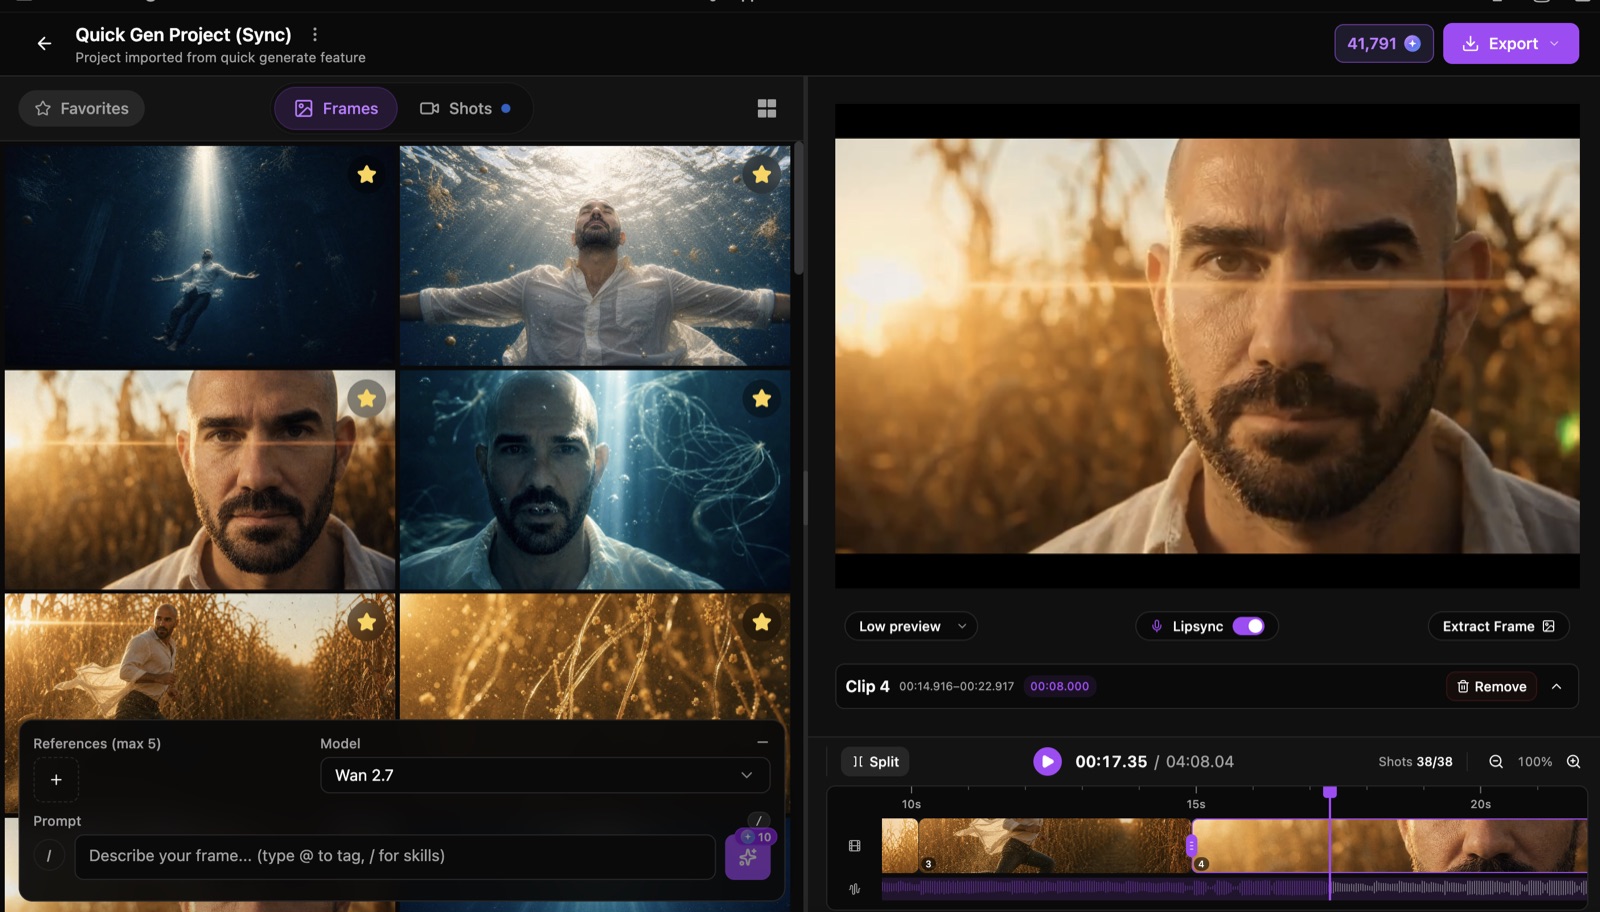
To fix a scene without losing the look, select an existing clip or frame and use it as a reference image (tag it @1, up to 5 references) to generate a new variation that matches. Each regeneration costs more tokens, so spend them on the shots that matter.
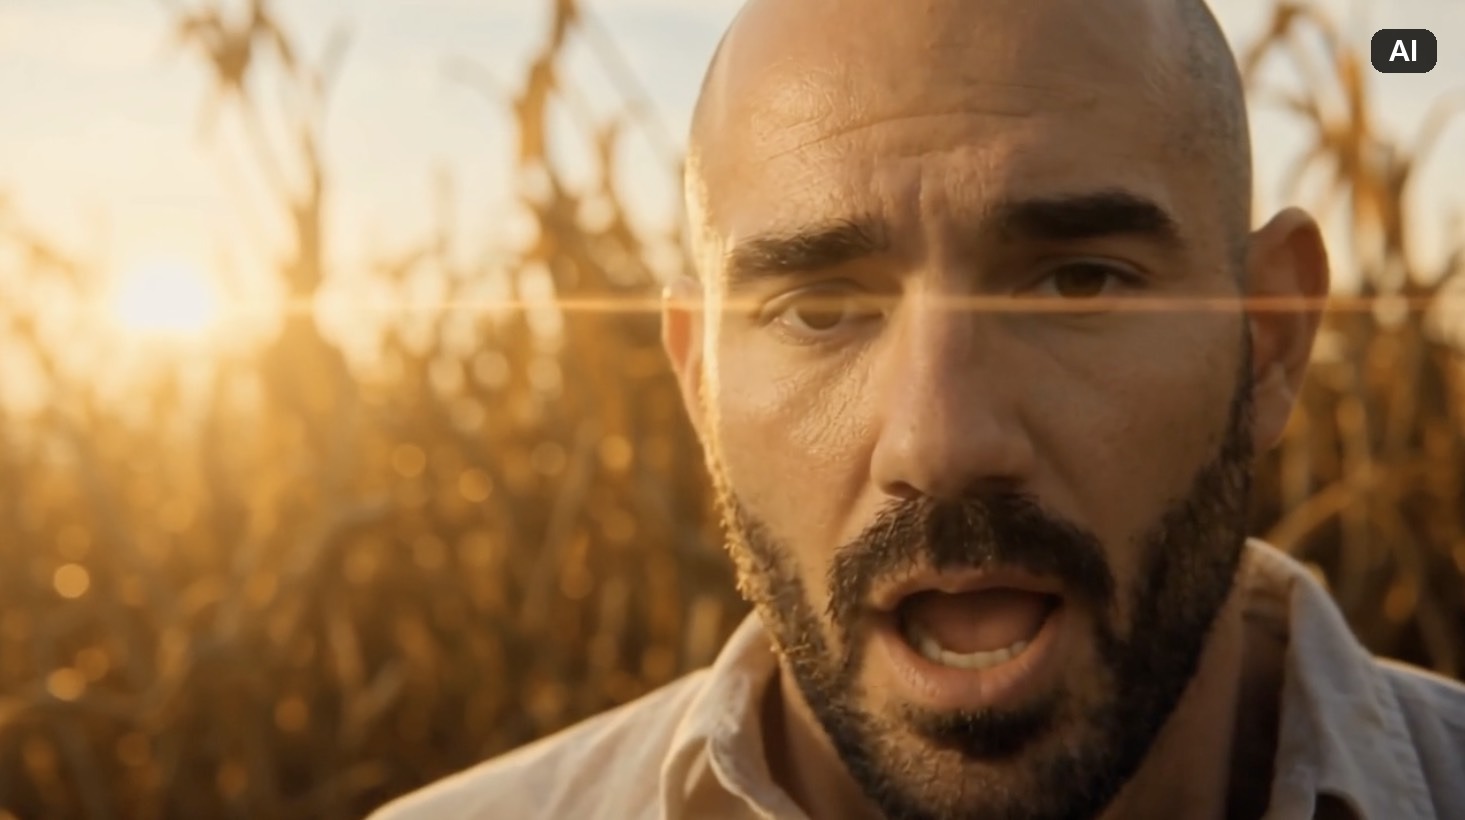
When the cut is right, hit Export to stitch and download the final video, up to 4K in your chosen aspect ratio. My result matched the brief: cornfield-running scenes that gave way to underwater scenes, with mostly accurate lip-sync and a few surface quirks. A true one shot, which fits the name.
Prefer full control? Build a video from scratch in the Advanced Editor
If you want to direct every cut instead of letting Auto drive, skip the Auto Videomaker and open a blank project in the same Frames, Shots, and Sync editor.
The flow runs in three rooms:
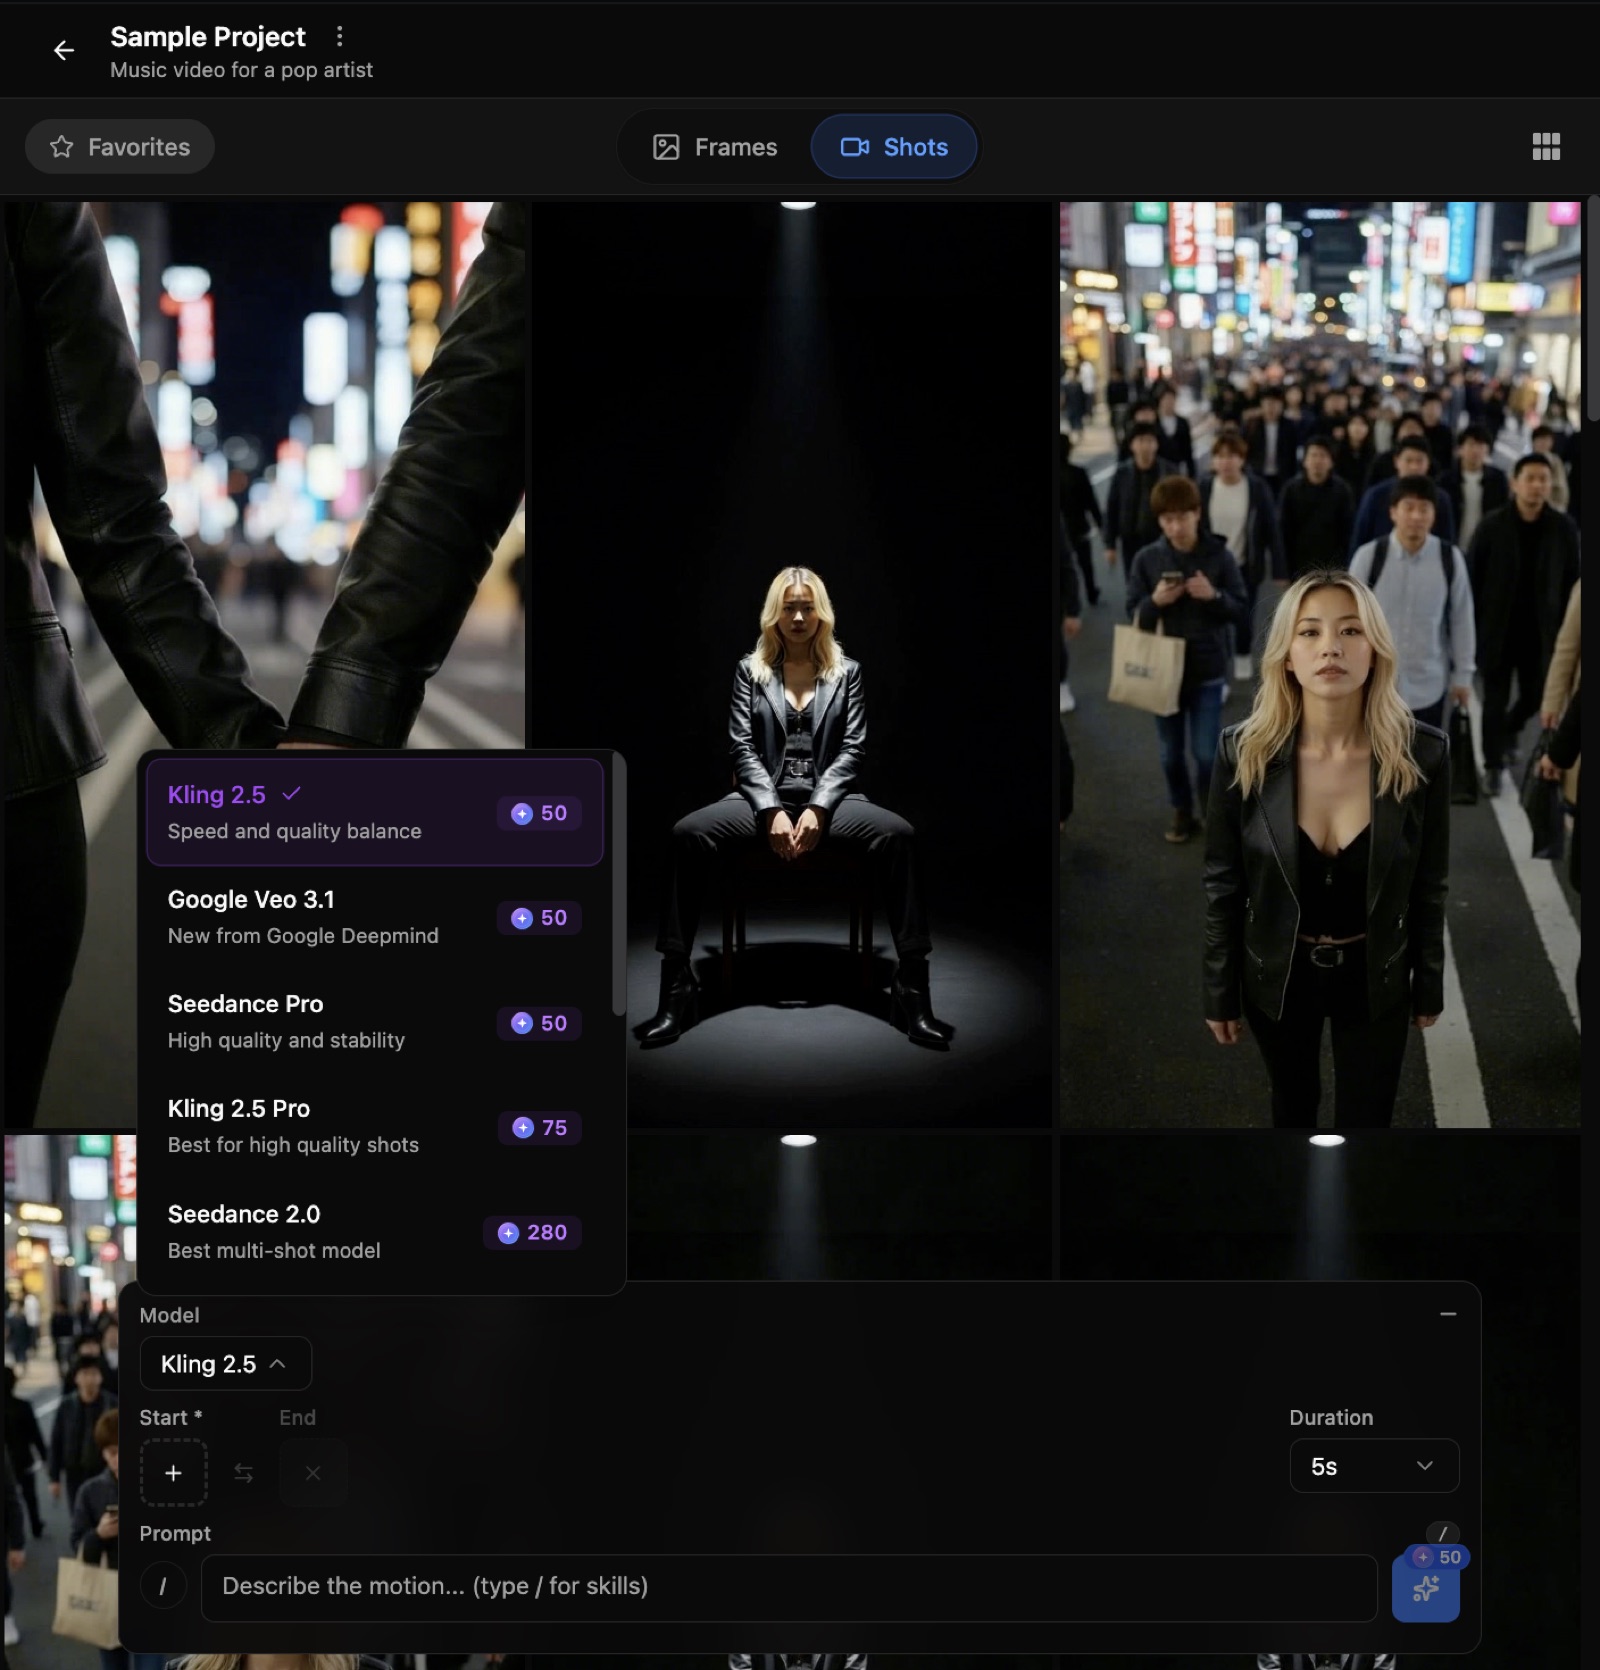
- Frames: write prompts to generate still images that define the look. Tag your @artist or an outfit, hit / for skills, or drop your own photos as references (up to 5).
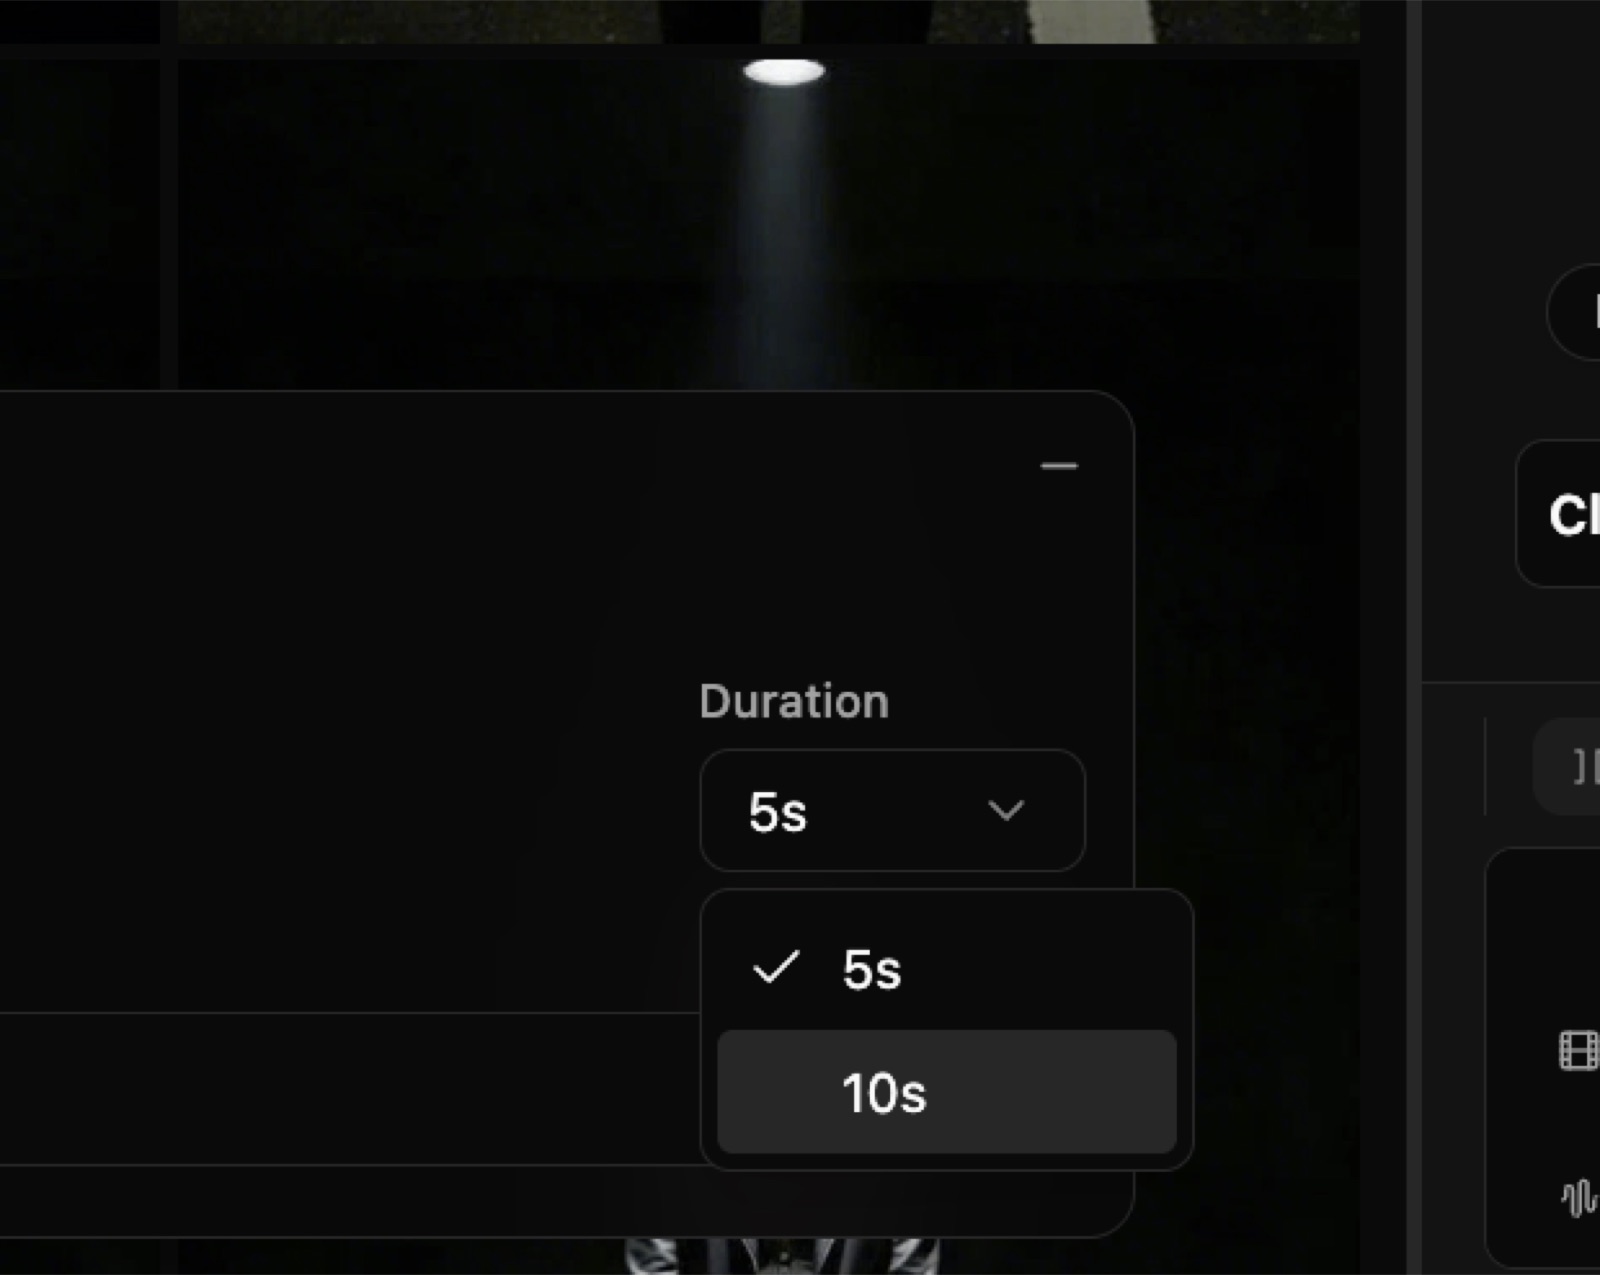
- Shots: animate the frames you favourite into clips. Pick the video model and a 5 or 10 second duration. Some models are audio-reactive and move to the beat once your song is imported.
- Sync: drop your shots on the timeline, snap them to the downbeats, and watch the lyrics scroll alongside.
This is also where the model choice lives. The Shots room lets you pick Kling 2.5 (50 tokens), Google Veo 3.1 (50), Seedance Pro (50), Kling 2.5 Pro (75), or Seedance 2.0 (280, the strongest for multi-shot and lip-sync). The Auto Videomaker does not expose this, so the Advanced Editor is the only place you control which engine renders a shot.
Hotkeys speed this up: 1 and 2 switch tabs, F favourites a frame, S splits a clip, M merges, [ and ] resize the grid, and Cmd+Z undoes. Use this mode for the official video with your name on it, and Auto for fast social cuts.
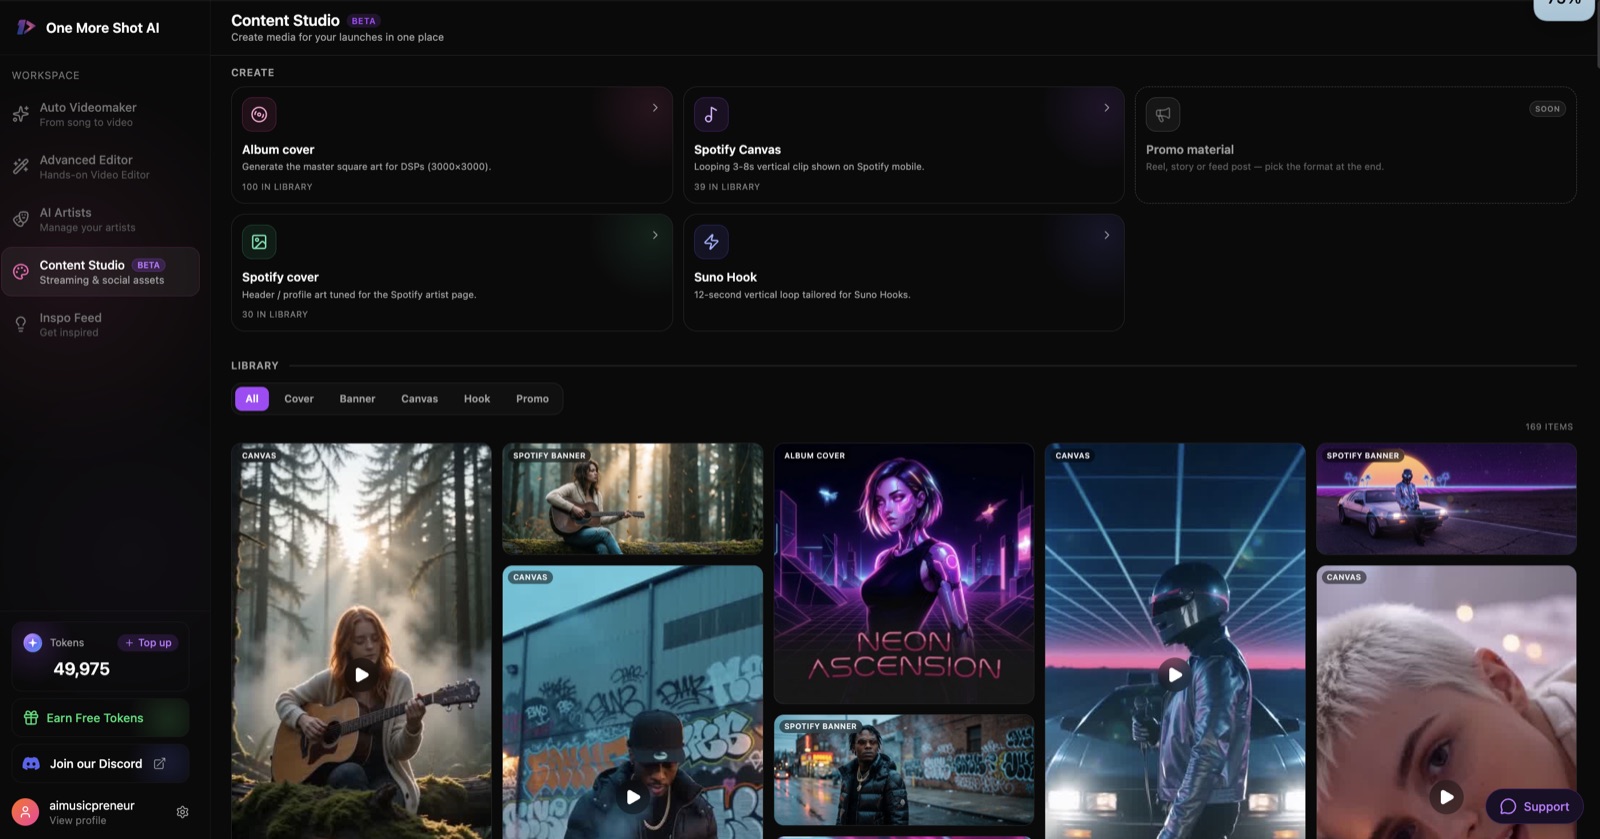
What else can OneMoreShot AI make for a release? (Content Studio)
The same artist feeds a small content suite, so one video is not the only thing you get. Content Studio (beta) creates:
- Album cover at 3000x3000 for DSPs.
- Spotify Canvas, a looping 3 to 8 second vertical clip.
- Spotify cover and profile art.
- Suno Hook, a 12 second vertical loop for Suno.
- Promo material for reels and stories (marked coming soon).
For an independent musician planning a single launch, that covers the visual rollout from one place: the music video, the cover art animation, and the Canvas loop all share the same look.
What common OneMoreShot AI mistakes trip people up, and how do you fix them?
A few things catch people on the first video. Here is how to avoid each:
- Reading the countdown as the real wait: it shows about 60 minutes, but a full video lands in 20 to 30. Walk away and come back.
- Spending tokens before you plan: there is no low-quality preview before the first render, so lock the concept on the moodboard first. Failed generations do not refund tokens.
- Overloading the scene prompt: too many specific instructions and the model picks the closest match. Keep it to one clear theme.
- Weak lip-sync: it softens on rapid lyric delivery. Choose stable face framing and less extreme camera motion for the singing shots.
- Relying on a couple of photos for the video: 2 photos nailed the likeness on the moodboard, but the finished video needs more angles to match your face. Upload images from different angles to push it higher.
How do you get the best results out of OneMoreShot AI?
Small habits make a real difference:
- Match the style to the song’s energy before you write the scene.
- Write short, single-theme scene prompts, not a shot list.
- Pick consistent face framing for the lip-sync moments.
- Budget tokens by planning around short clips, and save Seedance 2.0 for the hero shot only.
- Trim the song to the section you actually need before you generate.
Is OneMoreShot AI worth it for independent musicians?
Yes, for the job it is built for: turning a finished song into a real, beat-synced, lip-synced music video without a crew or an editing skill set. The moodboard review is the standout, the easiest way I have found to see a concept before spending on it. The trade-offs are no model choice in the Auto Videomaker and no per-scene preview before the first render, so you commit tokens up front.
If your priority is steering each scene, weigh it against the field in my best AI music video generators roundup. For the full verdict, pricing, and the buyer questions, read my OneMoreShot AI review. To start now, open OneMoreShot AI and build your first concept free, then generate when it looks right.
Frequently asked questions
How do I make an AI music video with OneMoreShot AI?
Upload your song, choose Performance or Lyrics video, pick or create an AI artist, describe the video and pick a style, then review the moodboard and generate. OneMoreShot AI renders a beat-synced, lip-synced video in one pass, which you can then edit clip by clip and export for YouTube, TikTok, or Spotify.
How do I upload my song to OneMoreShot AI?
On the song step, drag in an audio file (MP3, WAV, FLAC, AAC, or OGG) or paste a link from Suno, Udio, YouTube, or SoundCloud and it imports automatically. Then use the trim handles to set the start and end of the section you want as the video.
How do I create an AI artist in OneMoreShot AI?
Open AI Artists, give the artist a name, and upload up to 10 reference photos (more angles improve the result). Pick Realistic or Illustrated, add an optional bio, then Generate Preview to get a multi-angle character sheet you reuse across every video for that artist.
How do I add lyrics on screen with OneMoreShot AI?
Choose the Lyrics Video type at the first step instead of Performance Video. It gives you Animated, Lyrics, and Motion Graphics styles that put your words on screen in time with the track, which suits visualizers and lyric videos.
How do I make a lip sync music video in OneMoreShot AI?
Pick the Performance Video type with the Lipsync option and choose an AI artist as the singer. Lip-sync is applied to your vocal on export, and it reads most cleanly when you keep stable face framing and avoid extreme camera motion.
How do I choose the aspect ratio for TikTok or YouTube in OneMoreShot AI?
At the customize step, set the video format to Horizontal for YouTube (16:9) or Vertical for TikTok, Reels, and Shorts (9:16). Content Studio also exports a short vertical Spotify Canvas loop from the same source.
How do I export the final video from OneMoreShot AI?
Open the generated project, step through the clips on the Sync timeline, then hit Export to stitch and download the final cut. You can export up to 4K in the aspect ratio you chose.
How do I make teaser clips for socials with OneMoreShot AI?
Export a vertical cut for Reels and Shorts, or trim a single strong section before you generate so the video is short and social-ready. Content Studio also makes a 12 second Suno Hook loop and a Spotify Canvas clip for teasers.
How long does OneMoreShot AI take to generate a music video?
Short single clips render in a few minutes. A full concept-driven video takes longer: my 4 minute song showed a 60 minute countdown but actually finished in 20 to 30 minutes. Plan tightly on the moodboard first, since editing afterwards costs more tokens.
What AI video models does OneMoreShot AI use?
In the Advanced Editor you pick the video model per shot: Kling 2.5, Google Veo 3.1, Seedance Pro, Kling 2.5 Pro, or Seedance 2.0. The Auto Videomaker decides the model for you and does not show which one it used.
About the author
Covering AI music tools, industry shifts, and news for music creators and professionals. Twice-weekly newsletter at aimusicpreneur.com.