How to use LANDR Layers as your AI instrumental generator (Step-By-Step)
LANDR Layers is an AI instrumental generator that adds instrument parts to your song. Here's how to set it up and export stems to your DAW.
You have a half-finished song. The drums are tight, the vocal hook is there, and you can hear the missing guitar part in your head. You can’t play it. Every loop pack you open sounds wrong against your track. Hiring a session player costs more than the song will ever earn back.
LANDR Layers is an AI instrumental generator that solves this. It listens to your track and generates new instrument parts, layers, and samples that lock to your tempo, key, and feel.
This guide walks you through every step of using Layers as an AI instrumental maker, from upload to DAW export. You will leave with a clear workflow for adding AI-generated instrumentals to a track you are already working on, plus answers to the questions most producers ask before they sign up.
Prerequisites
- A track to layer over (WAV, AIFF, MP3, or similar, max 150MB)
- Your track’s BPM and time signature, with audio lined up to the grid
- A LANDR account (sign up at https://www.landr.com/pricing/studio)
- A DAW for the final export (Ableton, Logic, FL Studio, Pro Tools, Reason, or any DAW that accepts dragged audio)
- About 20 minutes for your first project
- Skill level: anyone who has used a DAW before will feel at home
LANDR Layers runs in the browser. No install. The interface borrows DAW conventions, so the learning curve is mostly about the AI controls, not the timeline.
Why an AI Instrumental Generator Like Layers Works for Producers
Most AI instrumental music generators want to write the whole song for you. Layers does the opposite. It only generates parts that fit the track you already have. Drums you wrote, a vocal you cut, a chord progression you spent a week on. Layers respects all of it and builds around it.
The engine is aiODE, an AI music model trained on licensed material. LANDR markets the tool as ethically trained, which matters if you plan to release commercially or pitch the track to sync agencies. Outside coverage from MusicRadar and Gearnews confirms the licensed-data positioning at NAMM 2026 launch.
When to pick something else: if you want a finished song from a text prompt, this is the wrong tool. If you want to add a guitarist, a bassist, a percussion layer, or a custom sample to a track in progress, this is the right one. For more context on where Layers fits in LANDR’s broader workflow play, see my coverage of the Reason Studios acquisition.
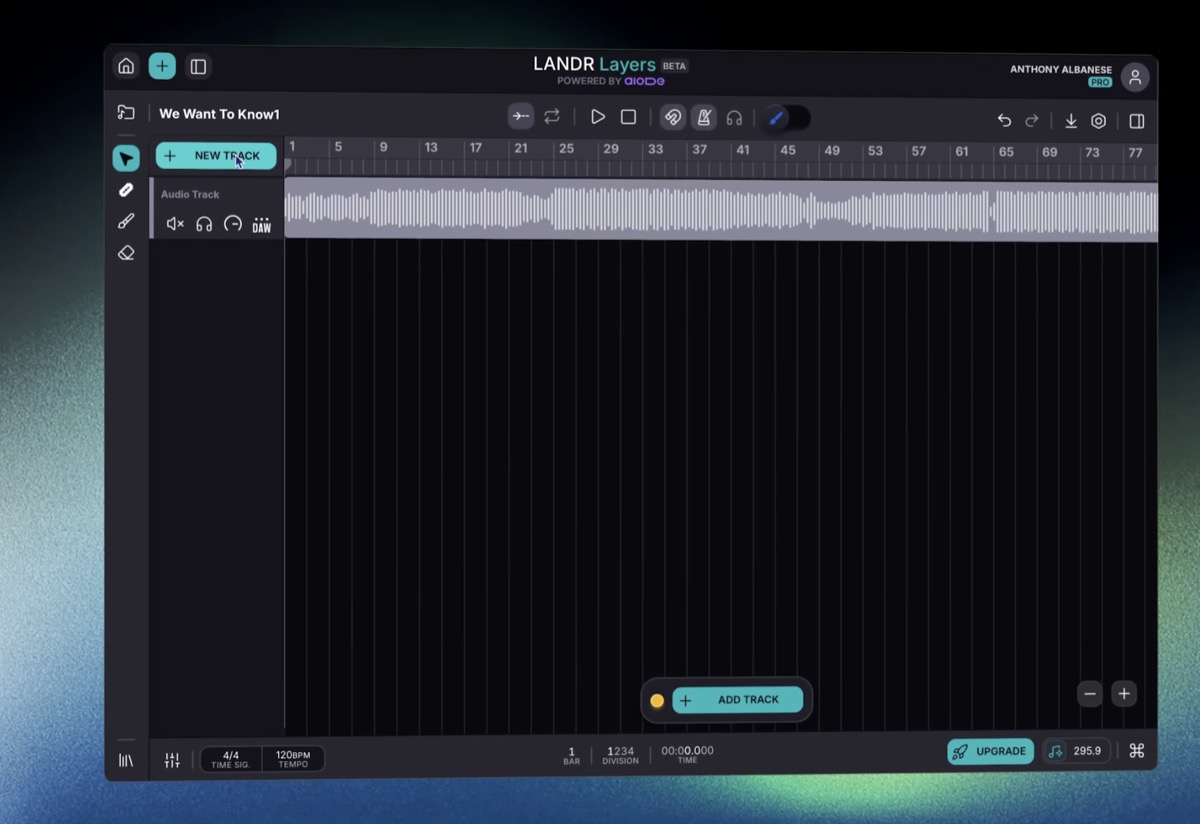
Step 1. Open Layers and Choose Your Starting Point
Purpose: Get into a working project in under 30 seconds.
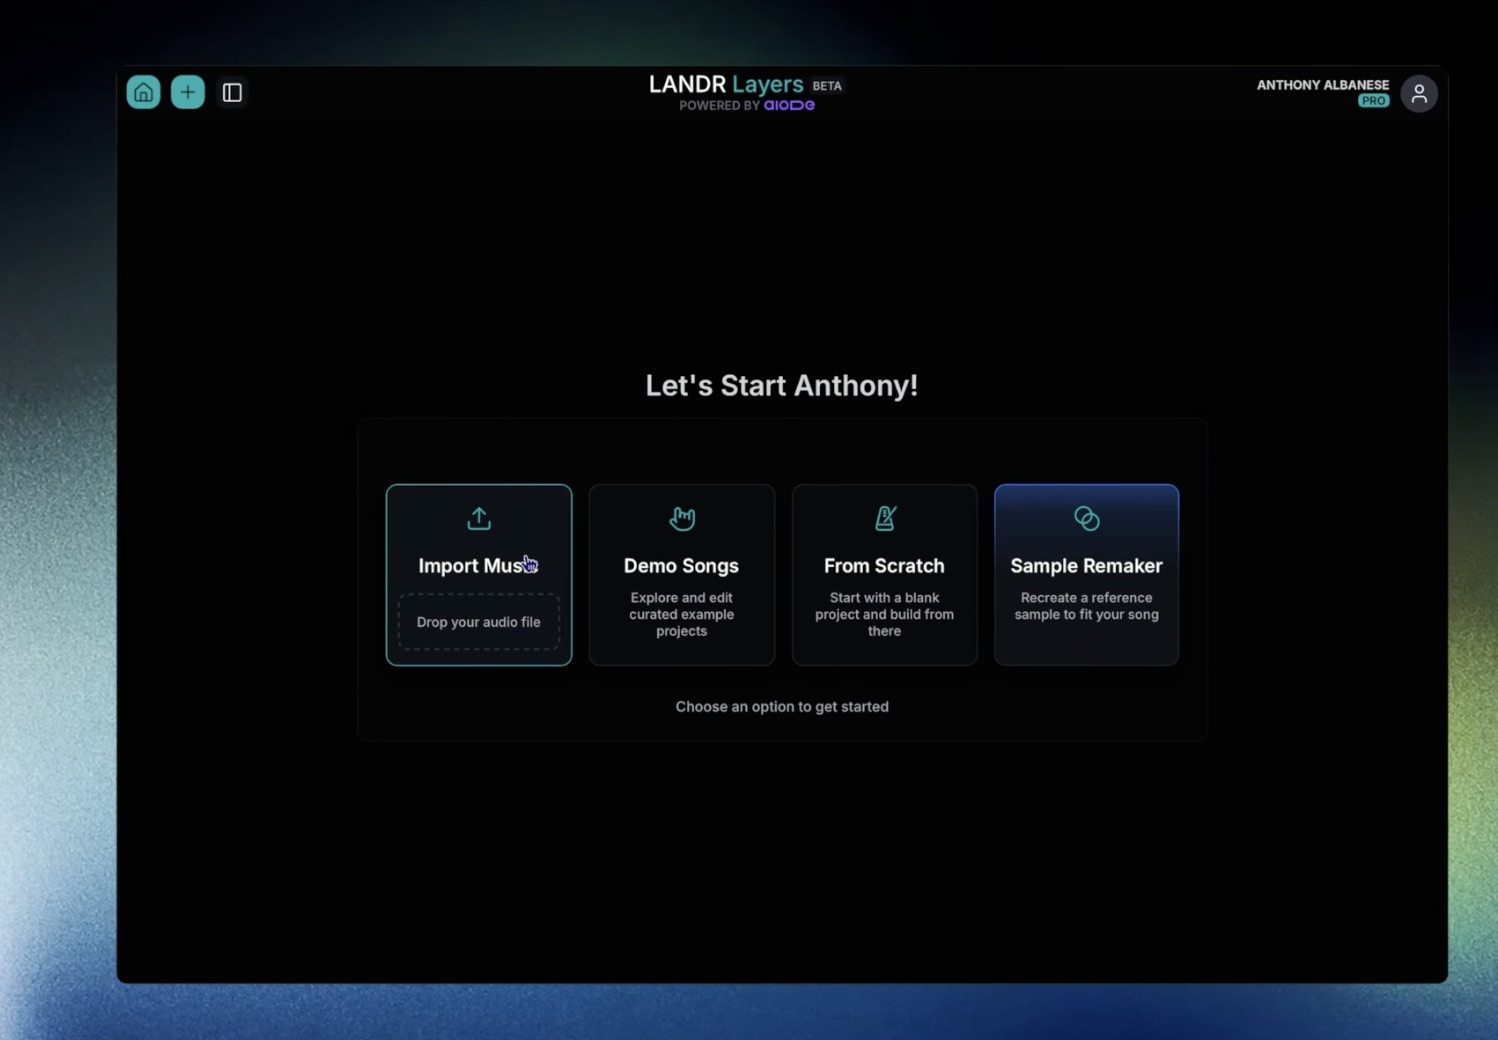
When you first open Layers, you see four cards:
- Import Music: drop a track you are already working on
- Demo Songs: explore curated example projects
- From Scratch: start with a blank project and build a song using only Layers
- Sample Remaker: flip a reference sample so it fits your track
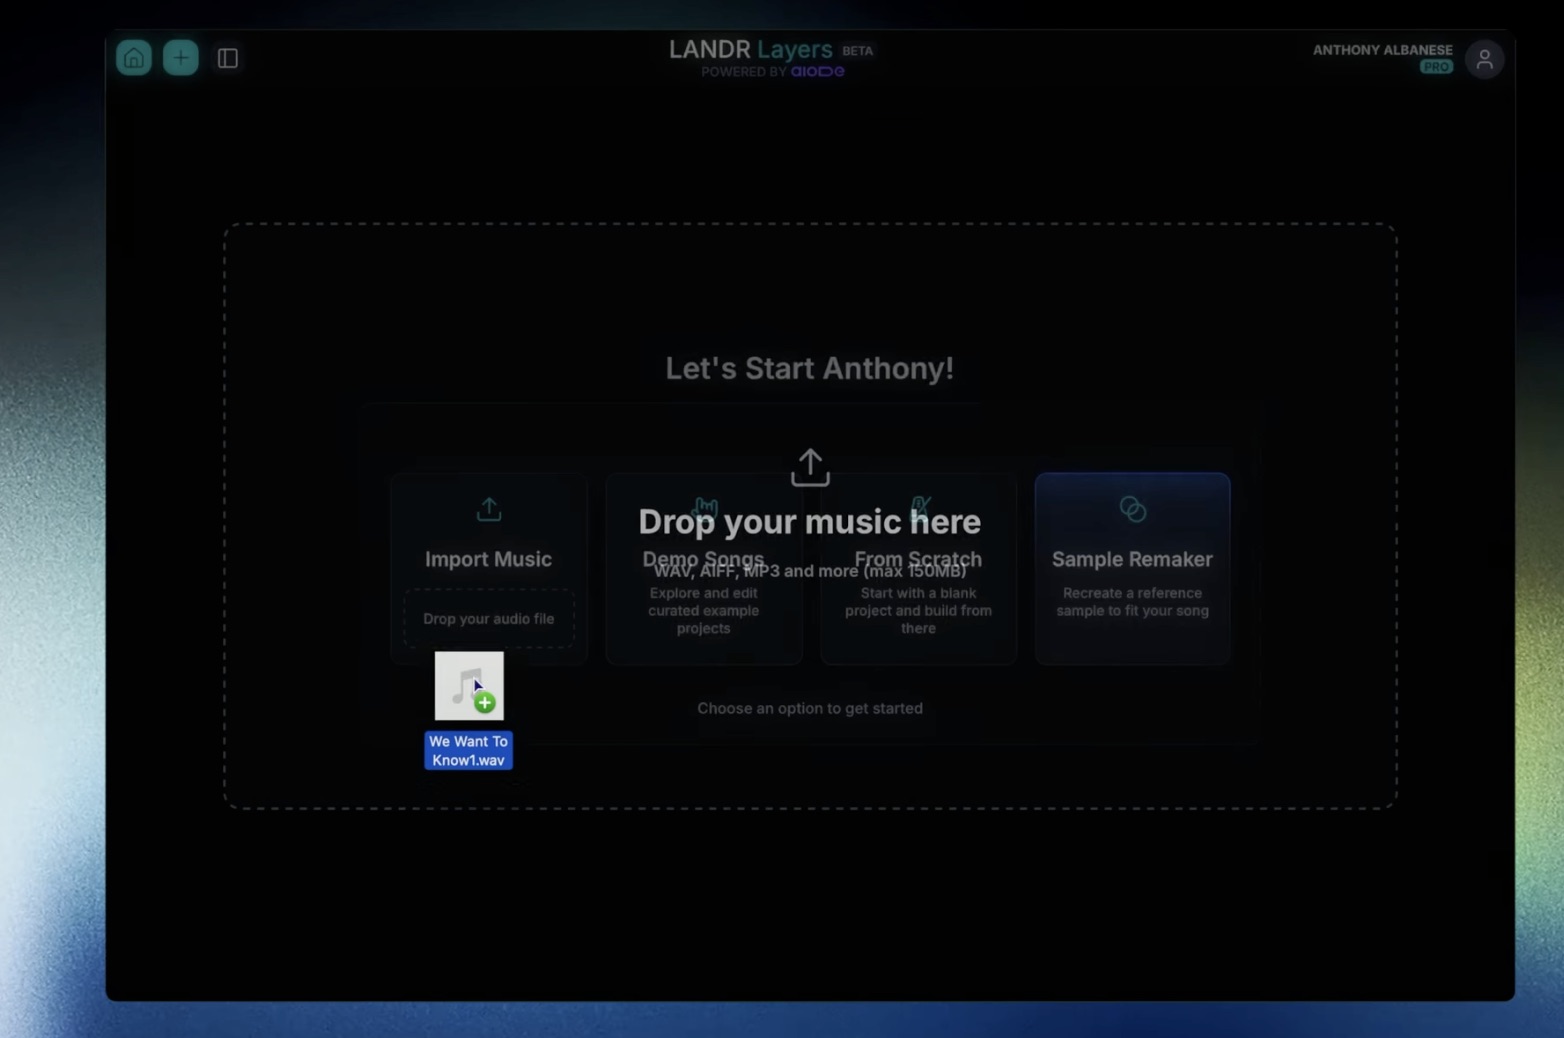
For this tutorial, click Import Music and drop your audio file in the drop zone. WAV, AIFF, MP3, and a few other formats work, up to 150MB.
Watch for these pitfalls:
- Files over 150MB are rejected silently. Bounce a smaller version first.
- Stereo bounces work better than mono for layering.
Pro tip: Bounce a rough mix first, not your full session. Layers reacts to whatever it hears, so unmuted clutter pollutes the analysis.
Success check: You should see a project view with your track loaded as an Audio Track, lined up to the timeline.
Step 2. Set Your BPM and Time Signature
Purpose: Lock the grid so every generated instrumental part lands in time.
After upload, Layers asks for BPM and time signature. Get this right or every layer you generate will fight your track.
- Enter your exact BPM (mine is 125 in the demo song)
- Enter your time signature (4/4 in the demo)
- Confirm the waveform aligns to the bar markers in the timeline
Watch for these pitfalls:
- A track at 124.99 BPM rounded to 125 will drift over 32 bars. Match what your DAW shows, decimals included.
- If your audio starts on an upbeat or with silence, slide the audio so bar 1 lands on the first downbeat.
Pro tip: If you don’t know your BPM, run the file through your DAW’s beat detection first, then bring the cleaned-up version into Layers.
Success check: Your waveform should sit cleanly under the bar numbers, with transients lining up to grid divisions.
Step 3. Learn the Interface Layout
Purpose: Know where everything is before you start generating.
Layers looks like a stripped-back DAW. Top to bottom:
- Top toolbar: project name, snap, loop, play, stop, link/follow, metronome, monitor, brush mode toggle, undo, redo, download, settings
- Left rail: cursor, razor, generation brush, eraser
- Timeline: your track plus any tracks you add
- Bottom panel: Library (all the AI models) and Mixer (faders for every track)
- Status bar: time signature, tempo, bar counter, division, time, key indicator
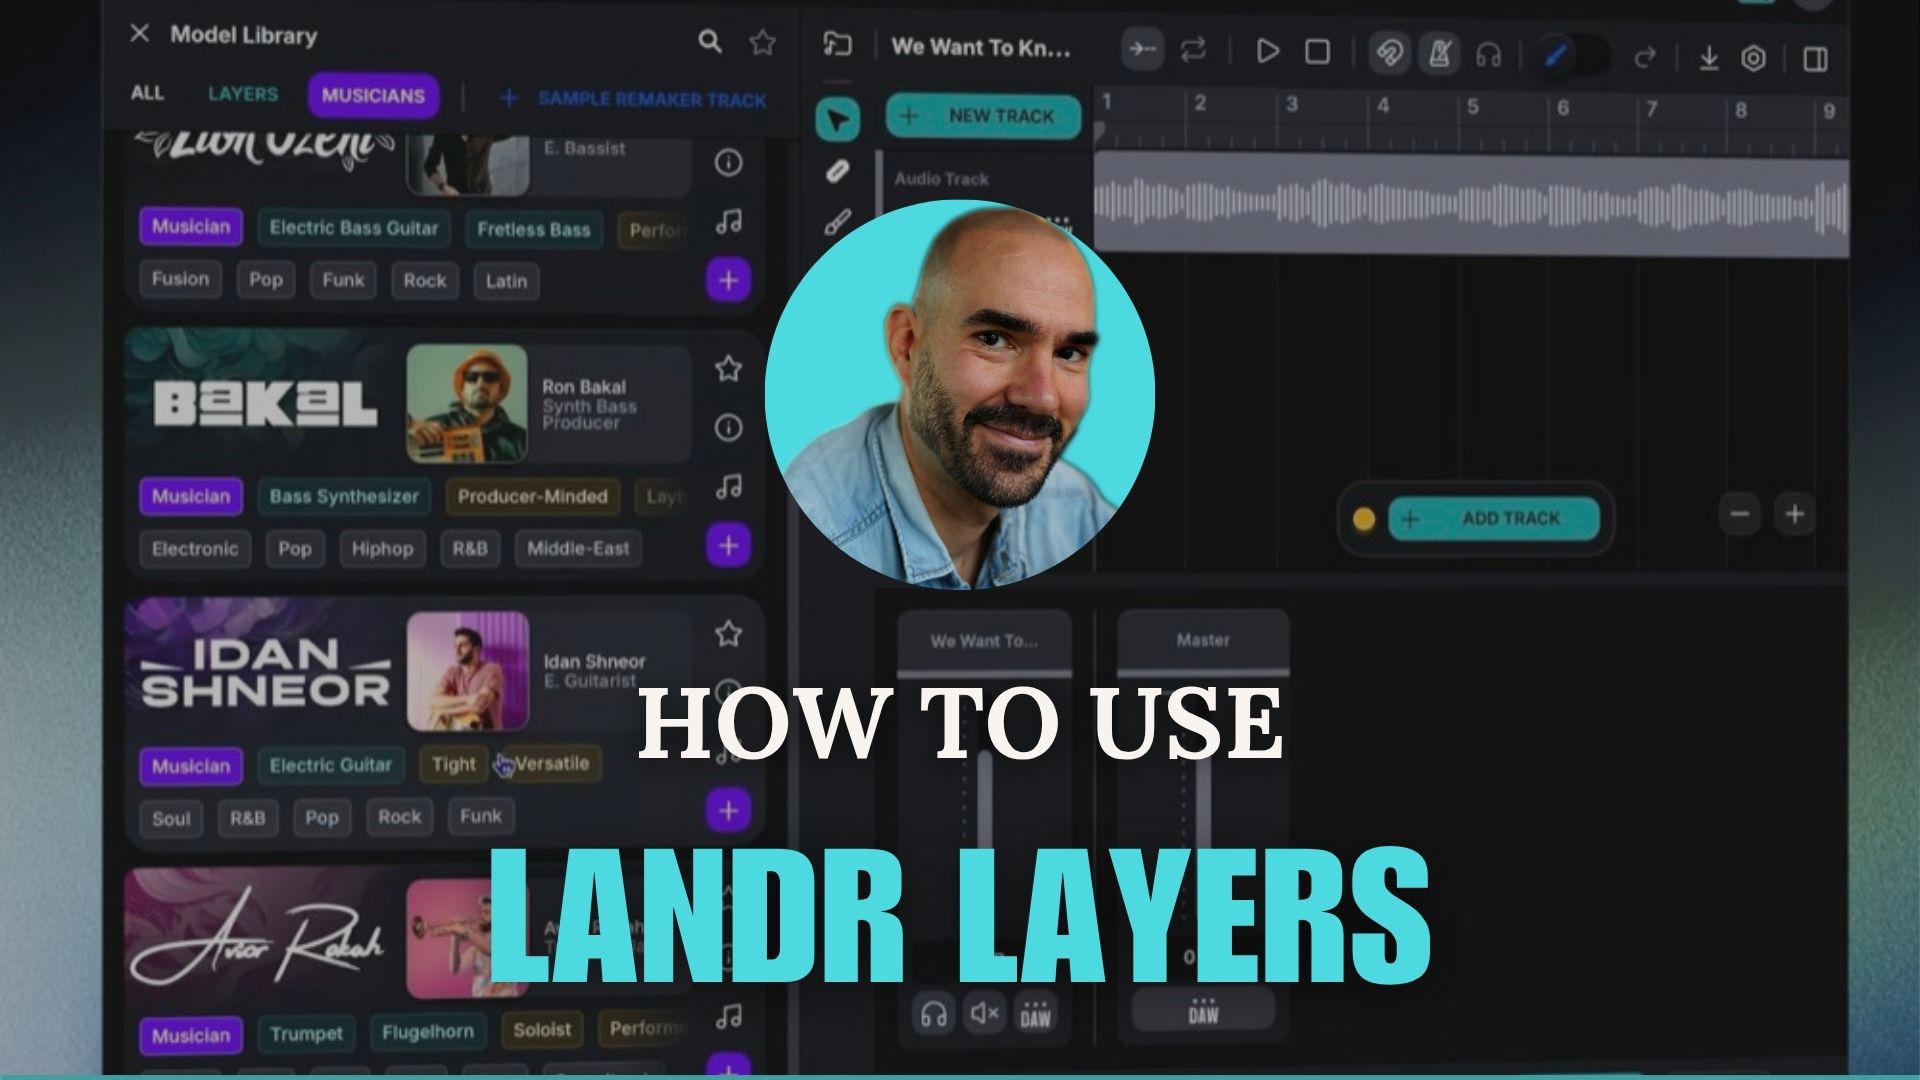
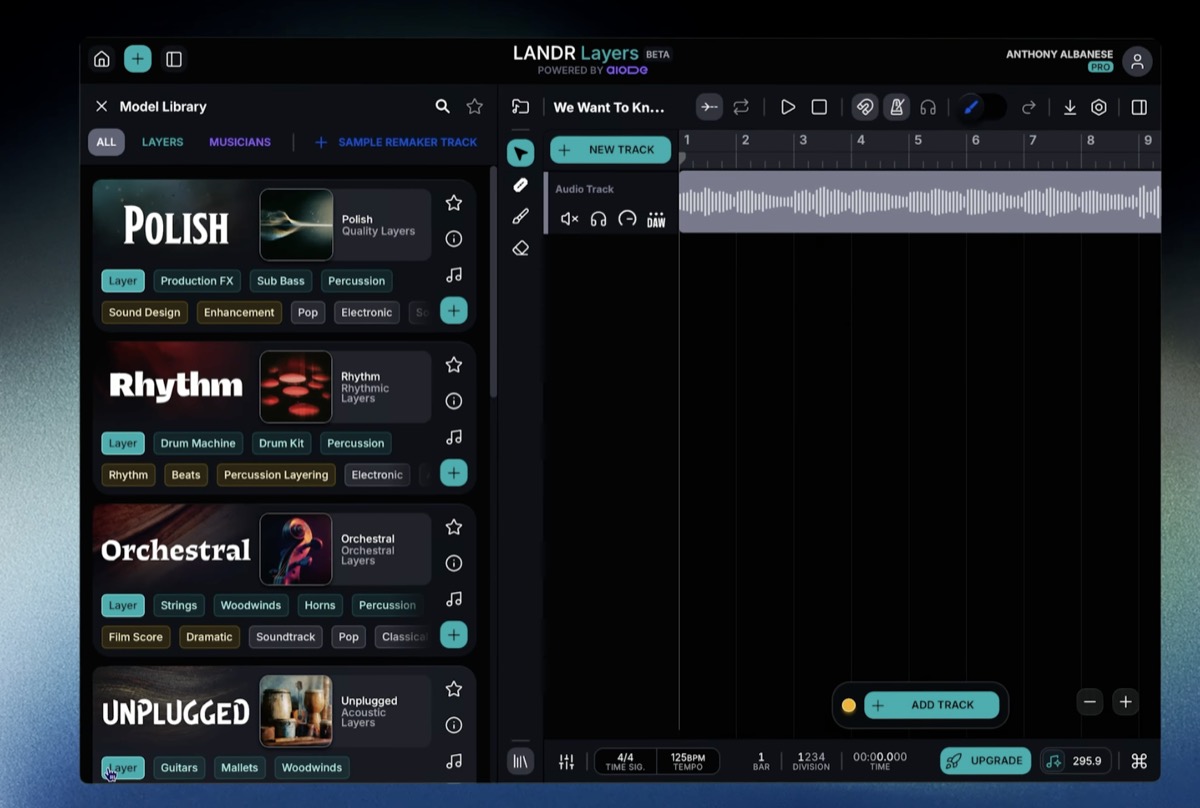
The Library has three tabs: ALL, LAYERS, and MUSICIANS. Plus a separate + SAMPLE REMAKER TRACK button.
- Layers are textures and stylistic beds: Polish (production FX), Rhythm (rhythmic layers), Orchestral, Unplugged (acoustic), Electro (electronic).
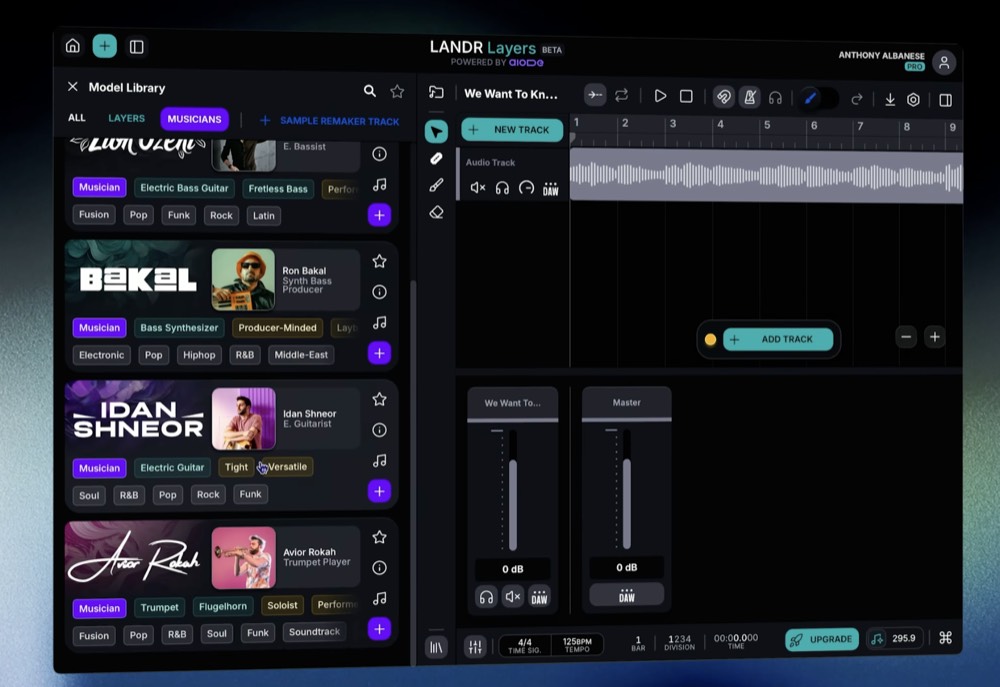
- Musicians are individual instrument performances: Tiger Beats (Ido Namer, beat maker), Lion Ozeri (bassist), Bakal (Ron Bakal, synth bass), Idan Shneor (electric guitarist), Avior Rokah (trumpet player).
Each model has style tags so you can filter by genre or feel.
Success check: You can name what each rail tool does and switch between the LAYERS and MUSICIANS tabs in the Library.
Step 4. Add a Musician and Generate Your First AI Instrumental Part
Purpose: Get a real instrument performance over a section of your track.
For the demo, I want a rhythm guitar from bar 9 to bar 25 to follow the build.
- Open the Library and click the MUSICIANS tab
- Pick Idan Shneor (electric guitarist) and hit the + to add him as a track
- Close the Library for more screen space
- Zoom out so you can see the full song
- Click and drag on the new track from bar 9 to bar 25 to draw a region
- Pick a region type from the popup: AMBIENCE, RHYTHM, HARMONY, MELODY, SOLO, or FREE. I picked Rhythm.
- Click GENERATE
Layers analyzes your track and writes a guitar part that follows the rhythm, dynamics, and harmony of what’s already there. Hit play to listen.
Watch for these pitfalls:
- If your region overlaps a section with no clear groove, the model has nothing to follow and will guess.
- Don’t draw regions that span an entire 5-minute song on the first try. Generate in 8-32 bar chunks so you can audition takes.
Pro tip: The 6 region types are real prompts to the model. RHYTHM and FREE behave differently. Test them on the same bars to feel the contrast.
Success check: You should see a colored region on the new track with TAKES READY below it, and hear a part that matches your tempo and key when you hit play.
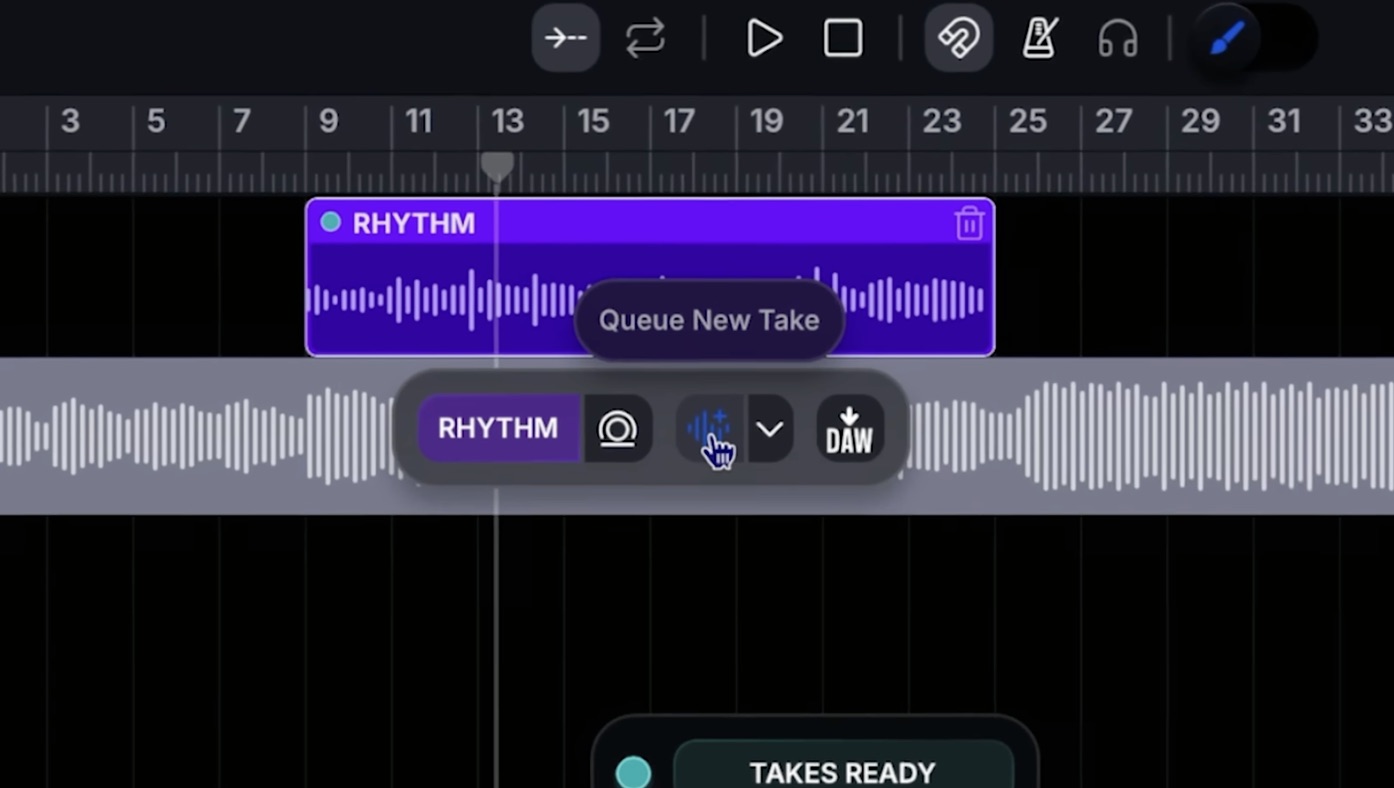
Step 5. Queue New Takes Until You Like One
Purpose: Get an AI instrumental take you want to keep without redrawing the region.
If the first take feels off, generate another:
- Click the generated event
- In the floating toolbar, click the waveform icon labeled Queue New Take
- Hit LETS GO!
- Use the dropdown next to the take button to switch between alternatives
Each take is saved. You can audition all of them and keep the best one.
Pro tip: Generate 3 takes before judging. The first take is rarely the best. The third often unlocks something you didn’t ask for but want.
Success check: The take dropdown should show multiple options, and switching between them swaps the audio in the region.
Step 6. Use the Generation Brush to Fix One Section
Purpose: Re-roll a small section without losing the rest of the take.
When the take is mostly right but one phrase sounds wrong, the generation brush is the fastest fix.
- Select the generation brush from the left rail
- Zoom in on the section that bothers you
- Highlight only the bars you want to regenerate
- Click LETS GO!
The model regenerates only that highlighted slice and stitches it back into the take.
Watch for these pitfalls:
- Highlighting too small a section (less than half a bar) gives the model nothing to work with.
- Brushing across a bar boundary can shift the regenerated phrase. Snap to bars when you can.
Success check: The waveform inside your highlighted section should change, and the audio outside it should stay identical.
Step 7. Tune the Performance
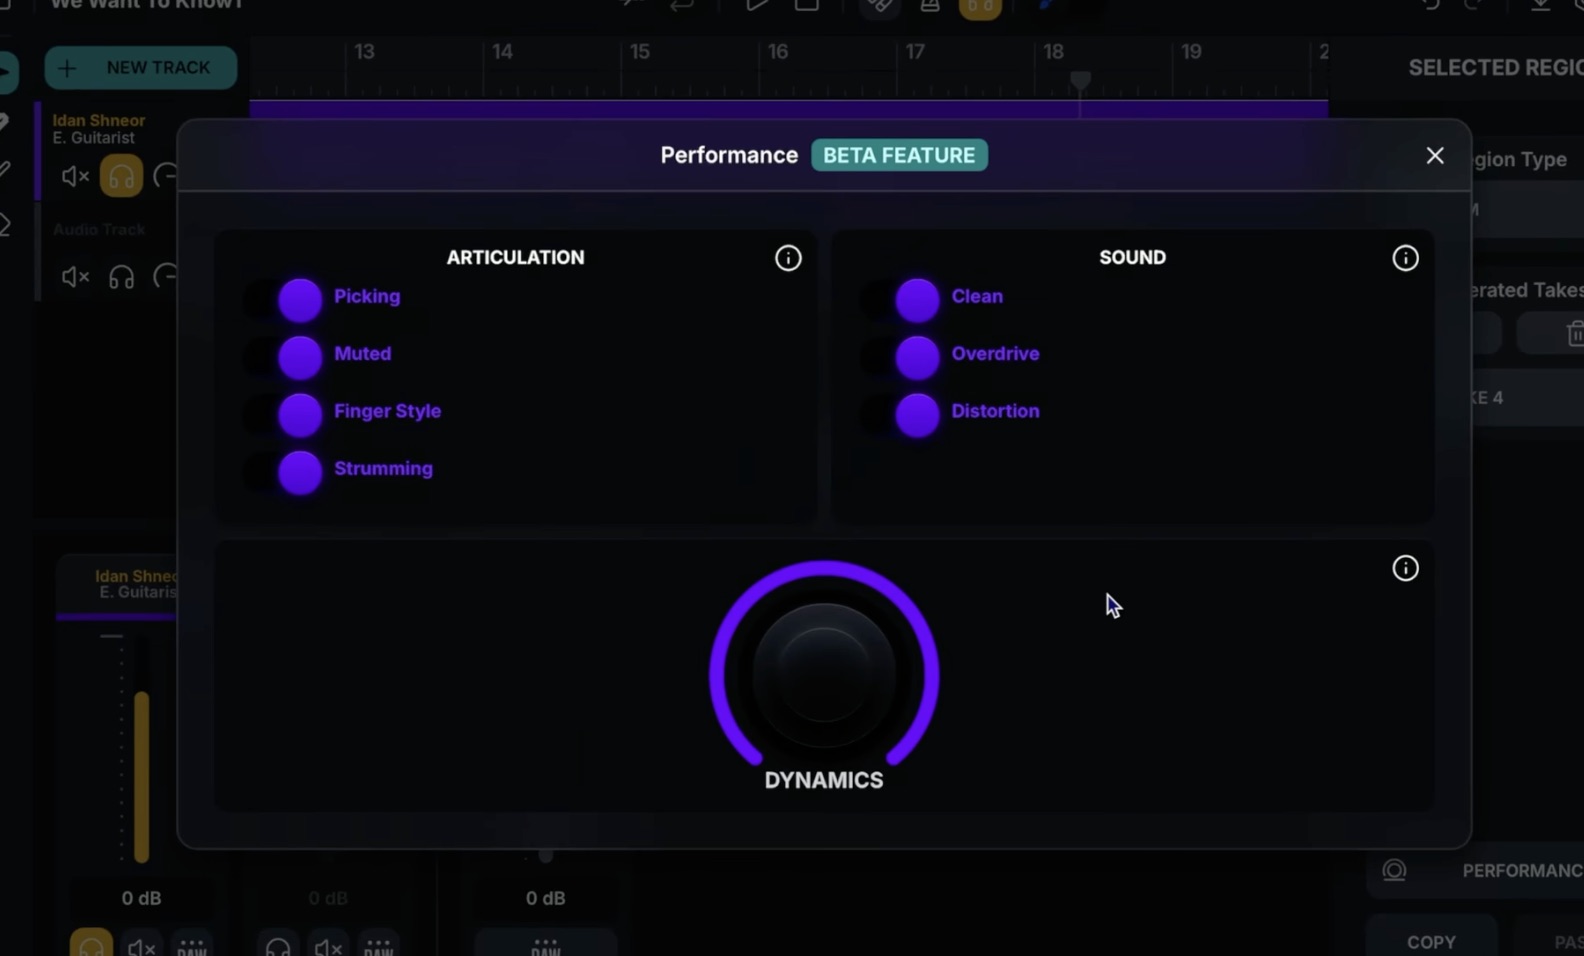
Purpose: Take control of how the instrument is played, not only what it plays.
For Musicians (not Layers), you get a Performance panel with three sections:
- Articulation: Picking, Muted, Finger Style, Strumming
- Sound: Clean, Overdrive, Distortion
- Dynamics: a single rotary knob
For my guitar take, I turned off Distortion, turned on Strumming, and pulled Dynamics down a notch.
- Click the generated region to select it
- Open the Performance tab in the right sidebar
- Toggle articulations and sound settings
- Adjust the Dynamics knob
- Close the panel and hit LETS GO! to regenerate with the new performance
Watch for these pitfalls:
- The Performance panel is marked BETA. Some toggles may behave inconsistently across model updates.
- Stacking too many articulations on one take produces a muddy result. Pick 1-2 per take.
Pro tip: Save your favorite Performance settings by copying the region. The right sidebar has Copy and Paste buttons for region settings.
Success check: A regenerated take with audibly different articulation, e.g. clear strumming where the previous take was picking.
Step 8. Add a Layer Track for Texture

Purpose: Widen the chorus with a rhythmic or stylistic bed instead of a single instrument.
Layers tracks work the same way as Musicians, with one difference: no Performance panel.
- Find the chorus on your timeline (mine starts at bar 26)
- Click + NEW TRACK and select Layer
- The Library auto-filters to Layer models. Pick Rhythm (Rhythmic Layers) for percussion
- Close the Library
- Draw a region across the chorus
- Hit GENERATE
Watch for these pitfalls:
- Layer models are stylistic beds, not solo instruments. Don’t expect a melodic hook.
- Doubling a Rhythm Layer over an already busy drum bus tends to clash. Mute your drums and audition first.
Success check: A new track with a generated layer that sits underneath your existing parts without fighting them.
Step 9. Use Sample Remaker to Flip a Sample Into Your Track
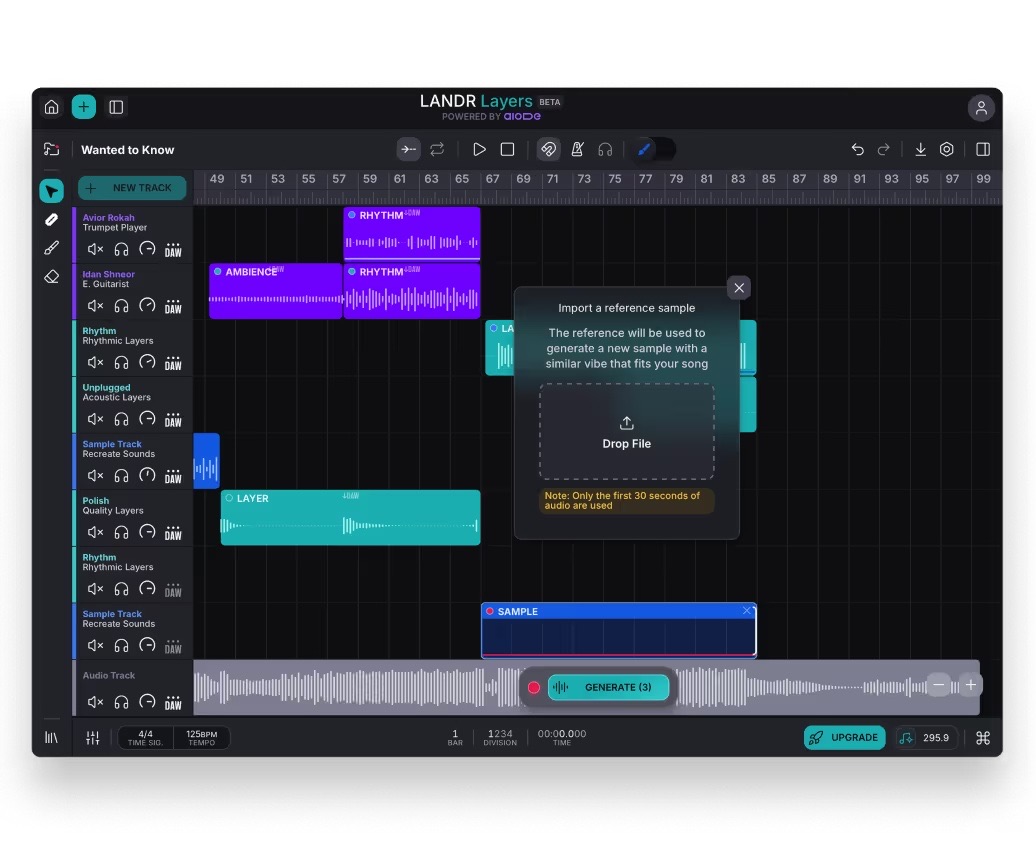
Purpose: Take a sample you love and make it fit your song.
Sample Remaker takes a reference audio file and generates a new sample with the same vibe, in your key and tempo.
- Click + NEW TRACK and select Sample Remaker
- Draw a region where you want the sample to play (I picked the end of a pre-chorus)
- Drop your reference audio in the Drop File zone
- Click GENERATE
The note in the modal is important: only the first 30 seconds of your reference audio are used. Trim before you upload.
Watch for these pitfalls:
- Long ambient pads as references give vague results. Punchier, more rhythmic samples translate better.
- The sample is generated, not licensed from the source. The output is original to your project, but the input has to be material you have rights to use. With a LANDR Studio subscription, you can also access LANDR’s library of 3+ million royalty-free samples.
Pro tip: Try the same reference sample across 3 different region positions. Same source, three different fills.
Success check: A new sample region with audio that matches your reference’s character but locks to your project’s tempo and key.
Step 10. Export Your AI-Generated Instrumental Stems to Your DAW
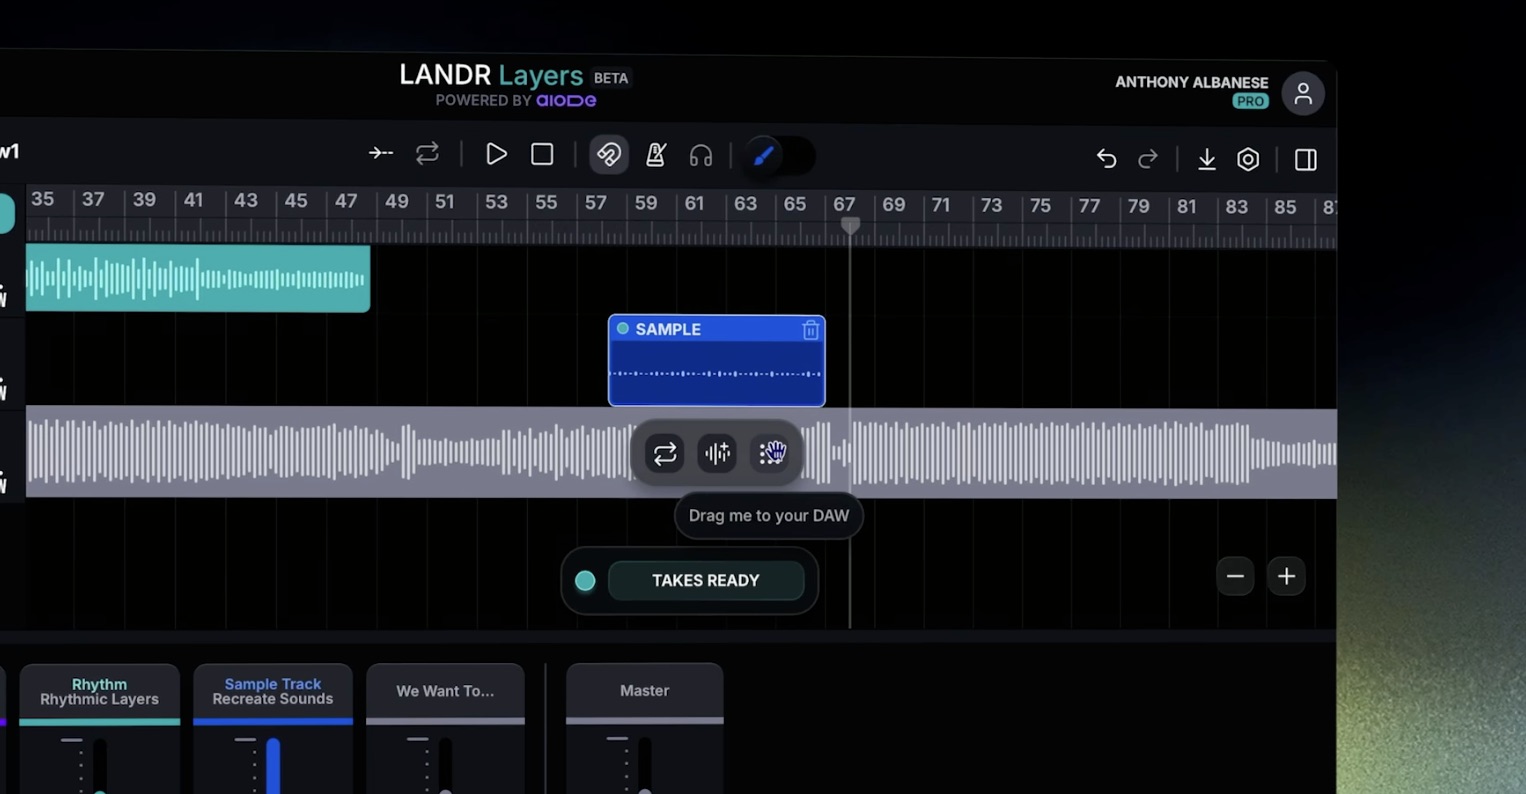
Purpose: Move everything into your real production environment.
Layers generates audio in-browser. To finish the song, you need it in your DAW.
- Find the DAW drag handle. It appears in three places: on each generated event, in the mixer strip, and in the track header
- Click, hold, and drag the DAW handle directly into your DAW timeline (or to a Finder window to save the file)
- Repeat for every track you want to export
Pro tip: Drag from the track header (not the event) to export the entire track as one stem. Drag from individual events to keep your takes separate.
Success check: WAV files appear in your DAW or download folder, named after the model and ready to mix.
Troubleshooting Guide
Symptom: Generated parts drift out of time after a few bars. Likely cause: BPM is rounded. Set the exact BPM your source DAW shows, decimals and all.
Symptom: TAKES READY never appears, generation hangs. Likely cause: Browser tab throttled in the background. Keep the Layers tab in the foreground while generating.
Symptom: The generation brush regenerates the whole region instead of the highlighted section. Likely cause: Brush highlight is too short or fell outside the region. Re-highlight clearly inside the colored region with at least one full bar selected.
Symptom: Sample Remaker gives unusable results. Likely cause: Reference sample is over 30 seconds and the first 30 are silence or intro. Trim to the part you want flipped.
Symptom: DAW drag exports a tiny file or fails. Likely cause: You dragged before TAKES READY appeared. Wait for the green pill, then drag.
When progress blocks:
- Refresh the browser. Your project autosaves.
- Bounce your source track to a fresh WAV at the correct BPM and start from a clean import.
- Check the Mixer to confirm no track is muted or soloed by accident.
Best Practices for Getting Strong AI Instrumentals Out of Layers
Top tips for getting strong results:
- Generate in 8-32 bar chunks. Smaller regions give more control. Bigger regions force the model to commit too early.
- Always queue 3 takes before deciding. The first is rarely the best.
- Use the brush for surgery, not for full regenerations. It’s faster and preserves the parts you like.
- Open the Performance panel for every Musician track. Defaults sound generic. 30 seconds of toggling fixes that.
- Export stems track by track, not as a stereo mixdown. You want full control in your DAW.
What to avoid:
- Generating 5 takes back-to-back without listening between them. Each take pulls compute and you lose the thread.
- Layering 4 generated tracks before you mix the first. Build, mix, then add.
- Treating Layers as a song generator. It’s a co-writer for the parts you can’t play yourself.
- Skipping the BPM check on import. Every drift problem starts here.
- Using copyrighted reference samples in Sample Remaker without rights. The output is yours, but the input still has to be clean.
Time savers:
- Right sidebar Copy/Paste copies all region settings, including Performance toggles, between regions.
- Keep one browser window for Layers and one for your DAW so drag-and-drop is one motion.
- Star your favorite models in the Library so they appear at the top next session.
Wrapping Up
Layers does one thing well: it adds AI instrumental parts that fit your track. Not full songs, not text-to-music, not a replacement for your DAW. A co-writer for the instruments you can’t play and the samples you can’t find.
The workflow is simple once you’ve done it twice. Import, set BPM, draw a region, pick a model, generate, audition takes, brush-fix the rough spots, drag to your DAW. You should expect 3-5 generations per part to get a keeper. Allow yourself the time.
For the bigger picture on where Layers sits in LANDR’s stack, see my original launch coverage of Blueprints and Layers. When you’re ready to mix and master what you build, my LANDR vs Ozone comparison covers the next step inside the same LANDR stack. And if you want to see how Layers compares to other AI instrumental tools in your producer toolbox, my 12 best AI VST plugins roundup is the wider context.
Open Layers, drop in a track you’ve been stuck on, and write the AI instrumental you’ve been hearing in your head.
Frequently asked questions
What is an AI instrumental generator?
An AI instrumental generator is a tool that creates new instrumental parts, beds, or full backing tracks using a trained machine learning model. Some generate full songs from text prompts. Others, like LANDR Layers, listen to a track you upload and generate parts that fit it. Most output WAV stems you can drop into your DAW.
How do I use LANDR Layers to create an instrumental?
Open Layers, import your track, set your BPM and time signature, then add a Musician or Layer track. Draw a region on the timeline, pick a region type (Rhythm, Harmony, Melody, etc.), and click Generate. Audition takes, fix rough spots with the generation brush, then drag the stems to your DAW.
Is LANDR Layers free to use?
LANDR Layers has a free tier inside the broader LANDR product line. The free version limits monthly generations and exports. The PRO plan, visible in the top-right of the app, lifts those limits and unlocks the full Library. Check the official Layers page for current plan pricing, since LANDR adjusts tiers regularly.
What types of stems can LANDR Layers generate?
Two categories. Layers generate stylistic beds: Polish (production FX), Rhythm (percussion), Orchestral (strings, woodwinds, horns), Unplugged (acoustic guitars, mallets), Electro (synths, beats, pads). Musicians generate single-instrument performances: drums, bass, synth bass, electric guitar, trumpet. Plus Sample Remaker, which flips a reference audio file into a new in-key sample.
How does an AI instrumental generator work?
It analyzes your input audio (tempo, key, harmony, dynamics) and uses a trained model to produce new audio that matches. LANDR Layers runs on the aiODE engine, trained on licensed material. The model listens to the section you select, then generates an instrument performance or texture that locks to what's already there. You get audio out, not MIDI.
Can I use AI to generate instrumentals for my vocals?
Yes. Drop your vocal track in as the source audio. Layers will read the tempo, key, and phrasing of the vocal, then generate guitar, bass, drums, or pads underneath it. Many producers use this exact flow to build full instrumentals around an a cappella demo. Make sure your vocal is dry (no reverb tail bleeding into the next bar) for the cleanest analysis.
What is the best free AI instrumental generator?
For producers who want to add parts to an existing track, LANDR Layers' free tier is the strongest starting point because the output is a usable WAV stem in your DAW. For text-to-song generation, the answer is different and the market shifts every few months.
How do I download my AI-generated instrumental from LANDR?
Find the DAW drag handle on a generated event, on the mixer strip, or in the track header. Click, hold, and drag it to your DAW or to a Finder window. The file exports as WAV. There is no separate download button. The drag-out is the export.
Can AI create full instrumentals from scratch?
Yes, but Layers is not the tool for that. Layers' From Scratch mode lets you build a song using only AI parts, but you still draw the regions and pick the models bar by bar. For a true text-to-song generator, you need a different category of tool. Layers' strength is co-writing with what you have, not writing in your place.
What makes LANDR Layers different from other AI instrumental tools?
Three things. First, it generates parts that fit your existing track instead of generating a whole song from a prompt. Second, the engine (aiODE) is trained on licensed material, which matters for commercial release. Third, the workflow is DAW-shaped (timeline, regions, stems, drag-out), so it slots into how producers already work.
About the author

Covering AI music tools, industry shifts, and news for music creators and professionals. Twice-weekly newsletter at aimusicpreneur.com.